All about Microsoft Intune
Peter blogs about Microsoft Intune, Microsoft Intune Suite, Windows Autopilot, Configuration Manager and more

Configuring multi-app kiosk mode on Windows 11
This week is all about multi-app kiosk mode on Windows 11 devices. Kiosk mode on itself is nothing new, nor is the configuration of kiosk mode. However, until a few months ago, it was not possible to configure multi-app kiosk mode on Windows 11. That’s possible now , except the configuration options via Microsoft Intune are not that straight forward yet. As in, it’s not available via a standardized configuration profile yet. It is, however, already possible to configure multi-app kiosk mode via the MDM WMI Bridge Provider. That provider relies on configuration capabilities within the MDM channel, which means that the configuration can also be achieved directly via Microsoft Intune. Multi-app kiosk mode relies on assigned access to run one or more apps from the desktop. This blog post will mainly focus on applying the multi-app kiosk mode on Windows 11 devices, by using Microsoft Intune. Besides that, it will describe the main configurations for creating the multi-app kiosk mode configuration. This post will end by showing the user experience with the applied multi-app kiosk mode configuration.
Note : The configuration option described in this post, relies on a custom configuration XML-file. That provides a lot of flexibility, but also relies on some more detailed knowledge. Make sure to be familiar with the required technology.
Creating the custom multi-app kiosk mode configuration
When looking at configuring multi-app kiosk mode, by relying on a custom configuration, it starts with the creation of the XML-file that describes the configuration. That XML-file can be used to apply the multi-app kiosk mode on Windows 11 devices. The configuration of that XML-file is still pretty similar to what it was for Windows 10. Just with some minor tweaks. The basic structure of the XML-file contains basically two sections. The first section is the profiles section, which contains a unique profile id and describes the applications that are allowed to run, the Start layout configuration, and the taskbar configuration. There can be multiple profiles within that section, each with their own unique profile id. Besides that, there is the config section. That section associates a non-admin user account to a profile. There can also be multiple configurations within that section. All focused on connecting a profile to an account. Now let’s briefly walk through the those different sections in a bit more detail.
The first section, within the profiles section, is the profile id section. That id is a GUID that is used to uniquely identify the profile. That GUID just needs to be unique within the XML-file. Within that section the configuration that belongs to that id is described. Any additional profile requires their own unique id. Below is an example of the profile id section.
AllowedApps
The next section, within the profile section, is actually the AllAppList section. That section, however, only contains the AllowedApps section. The AllowedApps section contains the apps that are allowed to run on the device. By default, the multi-app kiosk mode configuration applies AppLocker configurations to only allow the specified apps. That can be both, UWP apps and desktop apps. Below is an example of the AllowedApps section that contains Calculator , Notepad , Paint , Photos , and Settings .
Note : When allowing the Settings app, make sure to scope the available functionality to only what’s really needed.
The next section, within the profile section, is the StartPins section. That section configures the apps that should be pinned to the Start layout. This section should be in line with the previous section. Mainly because apps in the Start layout must be allowed to run, for the user to be able to start those apps. Below is an example of the StartPins section that also contains Calculator , Notepad , Paint , Photos , and Settings .
ShowTaskbar
The last section, within the profile section, is the ShowTaskbar section. That section configures whether the taskbar should be visible. Below is an example of the ShowTaskbar section that configures the taskbar as visible.
Note : Besides this it’s now also possible to add a TaskbarLayout section to pin specific apps to the taskbar.
The config section connects a profile to a user account. That account can actually be a group or an individual account. In both cases that can be something local, something from Active Directory, or something from Entra ID. Besides that, it can also be used to configure an auto logon account. Below is an example of the Config section that connects the user MultiAppKioskUser to the created profile.
Important : When using a local account that account must already exist before applying the configuration.
Note : Keep in mind that a profile has no effect when it’s not associated to an account in the config section.
Complete configuration overview
Putting all the different sections together, brings the complete picture of the multi-app kiosk mode configuration. Below is an example that brings all the pieces together that are briefly described in this post.
Applying multi-app kiosk mode configuration
When looking at applying the multi-app kiosk mode configuration, all roads point to the AssignedAccess CSP . That CSP can be used to configure a Windows device to run in (multi-app) kiosk mode. Once the CSP has been executed, the next user login that is associated with the (multi-app) kiosk mode puts the device into the specified kiosk mode. That CSP is the same that is also already used in the examples, provided by Microsoft, to configure the multi-app kiosk mode via the MDM WMI Bridge Provider. Within Microsoft Intune a Custom profile can be used to apply a custom multi-app kiosk mode configuration via the AssignedAccess CSP. The following nine steps walk through applying the custom multi-app kiosk mode configuration by using the configuration node of the AssignedAccess CSP.
- Open the Microsoft Intune admin center navigate to Devices > Windows > Configuration profiles
- On the Windows | Configuration profiles blade, click Create > New policy to open the Create a profile page
- On the Create a profile page, provide the following information and click Create
- Platform : Select Windows 10 and later as value
- Profile type : Select Templates as value
- Template name : Select Custom as value
- On the Basics page, provide a unique Name to distinguish the profile from other custom profiles and click Next
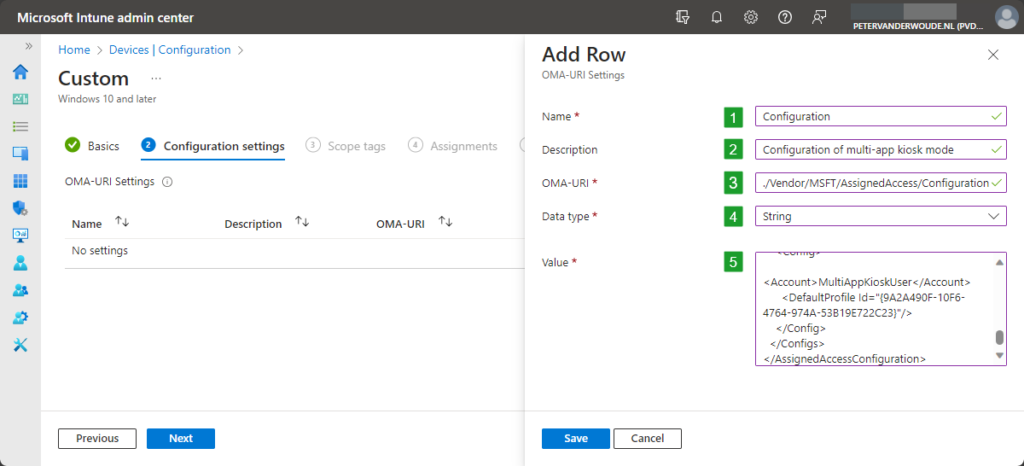
- On the Configuration settings page, as shown below in Figure 1, click Add to add rows for the following custom settings and click Next
- Name (1): Provide a name for the OMA-URI setting to distinguish it from other similar settings
- Description (2): (Optional) Provide a description for the OMA-URI setting to further differentiate settings
- OMA-URI (3): Specify ./Vendor/MSFT/AssignedAccess/Configuration as value to configure multi-app kiosk mode
- Data type (4): Select String as value
- Value (5): Specify the created XML-file as value to set the required multi-app kiosk mode configuration
- On the Scope tags page, configure the applicable scopes and click Next
- On the Assignments page, configure the assignment and click Next
- On the Applicability rules page, configure the applicability rules and click Next
- On the Review + create page, verify the configuration and click Create
Note : At some point in time this setting might become directly available within Microsoft Intune.
Experiencing multi-app kiosk mode on Windows 11
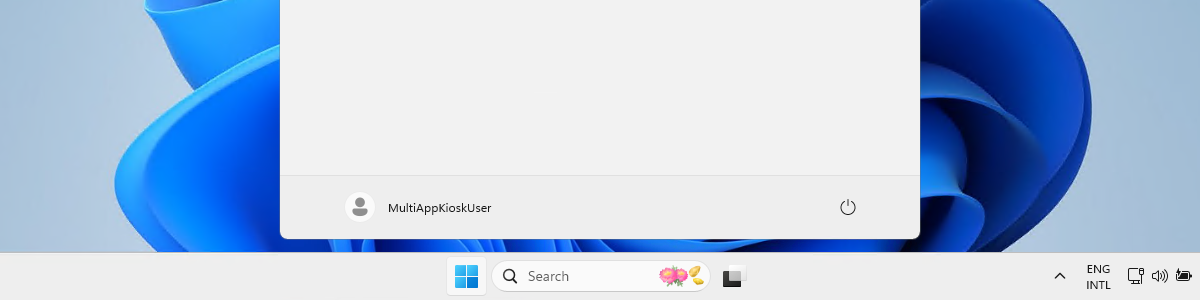
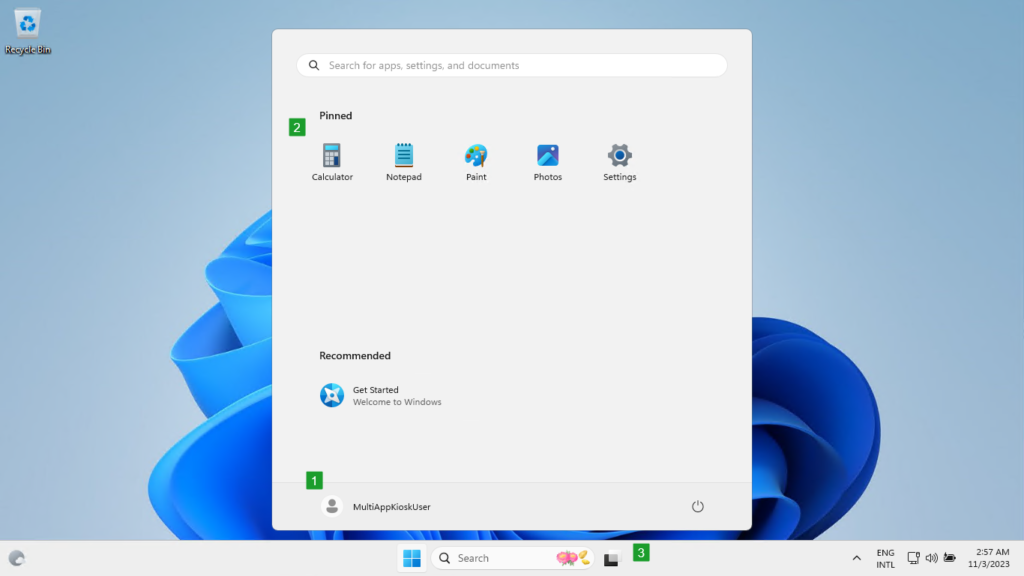
When the configuration of the multi-app kiosk mode is applied, it’s relatively easy to very the configuration. Simply sign in with a user account that has the multi-kiosk mode configured and see what happens. In this case there are a few things that are easily visible within a screenshot. With the configuration created throughout this post a few obvious items are configured and shown below in Figure 2. That shows the user account that is used with number 1, the pinned items in the Start layout with number 2, and the available taskbar with number 3. Besides that, when testing this configuration also try starting apps that are not allowed. Simply to verify the assigned access that comes with the multi-app kiosk mode.
More information
For more information about multi-kiosk mode on Windows 11 devices, refer to the following docs.
- Set up a multi-app kiosk on Windows 11 – Configure Windows | Microsoft Learn
- Find the Application User Model ID of an installed app – Configure Windows | Microsoft Learn
- AssignedAccess CSP – Windows Client Management | Microsoft Learn
- Multi-app kiosk mode now available in Windows 11! – Microsoft Community Hub
64 thoughts on “Configuring multi-app kiosk mode on Windows 11”
hello, if we try for example an app, which ist running from userprofile – it will not work
i’ll get in eventlog of applocker following error => error 8004 => %OSDRIVE%\USERS\KIOSKUSER0\APPDATA\LOCAL\WEBEX\CISCOWEBEXSTART.EXE blocked
Hi David, I haven’t had to deal with those type of apps yet. Can you provide an example of the allowed section of your configuration? Regards, Peter
I think the Comment system removed your formatted reply. You could try using the contact form. Regards, Peter
Great article, Peter! Have you ever tried to assign apps in kiosk-mode, which require a username in the app path, such as “%OSDRIVE%\USERS\*\APPDATA\LOCAL\Webex\WebexHost.exe”? Thanks, Klaus
Hi Klaus, I haven’t had to deal with those type of apps yet. Can you provide an example of the allowed section of your configuration? Regards, Peter
- Pingback: Intune Newsletter - 10th November 2023 - Andrew Taylor
Never works for me in intunes, all the rest code works just fine if i exclude “start pins”
my current code:
Hi Min, Can you provide some more details about what’s not working for you? Regards, Peter
Great article, but what is the best way to create a local user on those kiosk systems. By using an remediation script or someting else?
Hi Nico, What ever fits your scenario the best. That can be via the CSP (but that often still requires additional scripting), or directly via script. Regards, Peter
After pushing the exact XML to a Windows 11 device the configurations shows as “error” in Intune with an error code “0x87d1fde8”.
Any idea as to why this could be happening? I’m using your exact configuration.
Hi Dancr, Make sure that the quotes are all correctly formatted, as that’s often the problem with copy-paste. Regards, Peter
I did this and it worked for me, however it shows option for All Apps which user can easily go to select other Apps. It also shows Apps shortcut installed on Desktop.
Actually what I want to achieve is a single app and not multi app. I have used this code below but not sure about the OMA-URI
Two questions, – is this xml the correct format for kiosk mode? – what will be the OMA-URI in this instance?
Thanks very much for your help
Hi Dave, You can use the available Kiosk profile for that in Intune. Just as for Windows 10. Regards, Peter
Thanks for this but I am unable to get it working even with your xml. I have entered the quotations manually just incase I have the copy issue. But I am still unable to get this working.
Error code is: -2016281112
Hi Aran, That often implies that something is wrong with the XML. You could check locally on the device for some more details. Regards, Peter
Thanks for the article!
I’m just wondering if it’s possible to have the allowed apps using a tiled layout like in the Windows 10 kiosk? As I’m not a fan of the pinned list.
Win10 code looks like the below.
Also, how do we allow USB and access to the downloads folder, is it still like the below?
Hi Shawn, The Windows 11 multi-app kiosk mode no longer leverages the Tablet UI that was used on Windows 10. Regards, Peter
I’ve tried to implement a kiosk profile with your configuration but I keep getting error codes in intune:
ERROR CODE 0x87d1fde8
SETTING Configuration [./Vendor/MSFT/AssignedAccess/Configuration]
STATE Error
Perhaps I need to change something within the XML file.
Can you help me?
Hi Aflew, I would expect something to be wrong with the XML. Did you copy-paste it from my blog? If so, you might want to check the formatting of the quotes. Regards, Peter
I did copy and paste from your blog and got the same error.
MultiAppKioskUser
Hi Brandon, I don’t see any error, but as you’re referencing that account; is that account already available on that device? Regards, Peter
Thank you for the blog, it was very useful. Perhaps a small add-on: the requirement of Windows 11 version 22H2. It took me a while before I figured out why my policy didn’t apply and this was because my test device was still on 21H2.
https://learn.microsoft.com/en-us/windows/client-management/mdm/assignedaccess-csp#configuration
Regards Bjorn
You are absolutely correct, Bjorn Regards, Peter
The recycle bin being on the desktop is a hole for the non-admin kiosk user to be able to interact with the filesystem. Even though file explorer is not put in the AllowedApps section, it can still be opened and interacted with. Microsoft Edge is another example of an application somehow being allowed while not being included in the AllowedApps section of the XML.
This was not the case in Windows 10. Is this normal behavior?
I can see in Microsoft’s documentation: “Here are the predefined assigned access AppLocker rules for desktop apps: Default rule is to allow all users to launch the desktop programs signed with Microsoft Certificate in order for the system to boot and function. The rule also allows the admin user group to launch all desktop programs.
https://learn.microsoft.com/en-us/windows/configuration/lock-down-windows-11-to-specific-apps#create-the-xml-file
How would forcing these to run in a kiosk be a desired feature? Isn’t the point of a kiosk to whitelist what applications can be run? I sincerely hope Microsoft doesn’t think Edge is necessary to “boot and function”.
Hi Mitch, I only know that there were some design changes indeed and I can imagine that Edge is now often integrated with many sign-in experiences etc. Besides that, I can’t say a lot about why it is the way it is.. Regards, Peter
good article thanks, I’ve noticed that even though we apply what seem to be the correct power settings our kiosks, sleep – which is annoying. we have tried all sorts – have you seen this issue?
Hi David, No, I can’t say that I have seen that behavior. Can you provide some more details about your configuration? Regards, Peter
Hi Peter, Again a very interesting article. What do you advice on recommended deployment method and what intune license Only self deploying with a device license? Since the login user isnt AAD aware?
regards, Tom
Hi Tom, It really depends on the specific use case, but often when there is no user account involved it makes sense to look at device licenses. Regards, Peter
Bedankt voor je uitleg, alleen als ik het probeer op mijn Windows 11 23H2 dan krijg ik in intune te zien:
AssignedAccessConfigurationRS5 – conflict
Hi Chris, Do you have any other kiosk configurations applied to that device? A conflict usually means that there are conflicting policies applied. Regards, Peter
I know that this is all intune based but wanted to test randomly on a singular machine, I have 2 issues one is if you have a local account which yourself and microsoft both say can be used how would I get the profile ID or would I use the SID from the whoami. Secondly if you use the WMI bridge powershell where would be best location for the xml.
As I say know it’s mostly intune based – I’m just seeing if I can workaround for a few standalone machines.
Hi Eugnene, The profile ID is a GUID that you can generate yourself and use within your configuration. Regards, Peter
Hello Peter,
I was wondering if it’s possible to deploy a win32-app to a KIOSK-pc? or can you push a powershell-script to a kiosk pc via Intune? What I need to do is to put a certificate in the personal -store of the auto-logged-on user to make a website work.
Hi Lieven, Yes, you can deploy apps and scripts to those devices. Just keep in mind that it by default will run in SYSTEM-context. Regards, Peter
You have any more information on why they got rid of the tablet ui? The changes makes kiosk look worse on Windows 11 + now we have to do this XML manually instead of right from the GUI. Don’t understand why Microsoft would do this.
No, I don’t have information on why they’ve made these changes. I wish I did. Regards, Peter
I have tried the above XML, and the profile is failing from Intune. I am testing this on a Microsoft Surface Pro 9, which we want to roll out. Any idea why the profile is failing? Error code -2016281112
Hi Andy, Make sure that the quotes are all correctly formatted, as that’s often the problem with copy-paste. Regards, Peter
I wish to publish the System app so the users can manually set the display-settings to Duplicate. You mention to make sure to scope the available functionality to only what’s really needed. However, is it possible to do this within the XML, or will I have to configure this by Configuration Profile? Because I don’t think it’s possible to set anything in regard to Display Settings in that way.
Hi Rik, If that’s the only thing that the user is allowed to do, you can limit the experience in the Settings app to just that specific option. Regards, Peter
Hi! Thanks for a great article. We are trying to add a part in the script where the account is deleted after use. To you have any suggestion? We have tried this code but get error code 0x87d101f4
Setting #2: Name: “Add to Guests” Description: “Adds the kioskUser0 to the Guests group.” OMA-URI: “./Device/Vendor/MSFT/Policy/Config/LocalUsersAndGroups/Configure”
Data Type: String (XML File)
Hi Julia, I think part of the script fell out of the comment. Can you try again or sent it via email (using the Contact form). Regards, Peter
Here it is:
Hi Julia, I’m afraid the content is being filtered. Can you try the Contact form? Regards, Peter
Very helpful article. Do you know how we can hide or disable the recycle bin in Kiosk mode. We’ve found that users are able to access the file system from the recycle bin as another user noted and we need to prevent that.
Hi Michael, That setting is Remove Recycle Bin icon from desktop , if I’m not mistaken. That is not specific to kiosk mode, but does the job. Regards, Peter
Hi, but how Can you deploy a user policy to an kiosk local user account? I have created the local user by your oma-uri manual.
Hi Joerke, You can’t deploy a policy specifically to a local user. The only option would be to deploy it to the device, including that user. Regards, Peter
I’ve used a setting from settings catalog which hides all the icons on the desktop and locks it. That way the experience is closer to the one had with win10
I’ve had to do this too, but I used a CSP to do that so it’s all in the same custom policy.
It’s a shame that it doesn’t work the same as Win10 and the MS documentation doesn’t state otherwise. According to the doc, Assigned Access should apply GPOs for things like hiding desktop icons and the task view button on the taskbar but it doesn’t work. I’ve had to add in half a dozen extras for disabling OneDrive sync, turning off co-pilot, restricting access to Docs/Downloads/Pictures, etc. The only issue is that as I’ve used the device scope it applies to all users, including admins, whereas Assigned Access settings would only be for non-admins.
Hi Matt, we’re having trouble with the same issues on win 11 multi app kiosk mode. Could you please post your settings for disabling all the extra features like taskbar, onedrive etc.? Was ist all through intune/admx?
Was anybody having the 0x87d1fde8 error able to fix that? formatting and quote marks looks correct, I’ve just changed the user to kioskUser0 (existing as local user with no password on the client).
I’ve also tried the WMI bridge route by deploying the XML via powershell script, but despite the script seems to do fine the only thing happening is the autologon with the correct user, for the rest there’s no trace of multiapp kiosk settings.
Hi Max, So, there are no typos in the configuration and the user already exists when the configuration is applied? Regards, Peter
The error was apparently given by the AssignedAccessConfiguration tag on multiple lines, once I moved them on the same line it started to work
Thank you for the update, Max! Regards, Peter
Still a great article Peter, and used your XML multiple times already! Now I’m dealing with an application that’s installed in the %localappdata%\Programs folder of the KioskUser0. Application will not start, I think because it trows me an error that the %localappdata% location is not allowed to access.
Do you have a workarround for this? Would be great!
Regards, Michiel
Hi Michiel, What are you trying to achieve for which user? Regards, Peter
Thanks for this write up! I tried executing it but i must be doing something wrong. Here’s what i did:
1) Took your complete configuration and adjusted: ProfileID, Account, and DefaultProfileID 2) ProfileID & DefaultProfileID are both randomly generated and match 3) Account is the account name of the service account i want to use for this kiosk (not display name and not UPN)
I get an 0x87d1fde8 error in Intune and i’m wondering if you can suggest where i should look?
Hi Mike, More details will be available in the Event Viewer. Is that account already available before applying the configuration? Regards, Peter
Ok i’ll dig through the event viewer next time i try this. The account is indeed already available, its an Entra ID account, could that be why? does it have to be a local account?
Hi Mike, In that case make sure that the notation is correct. It must be like AzureAD\{UPN} Regards, Peter
Leave a Comment Cancel reply
Notify me of follow-up comments by email.
Notify me of new posts by email.
This site uses Akismet to reduce spam. Learn how your comment data is processed .
What Is Kiosk Mode? Here's How to Use It on Windows 11

Your changes have been saved
Email Is sent
Please verify your email address.
You’ve reached your account maximum for followed topics.
3 Ways to Open MSConfig in Windows 11
How to lock and unlock the function (fn) key in windows, what is the appdata folder in windows, and when should you use it.
Windows' kiosk mode isn't very well-known, because it serves a niche purpose. It's highly unlikely you'll use it on a personal PC; instead, it's aimed more at businesses that want a computer for people to use without giving them the ability to access files or mess up the system.
Like Windows 10, Kiosk mode feature also comes with Windows 11, but enabling and setting it up on the new operating system version is slightly different. Here is how to start using this feature and make the most of it.
What Is Kiosk Mode?

Windows' kiosk mode is an Administrator implementation that restricts users from running anything but one or more specific sets of applications on a Windows device. This mode turns your Windows PC into a single-purpose device that's dedicated to a specific task so that the users don’t interact with something they are not supposed to.
It all stems from the 'Assigned access' feature, which limits what users see when an application is opened.
Since the Kiosk environment is more restrictive than Windows 11's guest mode , businesses and owners are able to ensure better monitoring and control of Windows-based devices. Windows Kiosk mode offers two different environments: single-app and multi-app kiosks.
In single-app mode, users can only see and use one application on the device. When the user logs in using the credentials provided, the application will automatically launch. Users will have no control over switching to another application or tabbing out of the current one.
This lockdown mode is commonly used in public devices such as a computer running a search at the library or touch screens installed in the museums to provide information about relevant subjects.
On the other hand, multi-app mode lets users run multiple applications on a device. Organizations use this to apply predefined policies, configurations, & apps, thereby improving employee productivity and reducing distractions from other work.
How to Set Up and Use Kiosk Mode on Windows 11
Windows 11, just like Windows 10 comes with a dedicated Kiosk section within Windows Settings. Below, we will show you how to set up and use this mode step-by-step:
1. Enable Kiosk Mode
To get started, you first need to enable the feature in Windows settings by following the steps below:
- Press Win + I to open Windows Settings.

- Choose how will the users interact with Kiosk and click Next .
- Pick a time for the application to restart.
- Click Next > Close .
Kiosk mode on your Windows 11 is now enabled and ready to be used.
2. Disable Kiosk Mode
When you no longer need the Kiosk mode, you can simply disable it. Here is how to do so:
- Launch Windows Settings and choose Accounts from the left pane.
- Click on Family & other users on the right side of the window.
- Navigate to the Set up a kiosk section and select the Kiosk (active) setting.

This should remove the kiosk mode successfully on Windows 11.
Make Windows Kiosk Mode More Secure
While the Kiosk mode will work perfectly fine just after enabling it, you can go a step ahead and make certain configurations to make the experience even smoother.
1. Enable Tablet Mode
Since with a normal PC users are going to have access to your keyboard and its shortcuts, you can enable the tablet mode on your PC if it supports a touch screen. This will restrict users to only using the screen.
To enable Tablet mode, head over to Settings > System > Tablet mode and turn the toggle associated with the feature on.
2. Change Power Button Settings
If users have access to your keyboard, they are likely to use the power button to switch the device on and off. To prevent them from using the power button, you can disable it via Control Panel.
Launch the Control Panel and head over to Power Options > Choose what the power button does . Select Do nothing from the list of options available and save the changes. You can also remove the power button from the sign-in screen using the Group Policy Editor.
Here is what you need to do:
- Open a Run dialog by pressing Win + R .
- Type gpedit.msc in the text field of the dialog and hit Enter .

- Select Disabled and click on Apply > OK to save the changes.
The users will no longer be able to see the power button on their screens.
3. Disable Notifications
By default, kiosk mode blocks all notifications and prompts. However, the notifications might pop up on the sign-in screen if you haven’t disabled them exclusively. To disable the notifications, we will again be using the Group Policy Editor.
- Open Group Policy Editor by following the steps we described above.

- Choose Enabled and select Apply > OK to make the changes.
By following these steps, you will be able to make your Kiosk environment more safe and secure since it will further restrict your users' access to any functionality on your PC.
Control Your PC's Environment With Kiosk
Kiosk mode is a great way to prevent others from accessing files and using applications they are not supposed to. However, it is important to note that while this feature has several benefits, Kiosk mode may also cause some system-related issues like causing occasional freezing.
- Windows Customization
- Apple Watch
- Playstation
- Digital Marketing
- WooCommerce
- Tips & Tricks
- Troubleshooting
Understanding The Differences Between NTFS and Ext4 in Ubuntu File System
Comparing the best file editors for ubuntu: features, pros, and cons, securing your ubuntu system with proper file permissions, mastering ubuntu virtualization with virtualbox, how to change or lock the screen orientation on iphone 15, 7 essential tips to extend your iphone 15 battery life, “from overheating to overachieving: iphone 15 journey unfolded”, qick steps to transfer music to iphone 15, how to add a custom currency and its symbol in woocommerce, eliminating $0.01 or $0.02 minor tax calculation errors in woocommerce, web design trends: from minimalism to maximalism, how to locate the process id files in linux top command, 5 must-try google play features for poetry lovers, how to disable ads in windows 11- updated 2024, enable or disable location based features for photos app in windows…, fitbit-5: four reasons to start tracking your heart rate while you…, 10 chinese drama to watch this summer 2024, netflix’s badland hunters movie trailer is a thrilling mix of earthquakes,…, 10 popular korean series to watch this season, 10 korean movies to watch this july 2023, shelley duvall, iconic actress from ‘the shining,’ passes at 75, evo 2024 preview: top contenders and surprises await, joe biden falters during yet another contentious press briefing., alec baldwin’s manslaughter charges in rust case officially dropped., nasa’s rebekah hounsell: illuminating dark universe mysteries through cosmic light, xbox app compact mode upgrade: jump back in & enhanced friends…, how to unlock all king shark costumes and cosmetics in suicide…, the apex legends digital issue is now live, 5 games to play on android tablets and foldable phones, how to get xbox game pass ultimate for free, how to set up a kiosk in windows 11.
Windows 11 Kiosk Mode is a way for IT teams and administrators to keep Windows 11 devices running only on one app or a set of apps, which gives them more control and governance. Windows Kiosk Mode is a great way to keep Windows 11 devices that are used for a specific purpose, like self-check-in kiosks at airports, point-of-sale terminals at self-service restaurants, or digital signage used for advertising, from being used for other things. It also makes sure that users can’t change the settings on the devices, use them for other things, or even change the settings on the devices.
Some of the desktop computers in an organization have a specific use. To show you what this looks like, think of a computer in the lobby that customers use to look at your product catalog. Or, a computer that shows a digital sign with pictures on it.
Also Read: 8 Best Fixes: Discord Not Opening On Windows 11
Windows has two types of locked-down experiences that can be used for public or specialized use:
Single-app Kiosk : It runs a single Universal Windows Platform (UWP) app above the lock screen in full-screen mode. People who use the kiosk can only see that app. When the kiosk account (a local standard user account) signs in, the kiosk app will start automatically. You can also set the kiosk account to sign in automatically, and you can set it to do the same thing. In this case, the kiosk app will restart itself.
A Single-app kiosk is a perfect fit for public use. With the help of Shell Launcher, you can set up a kiosk that runs a Windows desktop application as the user interface. You can choose a different application to run instead of the default shell (explorer.exe) that usually starts when a user logs on. This type of kiosk doesn’t run above the lock screen.
Multi-app Kiosk : It runs one or more apps from the desktop. People who use the kiosk see a Start screen that only shows the tiles for the apps that can be used. When you use this method, you can set up different account types to have a different experience.
A multi-app kiosk is good for devices that are shared by a lot of people. When you set up a multi-app kiosk, certain rules are put in place that will affect all non-administrator users on the device.
Setting Single App Kiosk
A feature in the Windows client called Assigned Access lets an administrator control the user’s experience by limiting the number of application entry points that the user can see. Kiosk configurations are based on this feature.
You can choose from a variety of ways to set up your single-app kiosk.
- Settings: The Set up a kiosk option in Settings is a quick and easy way to set up a single device to be a kiosk for a local standard account.
PowerShell : Cmdlets for Windows PowerShell can be used to set up a single-app kiosk with Windows PowerShell. There are two steps you need to take before you can set up a user account on the device and install the kiosk app for that account on it.
The Kiosk Wizard in Windows Configuration Designer helps you set up a kiosk. Windows Configuration Designer is a tool that makes a provisioning package, like a zip file. Provisioning packages contain settings that can be used to set up one or more devices during or after the first-run experience (OOBE). These settings can be used on one or more devices during or after OOBE (runtime). When you use the kiosk wizard, you can also set up the kiosk user account, install the kiosk app, and make other important changes.
Also Read: [Fixed] Activation Error 0xc004c060 In Windows 11
Set up a kiosk in Windows 11 via local Settings
You can use Settings to quickly set up one or a few devices as a kiosk with just a few clicks.
As soon as you set up a kiosk in Settings for the Windows client, you also set up the user account for the kiosk at the same time. Changing the PC settings so that only certain people can do certain things can do this:

- Open the Settings app and go to Accounts. Then choose Other users or Family and other people.
- Select Set up a kiosk > Assign access, and then click on Get started to get started.
- Enter the name of the new account here.
When the kiosk account signs in, choose the app that will run. To choose an app, only apps that can run above the lock screen will be shown. Please see Guidelines for choosing an app that can be given to people who don’t have it on their own to use. if you choose Microsoft Edge as the kiosk app, you can set up the following things:
- Whether Microsoft Edge should show your website in full-screen mode (a digital sign) or with some browser controls (public browser)
- When a kiosk account signs in, which URL should be shown?
- When Microsoft Edge should start up again after a period of not being used (if you select to run as a public browser)
- Close the window.
The account tile is on the Set up a kiosk page. To remove access, click on the account tile, and then click Remove kiosk.
Set up a kiosk in Windows 11 using PowerShell
There are several PowerShell cmdlets you can use to make sure that you have access to multiple devices.
To run the cmdlet:
- Go into your account and sign in as a manager.
- For Assigned Access, make a user account.Sign in with the user account that was given access.
- Install the Universal Windows app that allows you to do what you’ve been given permission to do.
- Sign out of the account that has been given access. Go into your account and sign in as a manager.
- On a Windows client, type “PowerShell” into a search bar and look for the Windows PowerShell Desktop app.
Make sure you’re the owner of PowerShell.
- Configure assigned access by AppUserModelID and user name : Set-AssignedAccess -AppUserModelId <AUMID> -UserName <username>
- To Configure assigned access by AppUserModelID and user SID : Set-AssignedAccess -AppUserModelId <AUMID> -UserSID <usersid>
- Configure assigned access by app name and user name : Set-AssignedAccess -AppName <CustomApp> -UserName <username>
- To Configure assigned access by app name and user SID : Set-AssignedAccess -AppName <CustomApp> -UserSID <usersid>
Also Read: How To Change Size For Recycle Bin Storage In Windows 11
Set up a kiosk using the kiosk wizard in Windows Configuration Designer
Windows Configuration Designer’s Provision kiosk devices wizard lets you set up the kiosk in your Windows 11 to run either a Universal Windows app or a Windows desktop app. You can choose which one to run.
Make sure you have Windows Configuration Designer installed. Then open Windows Configuration Designer and click Provision kiosk devices to set up the devices. Choose your project title and click Next. Then, choose the following settings:

1. Enable device setup :
If you want to set up your device, choose Set up device, and make the following choices:
- Device name: You need this. It’s important to give the device a name that is at least 15 characters long. You can use variables to make the name more unique, like Contoso- percent SERIAL percent and Contoso- percent RAND:5 percent.
- This will let you get the product key. Optional. Select a licence file to upgrade your Windows client to a different edition. This is how you do it. For more information, check out the upgrades that can be made.
- Devices that can be used by more than one person need to be set up this way. For shared use situations, this setting makes the Windows client more efficient. It’s not important to make this setting for a kiosk. Default: Set this value to “No,” which may be the case by default now.
2. Set up the network :

If you want to set up a network, choose Set up the network, and make the following choices:
- It’s time to set up a new network: To turn on wireless connectivity, choose On.
- To find out the name of your network, type in its Service Set Identifier (SSID).
- It’s up to you which network type you want to use: open or WPA2. If you choose WPA2-Personal, type in the wireless network’s password, and then click OK.
3. Enable account management:
if you want to set up account management, choose Account Management, and make the following changes:
The Active Directory: In order to join the device to the domain, you need to enter the credentials for a user account that doesn’t have a lot of power.
- Before you use a Windows Configuration Designer wizard to set up bulk Azure AD enrollment, make sure your organization is set up to use Azure AD join. In your Azure AD tenant, the number of devices per user determines how many times the bulk token in the wizard can be used. This number is set by the number of devices per user in your Azure AD tenant.
- If you choose this option, you can give the bulk token you get from the wizard a name that’s easy to remember. Set a date when the token will expire, so that it will no longer work. After 180 days, you can’t use it any more than once a day for the rest of your life.
- Select the option to get a lot of tokens at once, and then click In Let’s get you signed in. You’ll need to enter an account that can join a device to Azure AD and then your password. Select Accept to give Windows Configuration Designer the permissions it needs.
- You must run Windows Configuration Designer on your Windows client to use any of the wizards to set up Azure AD enrollment. If you choose to be a local administrator, you’ll need to enter a user name and password. Make sure to change the password every 42 days by going to the Settings app and typing in the new one. It could happen if the password isn’t changed during that time. The account could be locked out and not be able to sign in.
Also Read: Windows 11 File Explorer Tabs Configuration Guide
4. Add applications:

To add apps to the devices, click on Add applications and choose the apps you want. You can put more than one app in a provisioning package, including apps for Windows desktops (Win32) and apps for the Universal Windows Platform (UWP). There are different settings in this step based on the application you choose to use.
5. Add certificates:
Choose “Add certificates.” Then, choose the settings for the following:
certificate name: Make sure to give it a name before you do this! certificate path: Choose the certificate you want to add from the list and click “Add Certificate.”
6. Configure the kiosk account and the kiosk mode app :
To add the account that runs the app and choose the type of app, choose Configure kiosk account and app, and make the following changes:
- To run the kiosk mode app, you need to set up a local standard user account.
Select “Yes” to set up a local standard user account.
- Then, choose the User name and Password for the account. This is the account that runs the app. If you choose No, make sure you already have a user account to run the kiosk app.
- When you sign in, you don’t have to do anything. Make sure to choose “Yes” so that you are able to sign in automatically when the device is on. No means that the account doesn’t already have a sign-in.If there are issues with auto sign-in after you apply the provisioning package, then check the Event Viewer logs for auto logon issues ( Applications and Services Logs\Microsoft\Windows\Authentication User Interface\Operational ).
- Users who will be able to use this kiosk mode app need to enter their usernames here. In-App type, choose the type of app you want to run. Choose from these: A desktop application for Windows: It’s time to enter the path or file name. If the path to the file is in the PATH environment variable, you can use the file name instead of the file path. Otherwise, the full path must be given. It’s a Universal Windows app: Go into the AUMID
Also Read: Amazing Windows 11 Keyboard Shortcuts You Should Know!
7. Configure kiosk common settings

To set up tablet mode, welcome and shut down screens, and power settings, choose Configure kiosk common settings. Then, make the changes to the following:
- Set tablet mode
- Customize user experience
- Configure power settings
To finish the wizard, choose Finish, and set the following setting:
Keep your package safe: To protect your provisioning package, choose Yes. Enter this password when you put the provisioning package on a device.
Also Read: How To Clean Install Windows 11
Conclusion:
Here are various methods on how you can set up a Kiosk in Windows 11. Setting up the kiosk mode has multiple benefits as it allows you to provision multiple apps. You can even command if you want the apps to be automatically installed across your devices and improve the overall efficiency of your devices.
You may also like these:
- How To Group Pinned Apps Into Folders On Start Menu In Windows 11
- How To Fix Wi-Fi Disconnecting Problem In Windows 11?
- How To Add Or Remove Widgets In Windows 11

Latest From Hawkdive
You may like these related articles, enable or disable location based features for photos app in windows 11, enable or disable hdr screenshot color corrector in snipping tool in windows 11, 7 ways to link android mobile device to microsoft account on windows 11 pc., how to disable automatic windows updates in windows 11: a comprehensive guide, how to rearrange taskbar icons in windows 11: a step-by-step guide, how to enable or disable sudo command in windows 11, how to check if pc has a neural processing unit (npu) in windows 11, tips to change recommended troubleshooter preferences in windows 11, how to turn on or off autocorrect misspelled words in windows 11, leave a reply cancel reply.
Save my name, email, and website in this browser for the next time I comment.
This site uses Akismet to reduce spam. Learn how your comment data is processed .
- Privacy Policy
- Search forums
Follow along with the video below to see how to install our site as a web app on your home screen.
Note: This feature may not be available in some browsers.
- Windows Support Forums
Accounts Change Kiosk App in Windows 11
- Thread starter Brink
- Start date Mar 6, 2022
- Mar 6, 2022
What is Assigned Access? - Configure Windows
You must be signed in as an administrator to change the kiosk app.
- As a digital sign or interactive display = The entered URL will open and appear full screen in Microsoft Edge.
- As a public browser = The entered URL will be used as the home page, start page, and new tab page in Microsoft Edge with a limited set of features.
- Enter a URL (ex: " www.elevenforum.com ") you want.
- Select how long you want to "Restart Microsoft Edge after someone has not used it for".
- Click/tap on Next .
- Set up a Kiosk in Windows 11
- Remove Kiosk in Windows 11
- Change Microsoft Edge Kiosk Settings in Windows 11
Similar Windows 11 Tutorials

- Jun 20, 2024
- Jul 3, 2024
- Jul 4, 2024

- Jul 2, 2024

- Jul 1, 2024

- Jun 28, 2024

Uninstall or Reinstall Copilot app in Windows 11 and Windows 10

Enable or Disable Recall Snapshots in Windows 11
- May 24, 2024

Enable or Disable Sudo Command in Windows 11
- Feb 8, 2024

Enable or Disable Feeds on Widgets Board in Windows 11
- Dec 4, 2023

Use ViVeTool to Enable or Disable Hidden Features in Windows 11
- Dec 1, 2023

Disable Ads in Windows 11
- Jul 28, 2022

Disable Modern Standby in Windows 10 and Windows 11
- Jan 11, 2022

Disable "Show more options" context menu in Windows 11
- Oct 4, 2021

Download Official Windows 11 ISO file from Microsoft
- Aug 19, 2021

Restore Classic File Explorer with Ribbon in Windows 11
- Jul 19, 2021

Repair Install Windows 11 with an In-place Upgrade
- Jul 5, 2021

Clean Install Windows 11
- Jun 22, 2021
Latest Support Threads
- Started by Fatty0312
- Today at 10:16 AM
- Started by Kreeep
- Today at 8:18 AM
- Started by trevo
- Today at 8:03 AM
- Started by spapakons
- Today at 8:01 AM
- Started by wiganken
- Today at 3:56 AM
Latest Tutorials

- Started by Brink
- Yesterday at 12:53 PM

- Sunday at 1:34 PM

- Saturday at 1:29 PM

- Friday at 11:41 AM

- Wednesday at 4:25 PM
How-To Geek
How to easily put a windows pc into kiosk mode with assigned access.

Your changes have been saved
Email Is sent
Please verify your email address.
You’ve reached your account maximum for followed topics.
6 Lesser-Known Built-in Windows Features You Should Use
How you can restore the windows 10 file explorer in windows 11, the nsa is warning you to restart your phone every week: here's why, quick links, step one: create a user account for assigned access, step two: set up assigned access, step three (optional): automatically log into assigned access mode, if you have other accounts, keep them secure, replace windows with a custom shell (enterprise and education only).
Assigned Access allows you to easily lock a Windows PC to a single application of your choice. This feature makes it easy for anyone to configure Windows 10 (or Windows 8.1) PCs as point-of-sale or other kiosk systems.
This feature was added in Windows 8.1 , but it's still around in Windows 10. You'll need a Professional, Enterprise, or Education version of Windows to do this--this feature isn't available in Windows 10 Home or the core versions of Windows 8.1.
Rather than turn your entire computer into a locked-down kiosk system, Assigned Access allows you to create a separate user account that can only launch a single app. To set this up, you must be logged into Windows as a user with administrator permissions.
On Windows 10, open the Settings app and navigate to Accounts > Family & Other People. Click "Add Someone Else to This PC".
On Windows 8.1, open the PC Settings app and head to Accounts > Other Accounts > Add an Account.

Decide whether you want to sign in with a Microsoft account or not. If you're setting up a locked down web browsing mode, you may not want to use a Microsoft account. But, if you need to install apps from the Windows Store to use in Assigned Access mode, you'll have to set up a Microsoft account instead of a local account. A local account will still allow you access to the universal apps included with Windows 10.
Windows 10 will guide you towards creating a Microsoft account by default. If you'd rather create a local user account, click "I Don't Have This Person's Sign In Information" and then click "Add a User Without a Microsoft Account" to create a new local user account. Enter a name like "Kiosk" and whatever password you like.
On Windows 8.1, "Sign In Without a Microsoft Account" and then click "Local Account" to create a local user account.

Enter a name like "Kiosk" for the user account. You may want to create a user account with a blank password. This will make it simple for anyone to access kiosk mode, even if the system becomes locked or needs to be rebooted.

The account will be created as a standard user account with limited system permissions. Leave it as a standard user account--don't make it an administrator account.
Related: How to Upgrade From Windows 10 Home to Windows 10 Professional
You can now set up Assigned Access. On Windows 10, look under the "Other People" section at Settings > Family & Other People. You'll see a "Set Up Assigned Access" link. Click it.
Don't see this link? You're probably using Windows 10 Home, which doesn't have the Assigned Access feature. You'll need to upgrade to Windows 10 Professiona l to get this feature.
On Windows 8.1, head to PC Settings > Accounts > Other Accounts and click "Set Up an Account for Assigned Access". You may need to sign into the account a single time so the first-time setup process runs before you configure Assigned Access, although this step isn't necessary on Windows 10.

Select the user account you created and select the app you want to limit the account to. Here are the limitations:
- Windows 10 Professional : Only new "Universal Windows Platform" apps bundled with Windows 10 or installed from the Windows Store can be selected. Unfortunately, you can't choose the Microsoft Edge web browser.
- Windows 10 Enterprise or Education : In addition to Universal Windows Platform apps, you can choose an installed desktop applications to limit a user account to.
- Windows 8.1 : You may only select Store apps, also known as Modern apps or Metro apps, including the "Modern" version of the Internet Explorer web browser.

When you're done, sign out of your current user account and log into the Assigned Access account. Windows will automatically open the app you chose in full screen mode and won't allow a user to leave that app. Standard features like the taskbar and Start menu won't appear, and the charms bar and app switcher won't appear on Windows 8.1. Press the Windows key or Alt+Tab and nothing will happen.
To leave Assigned Access mode on Windows 10, press Ctrl+Alt+Delete. On Windows 8.1, press the Windows key five times quickly. The account will actually still be logged in and the app will remain running--this method just "locks" the screen and allows another user to log in.

Whenever your Windows PC boots, you can log into the Assigned Access account and turn it into a kiosk system. While this isn't ideal for all kiosk systems, you may want the device to automatically launch the specific app when it boots without requiring any login process.
Related: How to Make Your Windows 10, 8, or 7 PC Log In Automatically
To do so, you'll just need to have Windows automatically log into the Assigned Access account when it boots. This option is hidden, and not available in the standard Control Panel. You'll need to use the hidden netplwiz Control Panel tool to set up automatic login on boot .
To do so, open a Run dialog by pressing Windows+R on your keyboard, type
into the box, and press Enter. Select the Kiosk user account, uncheck "Users must enter a user name and password to use this computer", and provide the kiosk user account's password.
If you didn't create a password for the user account, leave the Password field empty while configuring this.

If you're using this feature to turn a Windows 10 or 8.1 system into a kiosk and leaving it open to the public, remember to consider security. Anyone could come up to the system, press Ctrl+Alt+Delete or the Windows key five times, and try to log into your standard administrator user account. Ensure the administrator user account has a strong password so people won't be able to get past the kiosk system's limitations and gain access to the rest of the system.

Related: 10 Features Only Available in Windows 10 Enterprise (and Education)
Windows 10 added a new, related feature named Shell Launcher. Unfortunately, it's restricted to the Enterprise and Education editions of Windows 10 . This feature isn't included in Windows 10 Professional.
Shell Launcher allows you to replace Windows 10's shell--that is, Windows Explorer--with a custom shell of your choice. You can use any traditional desktop application as a custom shell. A business could restrict PCs to a single traditional desktop application or create a custom-made shell environment.
As this is intended for more experienced system administrators, it's more complicated to set up. Consult Microsoft's Shell Launcher documentation for more information.
What Is Kiosk Mode (Assigned Access) In Windows And How To Set It Up
The Windows operating system comes with a feature that allows you to configure only one UWP app to run while blocking everything else. This is known as the “Kiosk Mode,” formerly known as “Assigned Access.”
Note that kiosk mode is only available in the Enterprise, Education, and Professional editions of Windows 10 and 11 .
Previously, this feature had to be enabled through the Windows Registry manually. However, Microsoft has made this feature accessible by introducing more ways to enable and configure kiosk mode.
Please enable JavaScript
Table of Contents
What is Kiosk Mode in Windows
As mentioned earlier, Kiosk Mode allows you to run a dedicated application only while blocking the user from performing any other tasks. For example, if it has been configured to run an application, then the user will not be allowed to run any other application unless the app is changed by an administrator.
Kiosk Mode Limitations
The kiosk mode is a restricted environment in terms of allowed actions. Moreover, there are certain conditions associated with the user account itself which need to be satisfied in order to set it up in kiosk mode.
The kiosk account must be a standard user account , not an administrator or Microsoft account. This shouldn’t be an issue since the user account for kiosk mode is automatically created during the setup process and you do not have to create one beforehand.
Since the app would be in full-screen mode in the kiosk mode, you can only use the Ctrl+Alt+Del hotkey to exit from that Kiosk account.
Let us now continue to see how to set up kiosk mode in Windows.
How to Set Up Kiosk Mode in Windows
Begin by installing the application you want to run inside kiosk mode. In case you plan on running a preinstalled UWP app, make sure that it is available and running.
Now navigate to the following:
In Windows 11 22H2 or above:
Here, click Get Started in front of Kiosk .
Now pick an application you want to run in kiosk mode and click Next .
The next screen will be conditional upon what application you chose to run in kiosk mode.
Since we selected “Microsoft Edge,” we have been asked whether the app will be used as a digital sign or interactive display, or will be used as a public browser. At this point, make your selection and click Next .
If more windows show up, continue to provide the additional details.
How to Enter Kiosk Mode
Log out of the administrative account and switch your user account from the lock screen.
However, to exit the kiosk account, you need to press the CTRL + Alt + Del keys which will take you back to the lock screen.
How to Customize/Change Kiosk App
As we mentioned above, you can only run one kiosk account at a time. However, you can still make changes to the existing one without having to first remove it and then create a new kiosk mode from scratch.
Follow these steps to customize your kiosk configuration:
You will now see the kiosk account name and its app. Click on it to expand the options.
To change the kiosk app, click Change kiosk app and then select a new app.
How to Disable/Remove Kiosk Mode in Windows
Now click Remove Kiosk .
Closing Words
In Microsoft documentation , the company has given another method to set up and configure kiosk mode; using Windows PowerShell .However, after giving that method a try, we at iTechtics discovered that the method did not work properly.
That said, you can use the kiosk mode in your own environment and only allow specific apps to run on end-user machines. This is especially useful for devices that need to be placed in public places.
(Cancel Reply)
Get updates in your inbox.
Set up Assigned access In windows 10/11 to limit guest account
Let us suppose you want your grandparent to only use mail and touch nothing else on your PC. Or let’s say you want to use only one game on your PC and leave every other thing intact. Assigned access in windows 10 is a very useful feature for this purpose. In Assigned access feature, you can limit any guest account on your PC to use single app only and come out. It is like going inside a hotel with a single key and rights to use one room only.
let’s say you have a computer kept in public spaces meant for using internet only. you can install a browser app from windows store and then set up assigned access for guest account so that they can log in and use only one app that is browser for using internet. In this way your important files and softwares will remain safe.
Please follow the guide given below to set up assigned access
How to use Assigned access in Windows 10
Step 1 – First of all create a Local / guest account .
Step 2 – Now, open settings control panel. For opening settings control panel, either press windows key + i or click start key and then click settings .

Step 3 – Now, in right sidebar, click on Family & Other users. Now, click on set up assigned access as shown in below pic.

Step 4 – Now, click on Get started and select the local account which already exists (Or you can create one ) which you want to use with assigned access.

Step 5 – Select the local account or create One.
After you have selected the account , now choose the app which you want to provide the rights for. Here i have chosen calculator app.
That’s it. Now, shut down and log back in to use the assigned access account with access to one app of your choice.
What about those apps which are not present while choosing apps for assigned access. For example, what if you want the guest to use facebook only and then log out of the system. Well, you can download and install facebook from windows store.
- How to create a guest account in Windows 11
- How to Limit Diagnostic Data Collection in Windows 11
- How to change the limit reservable bandwidth in Windows 11
- How To Set, Reset and Remove Data Usage Limit For…
- How to Switch Account Type for User Account in Windows 11
- Fix - Error code 0x80070043 (Windows cannot Access)…
3 thoughts on “Set up Assigned access In windows 10/11 to limit guest account”
That does not address the non availability of a Guest account
Assigned access in only available in windows Pro and not available in windows 10 standard versions.
According to Microsoft engineers there is no such thing as a guest account in windows 10. I would be interested to know how you achieved this as I have tried all the known methods of implementing this account unsuccessfully. I can create an assigned account from a Standard one but a guest account would be better if possible.
Comments are closed.
Get the Reddit app
A reddit dedicated to the profession of Computer System Administration.
Windows 11 without tablet mode.. MultiApp Kiosks and Autologon in enterprise
Like most enterprises, we're going to move to Windows 11 at some point.
We will be replacing our existing public facing computers, POS terminals etc with kiosks and I've done thorough testing and I'm getting stuck with the account not logging in
I've seen a lot of people have had issues with MultiApp Kiosk mode not working with intune, mostly around the Assigned Access and domain accounts logging in. The most recent post I can find is here: https://www.reddit.com/r/Intune/comments/10pallj/kiosk_mode_issues_with_auto_logon/?share_id=DoJQEg-muEWKF4CdF3oQI&utm_content=1&utm_medium=android_app&utm_name=androidcss&utm_source=share&utm_term=10
I've even tried applying the ISConnectedAutoLogon and ForceAutoLogon reg keys
According to Microsoft you can have the locked down or kiosk mode:
https://learn.microsoft.com/en-us/windows/configuration/lock-down-windows-11-to-specific-apps
I've tried many XML profiles, via intune, WMI Bridge provider via powershell, even SCCM Task sequence and I can't get the account to logon automatically even with sysinternals Autologon or setting the registry keys:
I'm seeing the below events in the AssignedAccess event log
Error,3/11/2023 9:05:29 PM,Microsoft-Windows-AssignedAccess,33000,AssignedAccess MdmAlert messages, "<Events xmlns="" http://schemas.microsoft.com/AssignedAccess/2018/AssignedAccessAlert""> <Event Name=""MultiAppRuntimeStatus""><status>3</status><profileId>{C4B95AA3-FD0B-41DF-A41F-C70180E0675A}</profileId><errorCode>-2147019873</errorCode><OperationList><Operation><name>TabletMode</name><errorCode>-2147019873</errorCode><data>Apply:</data></Operation></OperationList></Event></Events> , ErrorCode(0x80004005)" Error,3/11/2023 9:04:59 PM,Microsoft-Windows-AssignedAccess,31000,Applying Assigned Access for current user.,"Error The group or resource is not in the correct state to perform the requested operation. applying assigned access for current user, signing out..." Error,3/11/2023 9:04:59 PM,Microsoft-Windows-AssignedAccess,31002,AssignedAccess OperationStatus messages,"TabletMode:Apply:, ErrorCode(0x8007139F)"
According to Microsoft there's no tablet mode in Windows 11 and this is what I make of the event:
TabletMode:Apply, ErrorCode(0x8007139F)"
Has anyone found a resolution for this?
Microsoft accidentally lists the benefits of not using a Microsoft account on Windows 11
Using a local account on Windows 11 has its benefits, as explained by Microsoft on accident.

What you need to know
- A recently updated Microsoft support page outlines how to switch from a Microsoft account to a local account on Windows 11.
- The page lists several reasons Microsoft recommends using a Microsoft account rather than a local account.
- While it is possible to use a local account on Windows 11, you must first set up a Microsoft account or be willing to use workarounds during the initial setup process of a PC.
Microsoft recommends using a Microsoft account on Windows 11 to get the best user experience. The tech giant lists several reasons to use a Microsoft account rather than a local account in a support document that was updated recently . Neowin spotted additions to the document, including Microsoft's reasons for recommending a Microsoft account.
There are benefits to using a Microsoft account on your Windows 11 PC, especially if you're deeply entrenched in the Microsoft ecosystem. Using a Microsoft account lets you connect your PC to Microsoft cloud services, sync files across devices, and even sync your settings across multiple PCs. There are also security benefits when using a Microsoft account, as highlighted by the tech giant in its support page about switching between Microsoft accounts and local accounts.
But not everyone wants to use a Microsoft account when using a PC. Some people prefer to use a local account instead. Microsoft, unsurprisingly, recommends using a Microsoft account. But in a twist of irony, Microsoft's argument to use a Microsoft account may actually convince some people to use a local account. Here are the main reasons listed by Microsoft:
- A local account is created on the device and doesn't require Internet connectivity to sign in. It's independent of other services, and it's not connected to the cloud. Your settings, files, and applications are limited to that single device
- A Microsoft account, on the other hand, is associated to an email address and password that you use with Outlook.com, Hotmail, Office, OneDrive, Skype, Xbox, and Windows. When you sign in to your PC with a Microsoft account, you’re connected to a Microsoft cloud service, and your settings and files can sync across various devices. You can also use it to access other Microsoft services
For those in the Microsoft ecosystem, the company's reasons for using a Microsoft account seem compelling. But I believe there are users who would view Microsoft's reasons against using a local account as positives, not negatives.
Windows 11 without an internet connection

I use a Microsoft account and sync just about everything across multiple PCs, but I understand that's not the preferred setup for everyone. The idea of being able to sign in without an internet connection seems like a positive. I bet there are many that want to use a PC without having it connected to Microsoft services as well.
While Microsoft has a support document on how to change from a Microsoft account to a local account, you'll notice a rather glaring omission. The support document does not list a way to set up your PC with a local account. You can either set up a PC with a Microsoft account and then switch to a local account or just use a Microsoft account. If you want to set up Windows 11 without a Microsoft account , you have to use workarounds.
It's frustrating that Microsoft almost makes using a Microsoft account essential to use a Windows 11 PC at all. Even those that switch to a local account have to make a Microsoft account at some point and then switch away from it (unless they're willing to use workarounds).
Get the Windows Central Newsletter
All the latest news, reviews, and guides for Windows and Xbox diehards.
I wonder how many people cannot use a modern PC because they lack an internet connection for the initial setup process. Microsoft is certainly aware that many people lack easy access to the web. The company has several initiatives to improve connectivity, such as Microsoft Airband. The tech giant goes as far as to call internet access a " fundamental right ." There are, however, people without access to the internet in 2024. I guess they're out of luck when it comes to setting up a Windows 11 PC.
Sean Endicott brings nearly a decade of experience covering Microsoft and Windows news to Windows Central. He joined our team in 2017 as an app reviewer and now heads up our day-to-day news coverage. If you have a news tip or an app to review, hit him up at [email protected] .
- fdruid This article is dumb, sorry. Reply
fdruid said: This article is dumb, sorry.
- taynjack Now that's the kind of transparency and honesty that will win you customers! Give people the objective information and let them make an informed decision for their needs. Microsoft finally does something right! Reply
- View All 3 Comments
- 2 OpenAI reportedly sent RSVPs for GPT-4o's launch party even before testing began — pressuring the safety team to speed through the process in under one week
- 3 The Ultimate Edition of one of the best co-op Soulslikes is having a 55% discount sale
- 4 CDKeys FAQ: How it works, legitimacy, platforms, where to find the best deals, and more
- 5 This powerful Thunderbolt 4 docking station is loud and proud, and the price reflects its size
Services Access is denied in Windows 11/10
1] gain permission through registry editor, 2] check dependencies and permissions, 3] set log on account, how to fix access denied on services, why do i keep getting an access denied message.
Windows OS Hub / Windows 10 / How to Set (Change) the Default Printer in Windows 10 and 11
How to Set (Change) the Default Printer in Windows 10 and 11
Set a default printer using the windows control panel, change a default printer from the powershell command prompt, how to set a default printer with gpo.
The default printer can be set in Windows via the Settings pane.
- Navigate to Settings -> Printers and Scanners

- Then select the printer you want to set as the default and click Manage .

The wmic tool can be used to change a default printer from the command prompt. List installed printers:
The default printer has the Default=True attribute enabled. Change the default print:
wmic printer where name="Brother MFC-L2750DW" call setdefaultprinter

In addition, you can use PowerShell to manage printers .
List printers:
Get-CimInstance -ClassName CIM_Printer |select name,default
$Printer = Get-CimInstance -Class Win32_Printer -Filter "Name='HP LaserJet M1530 MFP Series PCL 6'" Invoke-CimMethod -InputObject $Printer -MethodName SetDefaultPrinter
Enable the LegacyDefaultPrinterMode registry parameter to prevent Windows from automatically changing the default printer:
REG ADD "HKCU\SOFTWARE\Microsoft\Windows NT\CurrentVersion\Windows" -v LegacyDefaultPrinterMode /t REG_DWORD /d 1 /f

If you need to set the default printer for many users in an Active Directory domain from a central location, you can use a GPO.
In case you are using Group Policy to assign shared printers to users (User Configuration -> Preferences -> Control Panel Setting -> Printer), enable the Set this printer as the default printer option in the GPP item.

The user’s default printer set is stored in the Device parameter under the HKEY_CURRENT_USER\Software\Microsoft\Windows NT\CurrentVersion\Windows registry key. The following string format is used:

Use the GPO to create this registry parameter on the target user computers. This will change the default printer set in the user profile. Edit a domain GPO , go to User Configuration -> Preferences -> Windows Settings -> Registry , and create a new item with the following settings:
- Key Path: SOFTWARE\Microsoft\Windows NT\CurrentVersion\Windows
- Value Name: Device
- Value Type: REG_SZ
- Value Data: Brother MFC-L2750DW series,winspool,FILE:

Then disable automatic printer assignment in Windows using the GPO option Turn off Windows default printer management (User Configuration -> Administrative Templates -> Control Panel -> Printers).

Permanently Disable Driver Signature Enforcement on Windows 11
Mapping sharepoint online library as network drive in windows, related reading, fix: multiple connections to a server or shared..., mapping sharepoint online library as network drive in..., testing internet speed from windows command prompt (powershell), install any os from iso image over network..., leave a comment cancel reply.
Notify me of followup comments via e-mail. You can also subscribe without commenting.
Current ye@r *
Leave this field empty
- Back to main menu
- BROWSE BY TOPIC BROWSE BY TOPIC
- Global IT Asset Management
- IT Security
- Cloud & Container Security
- Web App Security
- Certificate Security & SSL Labs
- Developer API
- Cloud Platform
- Start a discussion
regreSSHion: Remote Unauthenticated Code Execution Vulnerability in OpenSSH server

Last updated on: July 15, 2024
Table of Contents
About openssh: securing enterprise communications and infrastructure, affected openssh versions:, potential impact of regresshion, immediate steps to mitigate risk, technical details, qualys qid coverage, discover vulnerable assets using qualys cybersecurity asset management (csam), enhance your security posture with qualys vulnerability management, detection, and response (vmdr).
- Gain exposure visibility and remediation tracking with the regreSSHion Unified Dashboard
- Automatically Patch regreSSHion vulnerability With Qualys Patch Management
Detect and remediate CVE-2024-6387 with Qualys TotalCloud Container Security
Qualys products and customer responsibilities, frequently asked questions (faqs).

The Qualys Threat Research Unit (TRU) has discovered a Remote Unauthenticated Code Execution (RCE) vulnerability in OpenSSH’s server (sshd) in glibc-based Linux systems. CVE assigned to this vulnerability is CVE-2024-6387.
The vulnerability, which is a signal handler race condition in OpenSSH’s server (sshd), allows unauthenticated remote code execution (RCE) as root on glibc-based Linux systems; that presents a significant security risk. This race condition affects sshd in its default configuration.
Based on searches using Censys and Shodan, we have identified over 14 million potentially vulnerable OpenSSH server instances exposed to the Internet. Anonymized data from Qualys CSAM 3.0 with External Attack Surface Management data reveals that approximately 700,000 external internet-facing instances are vulnerable. This accounts for 31% of all internet-facing instances with OpenSSH in our global customer base. Interestingly, over 0.14% of vulnerable internet-facing instances with OpenSSH service have an End-Of-Life/End-Of-Support version of OpenSSH running.
In our security analysis, we identified that this vulnerability is a regression of the previously patched vulnerability CVE-2006-5051, which was reported in 2006. A regression in this context means that a flaw, once fixed, has reappeared in a subsequent software release, typically due to changes or updates that inadvertently reintroduce the issue. This incident highlights the crucial role of thorough regression testing to prevent the reintroduction of known vulnerabilities into the environment. This regression was introduced in October 2020 (OpenSSH 8.5p1).
Qualys has developed a working exploit for the regreSSHion vulnerability. As part of the disclosure process, we successfully demonstrated the exploit to the OpenSSH team to assist with their understanding and remediation efforts. We do not release our exploits, as we must allow time for patches to be applied. However, even though the exploit is complex, we believe that other independent researchers will be able to replicate our results.
OpenSSH (Open Secure Shell) is a suite of secure networking utilities based on the Secure Shell (SSH) protocol, which is vital for secure communication over unsecured networks. It provides robust encryption to ensure privacy and secure file transfers, making it an essential tool for remote server management and secure data communication. Known for its extensive security and authentication features, OpenSSH supports various encryption technologies and is standard on multiple Unix-like systems, including macOS and Linux.
OpenSSH’s implementation serves as a critical tool for secure communication. Its enterprise value lies in its scalability and the ability to enforce robust access controls and secure automated processes across various environments. This includes everything from automated backups and batch processing to complex DevOps practices, which involve the secure handling of sensitive data across multiple systems and locations. Its continued development and widespread adoption highlight its importance in maintaining the confidentiality and integrity of network communications worldwide.
OpenSSH stands as a benchmark in software security, exemplifying a robust defense-in-depth approach. Despite the recent vulnerability, its overall track record remains exceptionally strong, serving as both a model and an inspiration in the field.
- OpenSSH versions earlier than 4.4p1 are vulnerable to this signal handler race condition unless they are patched for CVE-2006-5051 and CVE-2008-4109.
- Versions from 4.4p1 up to, but not including, 8.5p1 are not vulnerable due to a transformative patch for CVE-2006-5051, which made a previously unsafe function secure.
- The vulnerability resurfaces in versions from 8.5p1 up to, but not including, 9.8p1 due to the accidental removal of a critical component in a function.
OpenBSD systems are unaffected by this bug, as OpenBSD developed a secure mechanism in 2001 that prevents this vulnerability.
This vulnerability, if exploited, could lead to full system compromise where an attacker can execute arbitrary code with the highest privileges, resulting in a complete system takeover, installation of malware, data manipulation, and the creation of backdoors for persistent access. It could facilitate network propagation, allowing attackers to use a compromised system as a foothold to traverse and exploit other vulnerable systems within the organization.
Moreover, gaining root access would enable attackers to bypass critical security mechanisms such as firewalls, intrusion detection systems, and logging mechanisms, further obscuring their activities. This could also result in significant data breaches and leakage, giving attackers access to all data stored on the system, including sensitive or proprietary information that could be stolen or publicly disclosed.
This vulnerability is challenging to exploit due to its remote race condition nature, requiring multiple attempts for a successful attack. This can cause memory corruption and necessitate overcoming Address Space Layout Randomization (ASLR). Advancements in deep learning may significantly increase the exploitation rate, potentially providing attackers with a substantial advantage in leveraging such security flaws.
Addressing the regreSSHion vulnerability in OpenSSH, which enables remote code execution on Linux systems, demands a focused and layered security approach. Here are concise steps and strategic recommendations for enterprises to safeguard against this significant threat:
- Patch Management : Quickly apply available patches for OpenSSH and prioritize ongoing update processes.
- Enhanced Access Control : Limit SSH access through network-based controls to minimize the attack risks.
- Network Segmentation and Intrusion Detection : Divide networks to restrict unauthorized access and lateral movements within critical environments and deploy systems to monitor and alert on unusual activities indicative of exploitation attempts.
- Custom Assessment and Remediation: Quickly execute mitigation script on required assets. To find out more, check out the FAQ section ‘Are there any mitigations for this vulnerability?’
You can find the technical details of this vulnerability at:
https://www.qualys.com/2024/07/01/cve-2024-6387/regresshion.txt
Qualys is releasing the QIDs in the table below as they become available, starting with vulnsigs version VULNSIGS-2.6.83-4 and in Linux Cloud Agent manifest version LX_MANIFEST-2.6.83.4-5
| 513833 | Alpine Linux 3.20 Security Update for openssh (regreSSHion) | Alpine Linux |
| 513832 | Alpine Linux 3.19 Security Update for openssh (regreSSHion) | Alpine Linux |
| 513831 | Alpine Linux 3.18 Security Update for openssh (regreSSHion) | Alpine Linux |
| 513830 | Alpine Linux 3.17 Security Update for openssh (regreSSHion) | Alpine Linux |
| 285635 | Fedora Security Update for openssh (FEDORA-2024-213f33544e) (regreSSHion) | Fedora Security |
| 756591 | SUSE Enterprise Linux Security Update for openssh (SUSE-SU-2024:2275-1) (regreSSHion) | SUSE Enterprise |
| 357791 | Amazon Linux Security Advisory for openssh : ALAS2023-2024-649 (regreSSHion) | Amazon Linux |
| 710942 | Gentoo Linux OpenSSH Remote Code Execution Vulnerability (GLSA 202407-09) (regreSSHion) | Gentoo Linux |
| 6081987 | VMware Photon OS Security Update for openssh (PHSA-2024-4.0-0642) (regreSSHion) | VMware Photon |
| 6081986 | VMware Photon OS Security Update for openssh (PHSA-2024-5.0-0307) (regreSSHion) | VMware Photon |
| 6122971 | Google Container OS-Optimized OS 101 Security Update for net-misc/openssh (CVE-2024-6387) (regreSSHion) | Google Container OS |
| 6122969 | Google Container OS-Optimized OS 105 Security Update for net-misc/openssh (CVE-2024-6387) (regreSSHion) | Google Container OS |
| 6122965 | Google Container OS-Optimized OS 109 Security Update for net-misc/openssh (CVE-2024-6387) (regreSSHion) | Google Container OS |
| 6122961 | Google Container OS-Optimized OS 113 Security Update for net-misc/openssh (CVE-2024-6387) (regreSSHion) | Google Container OS |
| 161766 | Oracle Enterprise Linux Security Update for openssh (ELSA-2024-12468) (regreSSHion) | Oracle Enterprise |
| 691562 | Free Berkeley Software Distribution (FreeBSD) Security Update for openssh (f1a00122-3797-11ef-b611-84a93843eb75) (regreSSHion) | Free Berkeley |
| 200455 | Debian/Ubuntu Notification for OpenSSH Vulnerability (USN-6859-1) (regreSSHion) | Debian/Ubuntu |
| 6007430 | Debian 11 Security Update for openssh (CVE-2024-6387) (regreSSHion) | Debian 11 Security |
| 6007429 | Debian/Ubuntu Update for openssh (DSA 5724-1) (regreSSHion) | Debian/Ubuntu |
| 42046 | OpenSSH Remote Unauthenticated Code Execution Vulnerability (regreSSHion) | OS agnostic |
| 243964 | Red Hat Update for openssh (RHSA-2024:4312) | Red Hat |
It is recommended that Qualys customers use OS-specific QIDs to scan for backported packages on supported Linux distributions.
Please check the Qualys Vulnerability Knowledgebase for the full list of coverage for this vulnerability.
The initial and crucial step in managing this critical vulnerability and mitigating associated risks involves pinpointing all assets susceptible to this specific issue. Use CSAM 3.0 with External Attack Surface Management to identify your organization’s internet-facing instances that have vulnerable versions of OpenSSH or are at their End of Life (EOL) or End of Support (EOS).
Identify internet-facing instances with vulnerable versions of OpenSSH
In the following example, we aim to identify all assets running the OpenSSH:

Qualys VMDR offers comprehensive coverage and visibility into vulnerabilities, empowering organizations to rapidly respond to, prioritize, and mitigate the associated risks. Additionally, Qualys customers can leverage Qualys Patch Management to remediate these vulnerabilities effectively.
Leverage the power of Qualys VMDR alongside TruRisk and the Qualys Query Language (QQL) to efficiently identify and prioritize vulnerable assets, effectively addressing the vulnerabilities highlighted above.
Try Qualys VMDR at no cost for 30 days
Use this QQL statement:
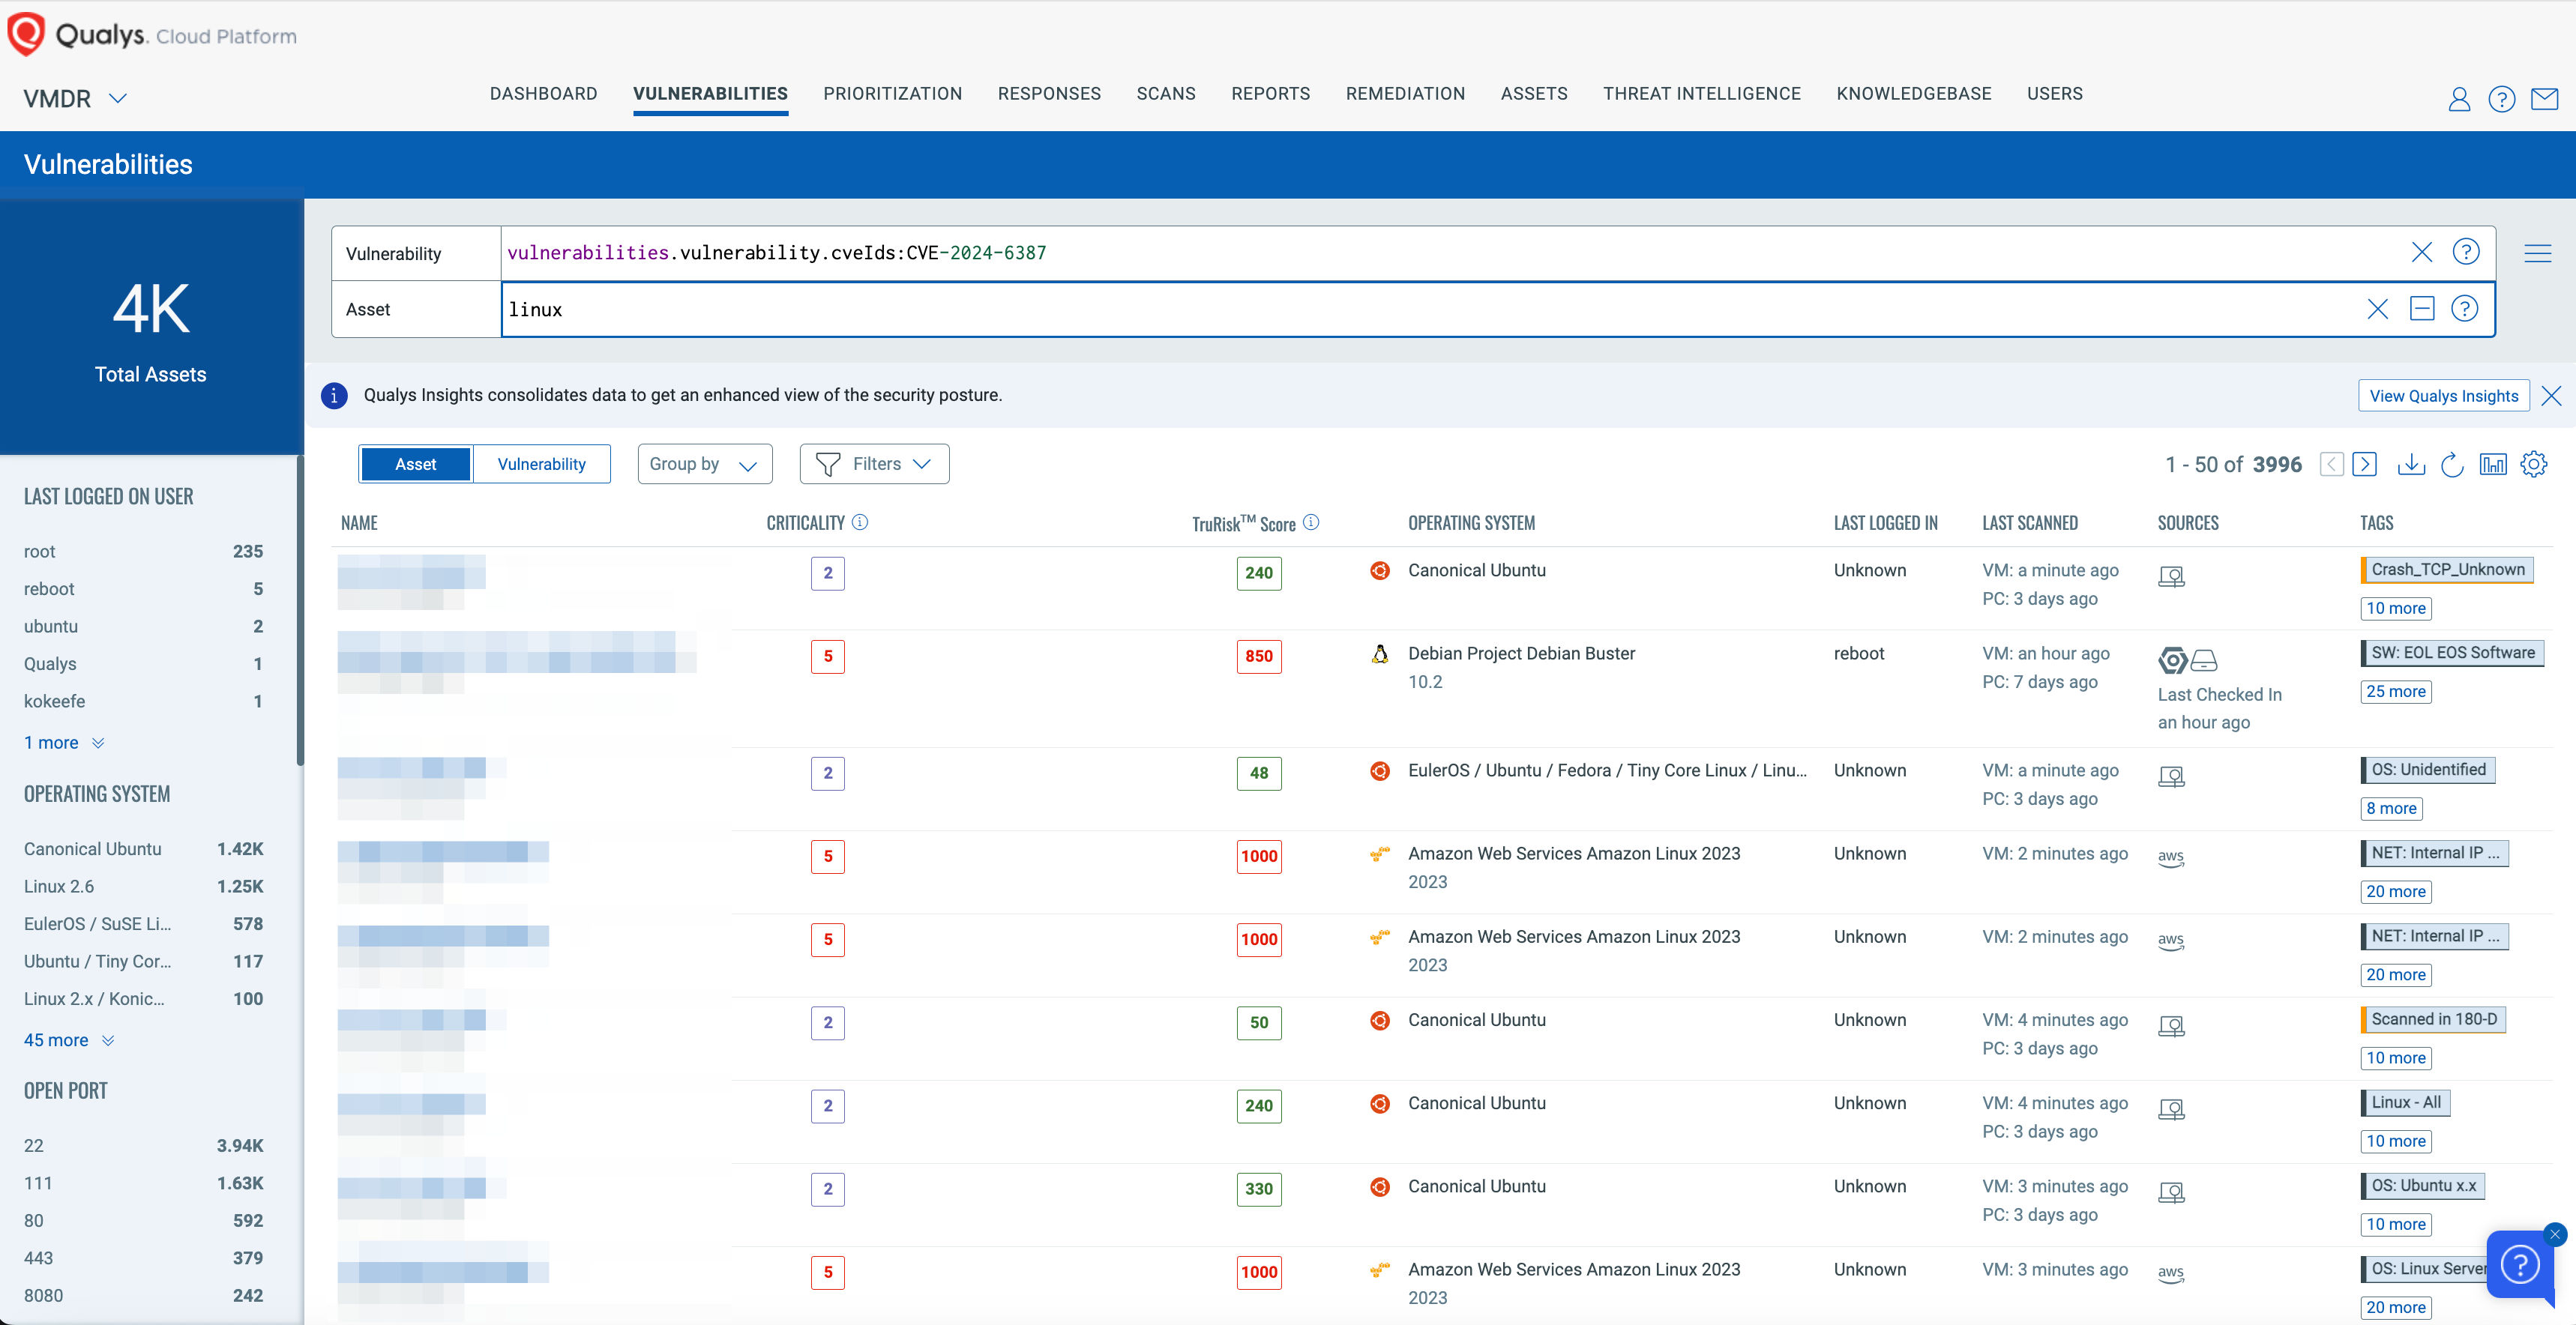
Gain exposure visibility and remediation tracking with the “regreSSHion” Unified Dashboard
With the Qualys Unified Dashboard, you can track the vulnerability exposure within your organization and view your impacted hosts, their status, distribution across environments, and overall management in real time, allowing you to see your mean time to remediation (MTTR).

To make it easier for customers to track and manage regreSSHion vulnerability in their subscriptions, we have created the Manage regreSSHion dashboard , which you can download and import into your subscription.
Automatically Patch “regreSSHion” vulnerability With Qualys Patch Management
We expect vendors to release patches for this vulnerability shortly. Qualys Patch Management can automatically deploy those patches to vulnerable assets, when available.
Customers can use the “patch now” button found to the right of the vulnerability to add regreSSHion to a patch job. Once patches are released, Qualys will find the relevant patches for this vulnerability and automatically add those patches to a patch job. This will allow customers to deploy those patches to vulnerable devices, all from the Qualys Cloud Platform.
Qualys Patch Management No-Cost 45-Day Trial
Qualys TotalCloud Container Security offers comprehensive coverage and visibility into vulnerabilities across all your container environments, including managed Kubernetes and on-premises Kubernetes. This empowers organizations to rapidly respond to, prioritize, and mitigate associated risks effectively.
Leverage the power of Qualys TotalCloud Container Security and the Qualys Query Language (QQL) to efficiently identify and prioritize vulnerable assets, ensuring prompt and effective remediation of the vulnerabilities highlighted by CVE-2024-6387.
Qualys is cutting the release cycle short for certain products that are deployed on customer premises. At least one of those products depends on a supplier that will publish a fix release shortly. We intend to release fixes for this Severity HIGH CVE in the coming days to ensure that customers are safe from regreSSHion. Once builds have cleared Quality Assurance, we will provide updates to help customers patch.
Will the Qualys Research Team publish exploit code or include proof-of-concept code for this vulnerability?
No, as part of our commitment to responsible disclosure and maintaining high-security standards, we will not publish exploit codes. Given the complexity of this vulnerability, it is crucial to allow organizations to apply patches effectively without the immediate pressure of public exploits.
Are there any mitigations for this vulnerability?
If sshd can’t be updated or recompiled, set LoginGraceTime to 0 in the config file. This exposes sshd to a denial of service by using up all MaxStartups connections, but it prevents the remote code execution risk.
Using the following Qualys Policy Compliance (PC) Control, you can evaluate whether the suggested mitigation has been applied to the affected assets.

To execute this evaluation, enable your free trial of Policy Compliance – https://www.qualys.com/forms/policy-compliance/
Using Qualys Custom Assessment and Remediation (CAR), you can easily apply this mitigation across affected assets in one go. Just follow these easy steps:
1. Go to CAR Library, look for Zero Day Utilities, and import the mitigation script.
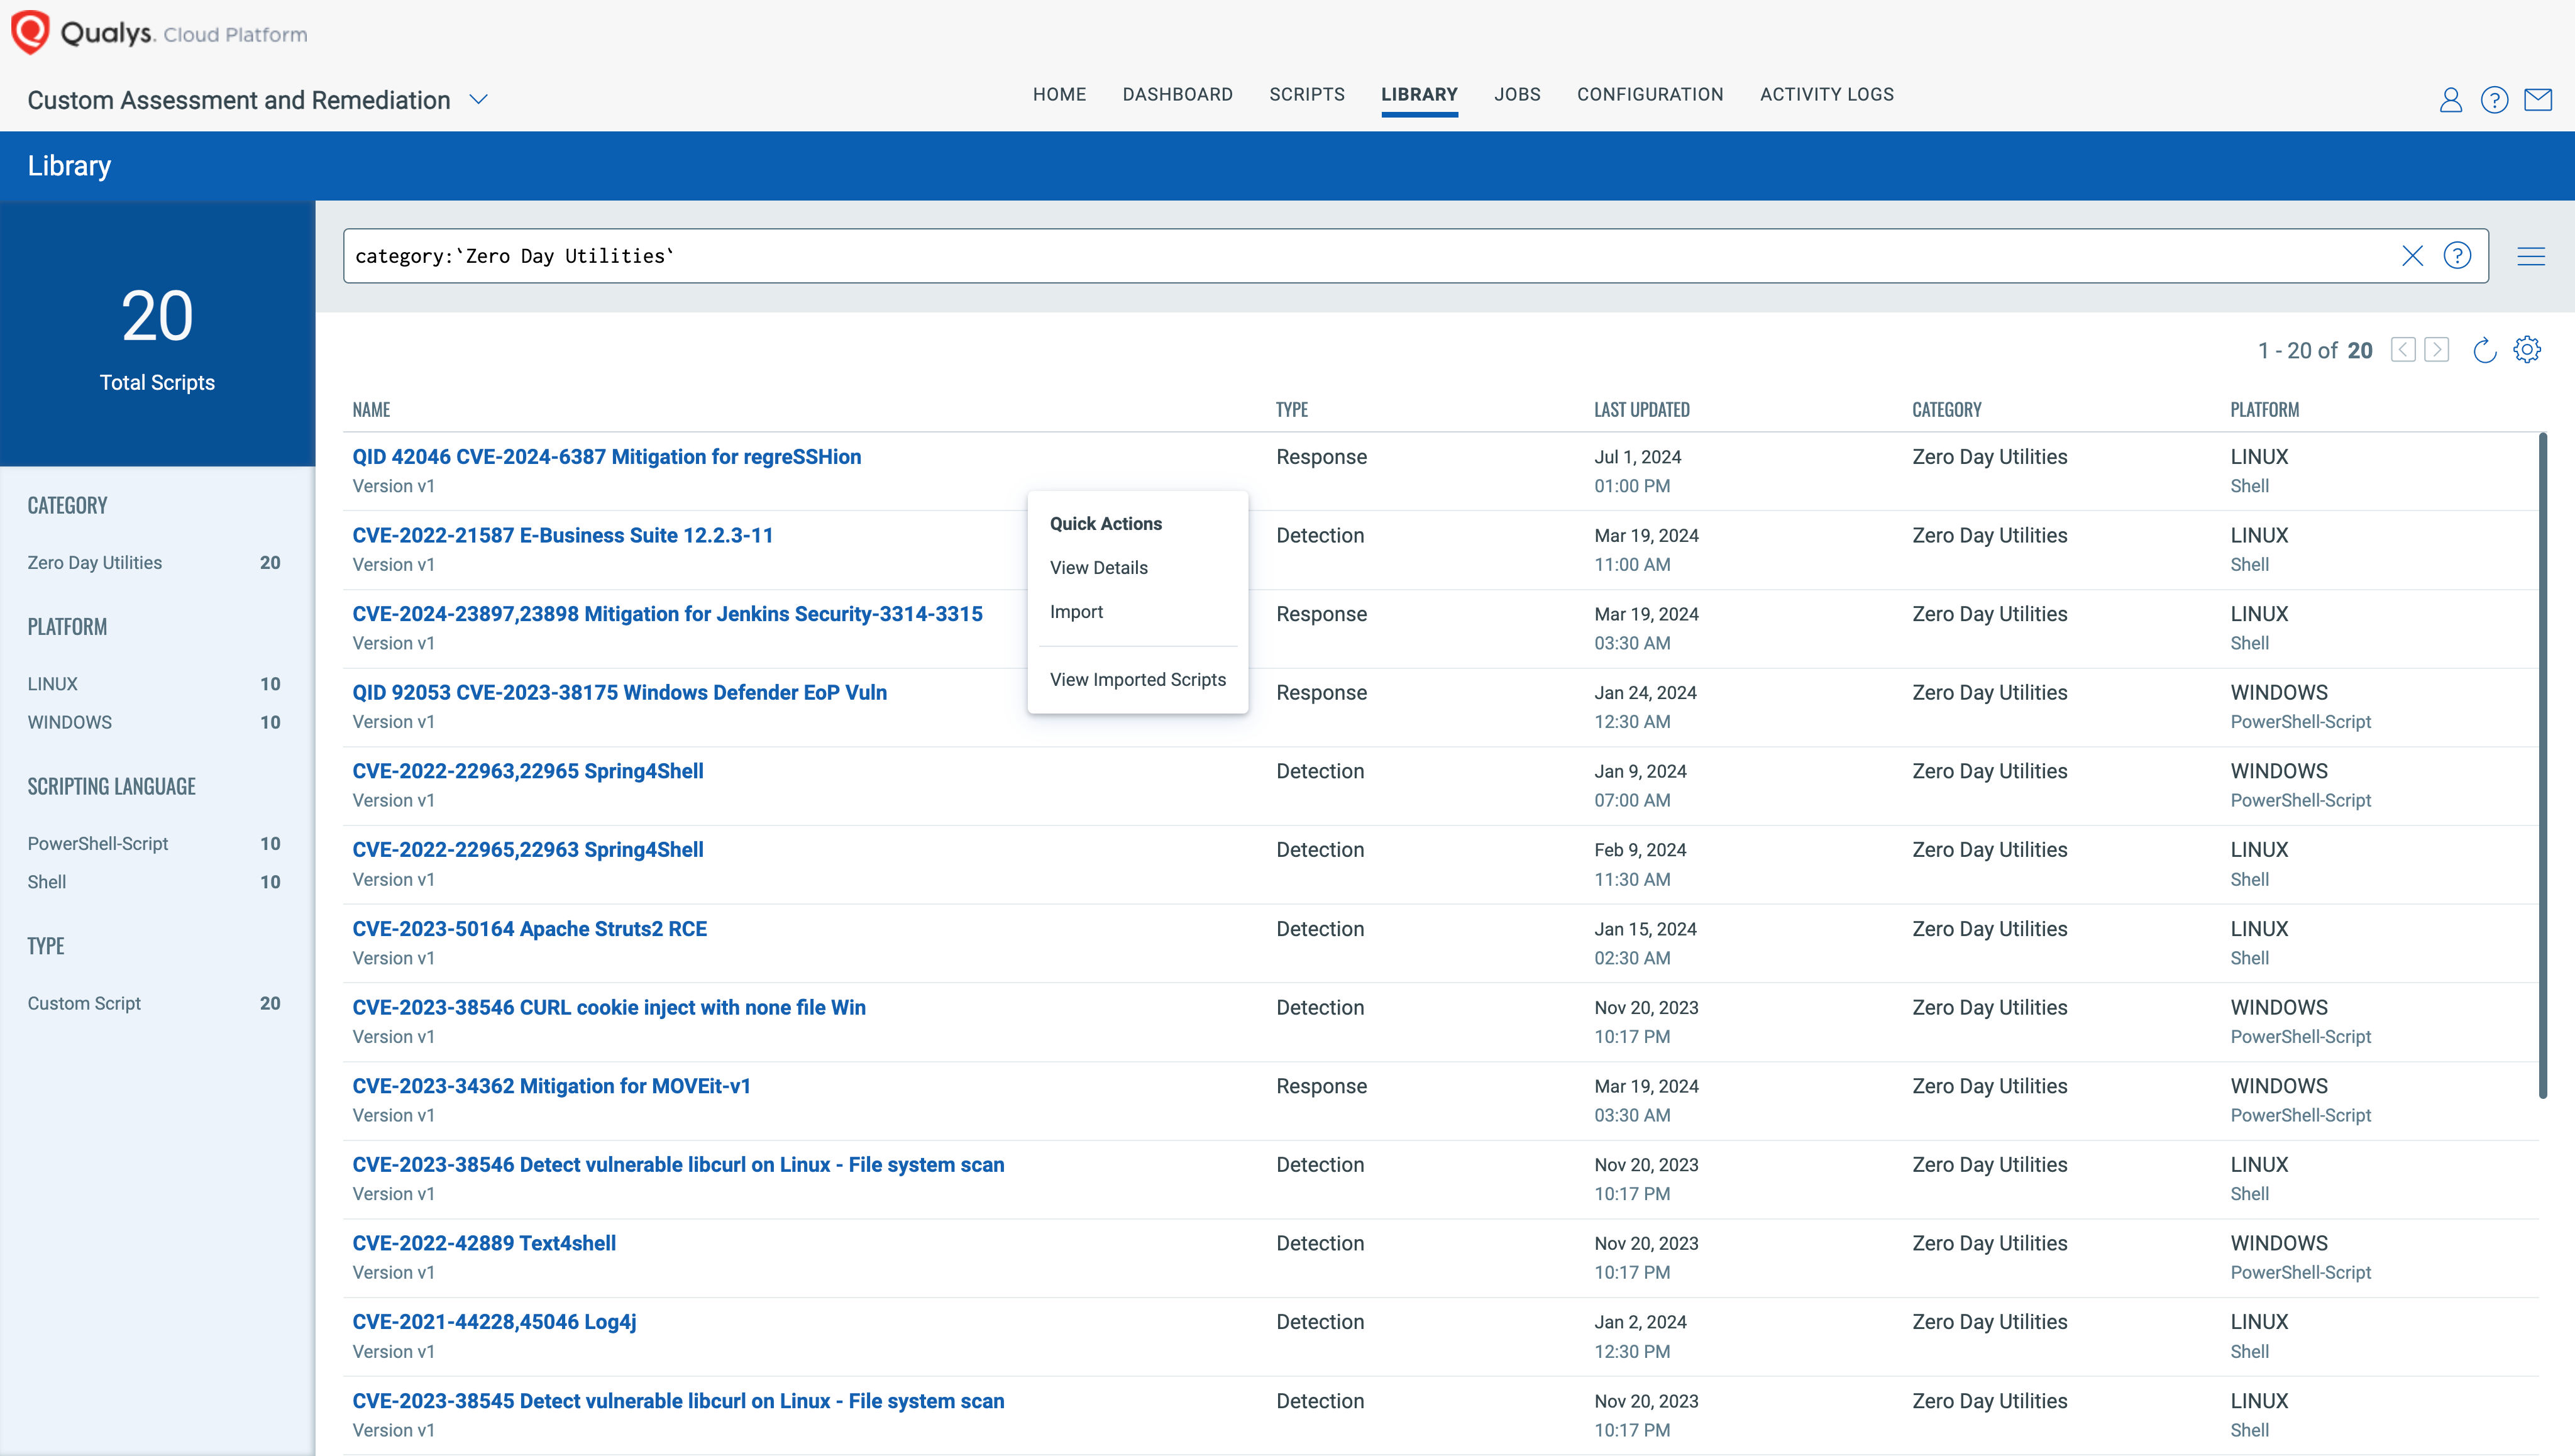
2. You can approve while importing or later on.
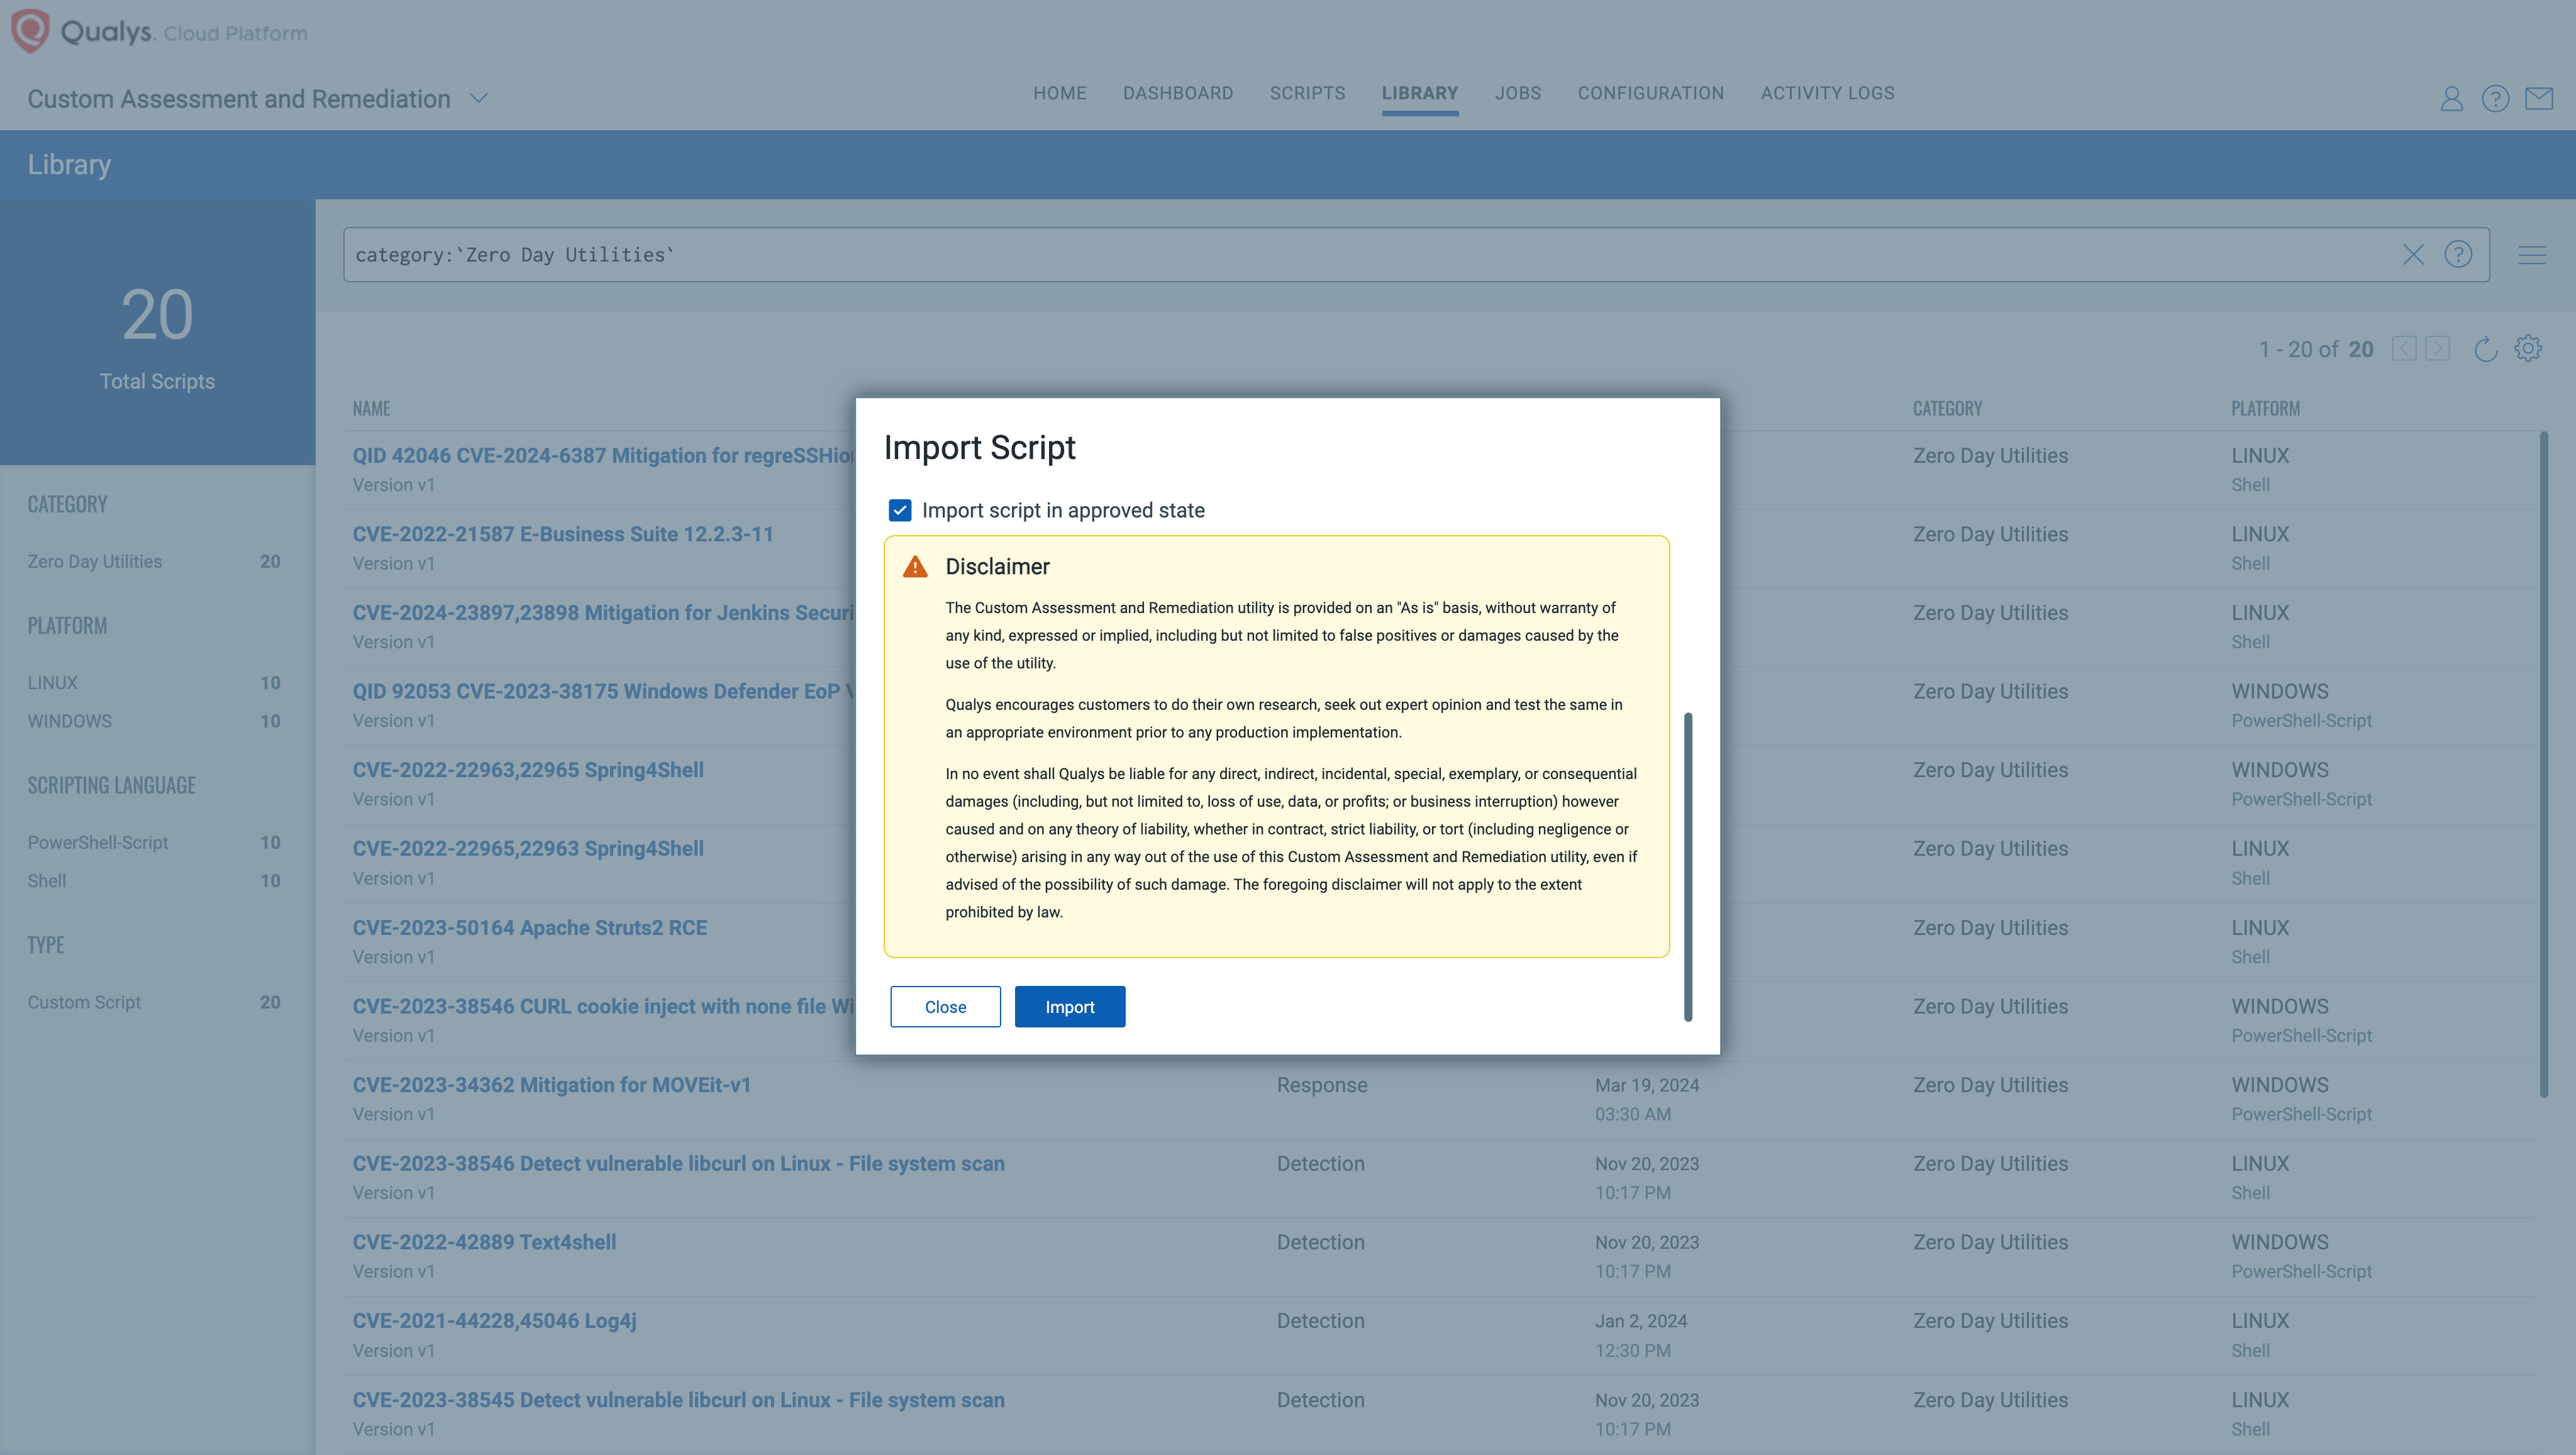
3. Execute it across required assets/asset tags.

To execute this mitigation, enable your free trial of CAR – https://www.qualys.com/forms/custom-assessment-remediation/
Is this vulnerability remotely exploitable?
Yes, this vulnerability can be exploited remotely and allows unauthenticated remote code execution (RCE) as root, posing a significant security risk.
Why is the vulnerability named “regreSSHion”?
This is a pun/reference to this being a regression bug affecting OpenSSH.
Should organizations patch these vulnerabilities urgently?
Yes, we would encourage organizations to patch this vulnerability urgently, especially on their internet-facing assets.
How will the new security fix be implemented for different versions?
This fix is part of a major update, making it challenging to backport. Consequently, users will have two update options: upgrading to the latest version released on Monday, July 1st (9.8p1) or applying a fix to older versions as outlined in the advisory, which is the approach most vendors will take.
Does this vulnerability affect macOS or Windows?
Per Microsoft Security Update Guide and our research team’s discussion with Microsoft, we have concluded that Windows installations are not vulnerable.
The regreSSHion vulnerability is applicable macOS platforms; however, its exploitability on these platforms remains uncertain. Further analysis is required to determine the specific impact.
How can users identify exploitation attempts of this vulnerability?
Exploitation attempts for this vulnerability can be identified by seeing many many lines of “Timeout before authentication” in the logs.
What is the exposure to Qualys infrastructure?
The Qualys security team has taken immediate steps to protect our corporate infrastructure and products from any impact regarding the exploitation of this vulnerability. At this time, we have not experienced any negative impacts or detected any exploitation attempts. In addition, the Qualys security team has implemented enhanced monitoring and response plans to detect and respond to future exploit attempts. Emergency patching procedures have been initiated to fully remediate the vulnerability. To further help the broader security community, we are sharing our detection logic (see FAQ: “How to identify exploitation attempts of this vulnerability?”) to help customers respond should attacks occur before patching and mitigation efforts are completed.
How can users identify systems vulnerable to the OpenSSH regreSSHion vulnerability?
Users can determine if their systems are vulnerable by verifying the version of the OpenSSH server installed. Systems running affected versions should be considered at risk and prioritized for updates.
Under what circumstances might QID 42046 fail to report accurately?
Accurate detection with QID 42046 requires root privileges, as the command used only runs with root access.
Why is a QID categorized as a confirmed or potential vulnerability?
A QID is reported as confirmed in authenticated scan results because these scans can access detailed information that verifies the vulnerability more reliably. On the other hand, remote unauthenticated scans categorize a QID as potential because they primarily depend on the information presented by the OpenSSH service banner. This banner might display a partial version of details, leading to less definitive conclusions about the presence of a vulnerability.
When will the Qualys Detection Score (QDS) be updated?
As the vulnerability begins to trend across various threat intelligence sources, our QDS will utilize these intelligent feeds for dynamic updates. We expect its effectiveness to reach a score of 90 or above.
Has the threat feed been updated to include the regreSSHion vulnerability?
Yes, the Qualys threat feed is updated when emerging threats are tracked and reported from the dark web and other sources. The update activates as soon as a vulnerability trends across various threat intelligence platforms.
Comments Cancel reply
Your email address will not be published. Required fields are marked *
Save my name, email, and website in this browser for the next time I comment.
No record found for this QID or CVE in Qualys KB. Great job on reporting however the data set is not published.
“Immediate Steps to Mitigate Risk” there’s a config-based mitigation, this section is just marketing nonsense and it’s irresponsible of you to hide the actual immediate mitigation in the “technical details”
This website helped me to learn about Remote Unauthenticated Code Execution Vulnerability in the OpenSSH server. It made it easy to work on the OpenSSH server.
What should be done for the windows servers marked with active for CVE-2024-6387? The 9.8 patch exists for windows also?
Microsoft seemingly backtracks on a controversial move to keep Windows 11 users stuck with their Microsoft Account
Official guide to switching from a Microsoft Account to a local one is back online

Microsoft has resurrected its instructions for Windows 11 (or 10) users who want to switch from a Microsoft Account login to a local account, after recently ditching this guide.
If you’ve not been following this somewhat odd chain of events – which would hardly be surprising – to get you up to speed, Microsoft has a couple of guides relating to Windows 11 and Windows 10 logins. One of them details how to switch from a local account to a Microsoft Account, and the other shows you how to transition the other way, from a Microsoft Account login to a local account.
In June, however, Microsoft dropped the guide on how to revert from a Microsoft Account to a local one. Why? Well, that’s a good question, and one we’ll come back to later.
Whatever the case, there were a number of Windows users who weren’t happy with this development, and how it seemed to fit in with the software giant’s agenda to push more people to use a Microsoft Account.
As Tom’s Hardware reports, though, the guide for changing back to a local account in Windows 11 (or 10) has now been reinstated (in this support document , if you scroll down to the bottom).
So, that’s obviously good news, and Tom’s further noticed that an addition has been made in the form of a new ‘password reset disk’ guide, an extra piece of advice for users who are reverting to a local account.
This is important because if you forget your password for a local account, there’s no way to access help (an online reset, as there is with a Microsoft Account). You’re up the local creek without a password paddle, in short. However, if you have a password reset disk, as you might guess, this helps you extricate yourself from that messy situation with a local account, facilitating a reset.
Get daily insight, inspiration and deals in your inbox
Sign up for breaking news, reviews, opinion, top tech deals, and more.
Check out this secondary guide here and bear in mind you’ll need a USB stick to use as the reset drive. Make sure you keep that USB drive in a safe place, of course, after you’ve created a reset disk on it – and we’d even advise creating a second copy on another USB drive to be extra safe (in case the first drive fails when it comes to the crunch).

Analysis: What was Microsoft thinking here?
As noted, the consternation around Microsoft’s decision to ditch the local account guide – temporarily – mainly revolved around bad feelings that the company was just trying on another measure to stoke Microsoft Account usage (or to keep Windows 11 users on their account login, more to the point).
Is that fair, though? Well, it’s understandable, certainly, given that over the past year or two, Microsoft has definitely cranked up its promotional efforts – some of which are outright ads, let’s be honest – around using a Microsoft Account. ( The latest move being to jam a thinly veiled advert into the Start menu, sadly ). Furthermore, Microsoft has been closing loopholes that allow folks to keep a local account when installing Windows 11, too .
However, could there be a genuine reason Microsoft pulled the guide – maybe to rewrite it with the added info on password recovery? Well, you could argue that, perhaps, but was there any need to completely take the guide down (after it’s been up for several years) to do that?
It’s stretching things, let’s be honest, but we guess the possibility can’t be ruled out. However, for us it feels inescapably like Microsoft got rid of the guide because it doesn’t think switching away from a Microsoft Account is a good idea – due to the benefits of the latter – then put it back up after the complaints and general outcry from some quarters of the Windows computing public.
Don’t get us wrong: there are indeed benefits to be gained from using a Microsoft Account, as the company keeps banging on about. But therein lies the problem – in the same way that Edge is actually a good web browser , but is constantly promoted in various over-the-top ways, having these products and services shoved in our face repeatedly simply makes us want to rebel and not use them out of principle. One day, perhaps, Microsoft finally will get that.
You might also like...
- Well done Microsoft, you’ve made me hate Windows 11 with your pushy ads
- How to set up your new Windows 11 laptop
- Windows 11 remains an unloved OS – but why won't people upgrade?
Darren is a freelancer writing news and features for TechRadar (and occasionally T3) across a broad range of computing topics including CPUs, GPUs, various other hardware, VPNs, antivirus and more. He has written about tech for the best part of three decades, and writes books in his spare time (his debut novel - 'I Know What You Did Last Supper' - was published by Hachette UK in 2013).
Windows 11 Start menu could get better if Microsoft pushes forward with this nifty change that’s currently in testing
Windows 11 is getting useful widget tweaks, but not the change we really want – Microsoft should learn from macOS
Zoho Mail business review
Most Popular
- 2 Best Buy's massive weekend sale is live: 32 deals I'd buy on TVs, laptops, and appliances
- 3 AMD just unleashed FSR 3.1 – and it’s a great day for PC gamers no matter what brand of graphics card they own
- 4 Early 4th of July deal drops LG's all-new C4 OLED TV to a new record-low price
- 5 Everything new on Max in July 2024
- 2 Geekom launches yet another mini PC that makes it a little bit more difficult to justify buying a traditional desktop PC — AX8 Pro looks like Intel's legendary NUC but with an unbelievably low price tag
- 3 Microsoft pauses Windows 11 update as it’s sending some PCs into an infinite reboot hell
- 4 Netflix in 2024: the 9 most unmissable shows so far and what’s coming next
- 5 This One Million Checkbox game is sparking an internet war – and it's taken hours of our life we'll never get back
This browser is no longer supported.
Upgrade to Microsoft Edge to take advantage of the latest features, security updates, and technical support.
AssignedAccess CSP
- 24 contributors
The AssignedAccess configuration service provider (CSP) is used to configure a kiosk or restricted user experience. Once the CSP is executed, the next user login that is associated with the Assigned Access profile puts the device into the kiosk mode specified in the CSP configuration.
To learn more about how to configure Assigned Access, see Configure kiosks and restricted user experiences .
The following list shows the AssignedAccess configuration service provider nodes:
Configuration
Kioskmodeapp, shelllauncher, statusconfiguration.
| Scope | Editions | Applicable OS |
|---|---|---|
| ✅ Device ❌ User | ✅ Pro ✅ Enterprise ✅ Education ✅ Windows SE ✅ IoT Enterprise / IoT Enterprise LTSC | ✅ Windows 10, version 1709 [10.0.16299] and later |
This node accepts an AssignedAccessConfiguration xml as input.
To learn how to configure xml file, see Create an Assigned Access configuration XML file
Description framework properties :
| Property name | Property value |
|---|---|
| Format | (string) |
| Access Type | Add, Delete, Get, Replace |
Get Configuration
Delete Configuration
This policy is deprecated and may be removed in a future release.
| Scope | Editions | Applicable OS |
|---|---|---|
| ✅ Device ❌ User | ✅ Pro ✅ Enterprise ✅ Education ✅ Windows SE ✅ IoT Enterprise / IoT Enterprise LTSC | ✅ Windows 10, version 1507 [10.0.10240] and later |
This node can accept and return json string which comprises of account name, and AUMID for Kiosk mode app.
Example: {"User":"domain\\user", "AUMID":"Microsoft. WindowsCalculator_8wekyb3d8bbwe!App"} .
When configuring kiosk mode app, account name will be used to find the target user. Account name includes domain name and user name. Domain name can be optional if user name is unique across the system. For a local account, domain name should be machine name. When "Get" is executed on this node, domain name is always returned in the output.
This node supports Add, Delete, Replace and Get methods. When there's no configuration, "Get" and "Delete" methods fail. When there's already a configuration for kiosk mode app, "Add" method fails. The data pattern for "Add" and "Replace" is the same.
In the above example the double \\ is required because it's in JSON and JSON escapes \\ into \ . If an MDM server uses JSON parser\composer, they should ask customers to type only one \ , which will be \\ in the JSON. If user types \\ , it'll become \\\\ in JSON, which will cause erroneous results. For the same reason, domain\user used in Configuration xml does not need \\ but only one \ , because xml does not (need to) escape \ .
This applies to both domain\user , AzureAD\[email protected] , as long as a \ is used in JSON string.
For more information about how to get the AUMID, see Find the Application User Model ID of an installed app .
- In Windows 10, version 1803, the Configuration node introduced single app kiosk profile to replace KioskModeApp CSP node. KioskModeApp node will be deprecated soon, so you should use the single app kiosk profile in configuration xml for Configuration node to configure public-facing single app Kiosk.
- Additionally, starting in Windows 10, version 1803, the KioskModeApp node becomes No-Op if Configuration node is configured on the device. Add/Replace/Delete commands on KioskModeApp node always returns SUCCESS to the MDM server if Configuration node is set, but the data of KioskModeApp will not take any effect on the device. Get command on KioskModeApp will return the configured JSON string even it's not effective.
- You can't set both KioskModeApp and ShellLauncher at the same time on the device.
Add KioskModeApp
Delete KioskModeApp
Get KioskModeApp
Replace KioskModeApp
| Scope | Editions | Applicable OS |
|---|---|---|
| ✅ Device ❌ User | ❌ Pro ✅ Enterprise ✅ Education ❌ Windows SE ✅ IoT Enterprise / IoT Enterprise LTSC | ✅ Windows 10, version 1803 [10.0.17134] and later |
This node accepts a ShellLauncherConfiguration xml as input.
To learn about Shell Launcher, see What is Shell Launcher? .
You can't set both ShellLauncher and KioskModeApp at the same time on the device.
Configuring Shell Launcher using the ShellLauncher node automatically enables the Shell Launcher feature, if it is available within the SKU.
Shell Launcher as a feature and the ShellLauncher node both require Windows Enterprise or Windows Education to function. The ShellLauncher node is not supported in Windows 10 Pro.
Here's the Shell Launcher XSD reference article: Shell Launcher XML Schema Definition (XSD) .
| Scope | Editions | Applicable OS |
|---|---|---|
| ✅ Device ❌ User | ✅ Pro ✅ Enterprise ✅ Education ✅ Windows SE ✅ IoT Enterprise / IoT Enterprise LTSC | ✅ Windows 10, version 1803 [10.0.17134] and later |
This read only node contains kiosk health event xml.
This allows MDM server to query the current KioskModeAppRuntimeStatus as long as the StatusConfiguration node is set to "On" or "OnWithAlerts". If the StatusConfiguration is "Off", a "node not found" error will be reported to the MDM server.
Starting in Windows 10, version 1809 , Assigned Access runtime status supports monitoring single-app kiosk and multi-app modes. Here are the possible status codes:
| Status Code | Status | Description |
|---|---|---|
| 0 | Unknown | Unknown status. |
| 1 | Running | The AssignedAccess account (kiosk or multi-app) is running normally. |
| 2 | AppNotFound | The kiosk app isn't deployed to the machine. |
| 3 | ActivationFailed | The AssignedAccess account (kiosk or multi-app) failed to sign in. |
| 4 | AppNoResponse | The kiosk app launched successfully but is now unresponsive. |
Additionally, the Status payload includes the following fields:
- profileId: It can be used by the MDM server to correlate which account caused the error.
- OperationList: It gives the list of failed operations that occurred while applying the assigned access CSP, if any exist.
| Property name | Property value |
|---|---|
| Format | (string) |
| Access Type | Get |
AssignedAccessAlert XSD :
This node accepts a StatusConfiguration xml as input.
There are three possible values for StatusEnabled node inside StatusConfiguration xml:
- OnWithAlerts
By default, the StatusConfiguration node doesn't exist, and it implies this feature is off. Once enabled via CSP, Assigned Access will check kiosk app status and wait for MDM server to query the latest status from the Status node. Optionally, the MDM server can opt in to the MDM alert so that an MDM alert will be generated and sent immediately to the MDM server when the assigned access runtime status is changed. This MDM alert will contain the status payload that is available via the Status node. This MDM alert header is defined as follows:
- MDMAlertMark: Critical
- MDMAlertType: com.microsoft.mdm.assignedaccess.status
- MDMAlertDataType: string
- Source: ./Vendor/MSFT/AssignedAccess
- Target: N/A
MDM alert are only sent for errors.
StatusConfiguration XSD :
Add StatusConfiguration with StatusEnabled set to OnWithAlerts
Delete StatusConfiguration
Get StatusConfiguration
Replace StatusEnabled value with On
AssignedAccessConfiguration XSD
Here's the Assigned Access XSD reference article: Assigned Access XML Schema Definition (XSD) .
For practical examples of Assigned Access configuration files, see Assigned Access examples .
Handling XML in Configuration
XML encoding (escaped) and CDATA of the XML in the Data node will both ensure that DM client can properly interpret the SyncML and send the configuration xml as string (in original format, unescaped) to AssignedAccess CSP to handle.
Similarly, the StartLayout xml inside the configuration xml is using the same format, xml inside xml as string. In the sample Configuration xml provided above, CDATA is used to embed the StartLayout xml. If you use CDATA to embed configuration xml in SyncML as well, you have nested CDATA, so pay attention to how CDATA is used in the provided CDATA sample. With that being said, when the Configuration xml is being constructed, MDM server can either escape start layout xml or put startlayout xml inside CDATA, when MDM server puts configuration xml inside SyncML, MDM server can also either escape it or wrap with CDATA.
Escape and CDATA are mechanisms used when handling xml in xml. Consider that it's a transportation channel to send the configuration xml as payload from server to client. It's transparent to both, the end user who configures the CSP and to our CSP. Both the customer on the server side and our CSP must only see the original configuration XML.
This example shows escaped XML of the Data node.
This example shows CData for the XML.
Related articles
Configuration service provider reference
Was this page helpful?
Coming soon: Throughout 2024 we will be phasing out GitHub Issues as the feedback mechanism for content and replacing it with a new feedback system. For more information see: https://aka.ms/ContentUserFeedback .
Submit and view feedback for
Additional resources
IMAGES
VIDEO
COMMENTS
Assigned Access is a Windows feature that lets you lock down a device to run a single app or a list of apps. Learn how to use PowerShell, Settings, or CSP to configure a kiosk or a restricted user experience for Windows 11 or 10.
This quickstart provides practical examples of how to configure a kiosk experience on Windows with Assigned Access. The examples describe the steps using the Settings app, a mobile device management solution (MDM) like Microsoft Intune, provisioning packages (PPKG), and PowerShell. While different solutions are used, the configuration settings and results are the same.
You can securely set up Windows 11/10 Pro, Enterprise, Education as a Kiosk device, to run a single Universal Windows app using Assigned Access feature.
Windows 11 multi-app kiosk mode desktop, showing 3 allowed apps: Edge browser, Calculator, and File Explorer. Multi-app kiosk accounts leverage the new Windows 11 desktop UI, with only the pre-selected apps available to access. Access to restricted areas through context menus, system tray icons and notification bar are blocked as well.
This article contains recommendations for devices configured with Assigned Access and Shell Launcher. Most of the recommendations include both group policy (GPO) and configuration service provider (CSP) settings to help you configure your kiosk devices.
Learn how to use Microsoft Intune to configure multi-app kiosk mode on Windows 11 devices, which relies on assigned access to run one or more apps from the desktop. Follow the steps to create a custom profile with a XML-file and apply it via the AssignedAccess CSP.
If you need to set up a kiosk device for the organization, event, or home, in this guide, we'll show you how on Windows 11.
Kiosk mode is a feature that restricts users to run only one or more specific applications on a Windows device. Learn how to set up and use kiosk mode on Windows 11, and how to make it more secure and customized.
Learn how to use Assigned Access feature to run a single app above the lock screen in Windows 11 Pro, Enterprise, and Education editions. See step-by-step instructions, screenshots, and tips for kiosk mode settings and options.
Windows is a strong choice for kiosk devices due to the various endpoints the OS can run on. Explore four ways of setting up Windows 11 kiosk mode.
Here in this article. you will find out how to set up kiosk in Windows 11 on the desktop versions of Windows 10 and Windows 11,
This article provides a guide on how to set up a single-app kiosk system on Windows 11 using the Assigned Access feature. The process requires turning on user account control (UAC) and using a non-…
This tutorial will show you how to change the kiosk app in Windows 11 Pro, Enterprise, and Education editions. A single-app kiosk uses the Assigned Access feature to run a single app above the lock screen. When the kiosk account signs in, the app is launched automatically. The person using the...
Assigned Access allows you to easily lock a Windows PC to a single application of your choice. This feature makes it easy for anyone to configure Windows 10 (or Windows 8.1) PCs as point-of-sale or other kiosk systems.
Learn how to configure kiosk mode in Windows 11 to run a single app exclusively on a user account. Find out the limitations, steps, and tips for setting up and customizing kiosk mode.
In this article. To configure Assigned Access, you must create and apply a configuration XML file to your devices. The configuration file must conform to a schema, as defined in Assigned Access XML Schema Definition (XSD). This article describes how to configure an Assigned Access configuration file, including practical examples.
Hey guys, so currently as this article states, kiosk multi app mode in Intune for windows 11 is on the roadmap, but there is no ETA, when it comes..
How to use Assigned access in Windows 10. Step 1 - First of all create a Local / guest account. Step 2 - Now, open settings control panel. For opening settings control panel, either press windows key + i or click start key and then click settings. Step 3 - Now, in right sidebar, click on Family & Other users.
Like most enterprises, we're going to move to Windows 11 at some point. We will be replacing our existing public facing computers, POS terminals etc with kiosks and I've done thorough testing and I'm getting stuck with the account not logging in
Set up Assigned Access MISSING. I want to restrict the apps another user account can access, people say you have to go to Settings > Accounts > Family and other people > Set up assigned access. BUT THIS BUTTON ISN'T THERE!
Microsoft wants you to use a Microsoft account on Windows 11, but it accidentally listed several benefits of using a local account instead.
If you see Access is denied while changing the status of a Service in Windows 11/10, then these suggestions may help you resolve the problem.
Learn how to configure a restricted user experience with Assigned Access using the Assigned Access configuration service provider (CSP), Microsoft Intune, PowerShell, or group policy (GPO).
Microsoft has changed how the default printer is assigned in Windows 10 and 11. Windows now always sets the default printer to the last printer the user successfully printed to in the current location.
This article contains examples of XML files to configure a device with Assigned Access. The files can be easily modified to fit your specific needs.
If everything else is in working order and you're still getting an "Access Denied" error, Windows likely thinks you don't have the necessary permissions for the file or folder in question.
CVE assigned to this vulnerability is CVE-2024-6387. The vulnerability, which is a signal handler race condition in OpenSSH's server (sshd), allows unauthenticated remote code execution (RCE) as root on glibc-based Linux systems; that presents a significant security risk.
Microsoft has resurrected its instructions for Windows 11 (or 10) users who want to switch from a Microsoft Account login to a local account, after recently ditching this guide. If you've not ...
The AssignedAccess configuration service provider (CSP) is used to configure a kiosk or restricted user experience. Once the CSP is executed, the next user login that is associated with the Assigned Access profile puts the device into the kiosk mode specified in the CSP configuration. To learn more about how to configure Assigned Access, see ...