The Ultimate AWS Cost and Usage Report (CUR) Guide
Alexander Yu
28 May, 2023
20 mins read
AWS is big. So big, in fact, that it’s comprised of over 200 fully featured cloud services that could power just about any use case you could think of. With so many features and capabilities, it’s no wonder AWS is the most widely-adopted cloud provider today, claiming nearly a third of the total cloud market share .
Yet, it’s exactly the sheer amount of services and features that threatens to rear AWS’s ugly head. Because while your developers will have a field day working with this talented roster of technologies, your accountants might be left scratching their heads at the one thing AWS makes particularly difficult to track across 200+ services– costs .
Let’s sympathize with your financial team for a bit. You might think it’d be easy for them to answer questions like:
- Which Lambda functions belong to team Foo, and how much did those functions cost the company last month?
- There was a load test done last week by team Bar to prepare for an upcoming feature launch. How much did that load test cost, broken down by each component?
- Last month, team Bar decided to switch all of their DynamoDB tables from provisioned capacity mode to on-demand. How much money did this save per table?
In a perfect cloud, yes, it should be easy to answer these questions precisely. Unfortunately, without the proper setup, it can be incredibly difficult even knowing where to begin.
But there is good news. What if we told you AWS had a native, and best of all, free solution to help you understand every little detail about your costs? It’s called the AWS Cost & Usage Report, or CUR for short. This guide will cover everything you need to know about the CUR as well as its latest feature, AWS Data Exports.

What is the AWS Cost and Usage Report (CUR)?
The AWS Cost and Usage Report, or CUR for short, is exactly what it claims to be: a detailed report that breaks down all of the cost and usage metrics related to your account. More specifically, here are some key features of CUR:
- You can configure AWS Cost and Usage Reports to publish CSV report files to an Amazon S3 bucket.
- CUR can update your reports up to three times a day.
- You can choose to break down your costs by hour, day, or month.
- CUR also breaks down costs by service, resource, and user-defined tags.
- CUR integrates natively with Amazon Athena, Amazon Redshift, and Amazon QuickSight for data analytics.
The CUR is the single source of truth when it comes to billing. At the end of the month, the sum of all the costs in the CUR should add up perfectly to your monthly AWS bill. Additionally, if you’ve ever used AWS Cost Explorer , that service actually uses data from the CUR under the hood to generate those neat-looking visualizations.
Say Hello to a Sample CUR
So what does a sample CUR actually look like? Well, we’re glad you asked… or are we?
Here’s what you might see if you try to view the CUR using Excel or Numbers. Immediately, you’ll notice that the CUR is absolutely gigantic–you might even have trouble opening the file without Excel crashing. AWS Data Exports can somewhat mitigate this problem, but we’ll discuss that more in the next section.
For now, you might notice that some of the column names can seem very cryptic. To better understand the data that the CUR provides, you can refer to the data dictionary in the AWS documentation. For example, the dictionary lists bill/BillType as an enum with three possible values: Anniversary, Purchase, and Refund.
All this means is that data in the CUR is very comprehensive and customizable, which is definitely a huge plus. However, the CUR was never really designed to be consumed by humans. You’re much better off using a data analytics tool, and we’ll revisit this later in this article.
AWS Data Exports and the CUR 2.0
We’ve hinted at Data Exports a couple times already, so let’s put an end to the gatekeeping. What are they, and what’s all the buzz about?
To understand Data Exports, let’s first talk about the Cost and Usage Report (CUR) 2.0 . CUR 2.0 offers a more consistent and predictable schema, nested data for reduced data sparsity, and two additional columns to help with billing account identification. All newly-generated Cost and Usage Reports now use the CUR 2.0.
AWS Data Exports is a feature on top of the CUR 2.0 that allows users to export just the relevant billing and cost management data rows and columns that they want. This means that instead of having to consume the entire CUR, you can simply exclude any columns that you don’t need during CUR setup. If done right, this can significantly reduce the size of your CUR, help you customize your CUR to match any existing data pipelines you have, and save money on data storage costs. It’s a win-win-win.
So what does a Data Export look like compared to the CUR? Well, mostly the same, but this would depend on what columns you choose to include in your export. Let’s suppose you uncheck the `bill_invoice_id` column during setup:
If you open the corresponding export in Numbers or Excel, `bill_invoice_id` is nowhere to be found:
This illustrates the infinite power of Data Exports: use the column selection feature to your advantage. You can significantly cut down the size of your CUR if most of the columns aren’t useful to you.
Another important change you might have noticed is the reformatting of column names. For example, in the older version of the CUR, there was a column named `bill/BillingEntity`. This has been reformatted to `bill_billing_entity` in CUR 2.0-land.
Where Are AWS Cost and Usage Reports Stored?
CUR files live in S3. When you create a CUR, you must specify an S3 bucket as the destination. AWS can update your report up to three times a day. Here, “update” can either mean overwriting the previous report version, or delivering a new report in addition to previous versions. You can configure this during the CUR setup.
Are AWS Cost and Usage Reports Free?
Yes, the CUR is absolutely free, so you should definitely take advantage of it!
Why Should I Use the CUR?
There are many reasons to use the CUR (for starters, did we mention that it’s free?). Here are three of the most important ones:
- Cost and usage are difficult to see otherwise. AWS doesn’t give you many options when it comes to understanding costs. The Cost Explorer tool is great for getting a high-level overview of your costs, but anything more granular requires a more powerful tool like the CUR.
- The CUR lets you see what you’re spending in detail . Like we mentioned in the previous section, the CUR has a ton of columns. It can tell you everything you need to know about your spending broken down by service, resource, or any custom categorization method (using tags).
- Use the CUR alongside other AWS services to gain valuable insights . You can harness the full power of the CUR with services like Athena, Redshift, or QuickSight. This can help you detect things like cost anomalies and figure out how to optimize your AWS usage.
Common CUR Use Cases
The CUR is useful for everyone. However, you’ll have to customize how you use the CUR depending on the extent of your application, and the size of your team. Here are a few common CUR use cases:
- If you’re a solo hobbyist developer , the native CUR settings will probably suffice. While Cost Explorer allows you to see your costs broken down by service, you might use the CUR to get a more detailed breakdown of your costs by resource (i.e. specific DynamoDB tables or Lambda functions). Also, Cost Explorer only shows you up to 12 months of past usage data. Since CUR files are stored in S3 forever, this allows you to retain a full copy of your past cost history.
- If you’re a software team with multiple developers and services , you might capitalize on the more advanced capabilities in the CUR to leverage its full potential. For example, you could use tags to categorize your resources by the services that they are a part of. You can then use the CUR to understand the costs of each of your services, broken down by the resources that support it.
- If you’re on a contract with AWS for an AWS Savings Plan , you can use the CUR to track Savings Plan usage . You’ll get specific columns detailing things like your savings plan rate and effective cost.
How Do I Create an AWS Cost and Usage Report?
Alright, enough talk about benefits and use cases–hopefully by now, you’re sold. On to the fun part–setting up the CUR in your AWS account.
Who Can Create a CUR?
In AWS, permissions are always governed by IAM, and the CUR is no exception. Any IAM user with the `cur:PutReportDefinition`, `cur:DeleteReportDefinition`, or `cur:ModifyReportDefinition` has permissions to create, delete, or modify CUR files respectively. You can attach this IAM policy from the AWS documentation to any IAM user to grant them the necessary permissions.
Setting up the CUR – Step-By-Step
In the following procedure, we’ll walk through how to set up CUR files to be delivered to an S3 bucket in your account. The entire procedure is done from the AWS console.
1. Sign in to your AWS account, and navigate to the Billing and Cost Management console .
2. In the left menu bar, under Cost Analysis , select Data Exports (the legacy way to create a CUR can still be found under Legacy Pages , but we won’t be going over this older method).
3. Choose Create .
4. For Export type , choose Standard data export . We suggest this for just about all use cases, as it’s the most flexible option.
5. For Export name , enter a name for your report.
6. Under Data table content settings , make a few selections on what you want to include in your report. Here are some considerations to make:
- Under Additional export content , check the Include resource IDs box if you want information about your resource IDs in the report. This adds one more column to the CUR and can increase file size.
- Again under Additional export content , check the Split cost allocation data to include information about container-level costs and usage for ECS and EKS. This is a lot more granular than the default, which covers just instance-level costs. Checking this box adds 11 more columns to the output CUR and can greatly increase file size.
- For Time granularity , choose how you want your costs to be aggregated by: Hourly, Daily, or Monthly. For example, if you choose Hourly, you’ll only have one row for each line item per hour. We recommend choosing Hourly.
- For Column selection , uncheck any columns that you don’t want to include in the CUR. Luckily, the web interface provides a short description of each column next to its name, so use this to determine whether a column is worth keeping. If you’re unsure, we recommend keeping the column just in case.
7. Under Data export delivery options , choose the desired file format. If you intend to analyze your report in Athena, choose Parquet. Otherwise, choose gzip.
8. Also under Data export delivery options , choose the desired file versioning behavior. If you choose Overwrite existing data export file , AWS overwrites the previous CUR file with each update. If you choose Create new data export file , AWS will deliver a separate CUR on each update. We recommend choosing Create new data export file .
9. Under Data export storage settings , choose where you want AWS to store your reports in S3:
- For S3 bucket , choose Configure . In the pop-up menu, choose either an existing bucket or create a new bucket. If you choose an existing bucket, you’ll also need to check the box acknowledging that your S3 bucket policy will be overwritten. Choose Select bucket .
- For S3 path prefix , enter the report path prefix that will be prepended to the name of your report.
10. Choose Create . You’re done!
On the next screen, you should see a confirmation at the top. It’ll say that all you have to do now is twiddle your thumbs for up to 24 hours:
Soon enough, if you check your S3 bucket, you should see a sparkling new set of Data Export CUR files waiting for you (in the below screenshot, all Data Export files are under the data-exports prefix):
AWS Cost and Usage Reports vs. Data Exports
Data Exports are essentially the latest and greatest “version” of Cost and Usage Reports. You might also see Data Exports referred to as the “CUR 2.0”. However, to get technically precise, CUR 2.0 is the underlying table schema; Data Exports is a feature customers can use to create their own tables that use the CUR 2.0 schema.
Unlike older versions of the CUR, the biggest benefit of Data Exports is that you can select the columns appearing in your export. This can help you trim off any data you don’t need, and reduce the overall size of your CUR tables.
AWS Cost and Usage Reports vs. Cost Explorer
We’ve mentioned AWS Cost Explorer (CE) a number of times so far, so let’s discuss the similarities and differences between CE and the CUR.
Both CE and CUR are tools that help you understand spend and usage. However, you might call CE a “lightweight” tool and the CUR a “heavyweight” tool. This is because the CUR focuses a lot more on all the peculiar details of your billing. After all, data in the CUR is organized in many columns, and thus intended to be consumed by other “heavyweight” tools like Athena for analysis.
Cost Explorer is more high-level, and is more intended as a tool for visualizing your spend. If you like seeing cool graphs and charts and don’t need more advanced analysis that the CUR enables you to do, the CE is an excellent tool.
One very important thing to consider is that CE only lets you see spending data from the past 12 months. To retain spending history longer than that, you must use the CUR.
AWS Cost and Usage Reports vs. the Detailed Billing Report
The Detailed Billing Report (DBR) is a legacy feature that’s no longer supported for new customers as of July 2019. So, as of the Data Exports launch in November 2023, the DBR is older than old. Anyway, much of the information in a DBR is the same as the CUR, but the latest CUR 2.0 (Data Exports) is the shiny new thing that you should migrate to as soon as you can. You can migrate from DBR to CUR using this guide , and then from CUR to CUR 2.0 using this guide .
Nuances, Limitations, and Shortcomings of the CUR
So far, we’ve established that if you’re an AWS customer, you should probably set up the CUR sooner rather than later. However, we’ve also hinted at some of the CUR’s flaws. After all, the CUR is far from a perfect tool!
That’s why before you start working with the CUR, you’ll want to be aware of its various nuances, limitations, and shortcomings. Here are some of the major ones:
- The CUR in its native form is unreadable
- Requires an analytics tool to parse and interpret data
- Learning curve for CUR-specific structure and terminology
- CUR updates can be inconsistent
- CUR features and documentation can be misaligned
- You must opt into the CUR to get detailed data
We’ll take a closer look at each one in turn.
Unreadable in Native Form
While the CUR is essentially just a database table, it’s a really big database table. In the words of the AWS documentation : “The size of an individual report can grow to more than a gigabyte and might exceed the capacity of a desktop spreadsheet
applications to display every line.” Indeed, as we saw in an earlier screenshot of the CUR, it’s not something you’d want to view in Excel.
Why is this? A single Cost and Usage report can have over a hundred columns, and that’s with the default settings. If you use extensive tagging on your resources, the number of columns becomes effectively unlimited.
Yes, you can use Data Exports to deselect a lot of unnecessary columns. However, most enterprise-level CURs will still be too big to read as is. For example, if you choose the hourly time granularity, AWS generates one row per hour for each resource. Given this, it’s easy to see why CUR files, even for small and mid-sized organizations, can easily surpass the 1 million lines per file limit. When this happens, your CUR will be split into multiple files.
And finally, even if CUR files were manageable in size, their column names and data values can be very difficult to understand. Unless you’re well-versed in CUR-speak, it’s hard to decipher what the column “ lineItem/UsageType ” refers to, especially when possible values include the ever-cryptic “USE1-EUC1-AWS-Out-Bytes”, “APN2-FreeEventsRecorded”, and “Requests-Tier1”.
Requires an Analytics Tool
To handle a beast like the CUR, a data analytics tool is a must. The AWS CUR offers native integrations with Athena, Redshift, and QuickSight. This is great for
convenience… though it’s also great thinking on AWS’s front to pull you deeper into their ecosystem.
Despite the powerful capabilities of these tools, utilizing them effectively requires some technical know-how. For example, a DevOps team might struggle to handle a CUR or Data Export file without prerequisite SQL skills. Ensure that someone on your team is proficient in SQL is essential if you plan to do anything useful with the CUR, such as analyze them in Athena or Redshift.
As an additional hidden nuance, switching between native integrations, if you choose to do so, can be quirky. There are slight differences in the way Athena and Redshift format CUR columns. Changing the analytics tool you use might mean editing your SQL queries to ensure they still work.
Learning Curve
The first two points highlight an overarching theme when adopting the CUR: there can be a significant learning curve. This applies to both understanding the complex columns and format of the CUR, as well as becoming fluent in the analytics tool you choose.
Just consider some of the CUR billing terminology: one topic that newer AWS users often get tangled up is the difference between “unblended” versus “blended” costs :
- Unblended costs represent actual, real-time costs: if you spend $1/day on EC2 in an account, your unblended cost is $1/day.
- Blended costs represent average costs across accounts in an organization: if your organization spends $1/day on EC2 in account A, and $5/day on EC2 in account B, the blended cost for both accounts is $3/day (the unblended cost for account A is still $1/day, and $5/day for account B).
- Apart from these two, you also have amortized costs, which distribute recurring charges evenly across a more reasonable timeframe. For example, if you’re charged monthly for AWS EC2 Reserved Instances, it often helps to view amortized costs to distribute that charge evenly across each day so you don’t see a spike in billing at the start of each month.
But apart from terminology, there’s also the file structure that you have to get used to, which varies based on the integration you choose. For example, with a Redshift integration, you’d get a CSV file, a Manifest JSON file, a SQL command to create a Redshift table, and a Redshift Manifest JSON file. The Manifest JSON file contains metadata about the CUR, such as a description of the columns, the report ID, and billing period.
All this to say, the CUR isn’t the most intuitive tool in the world. Expect to devote some time to learning how to use it.
Inconsistent CUR Updates
Every day, AWS updates your CUR file for costs incurred the day before (in UTC). At most, updates happen 3 to 4 times a day at regular intervals every 6 to 8 hours. In reality however, AWS can be very inconsistent in delivering timely updates. For example, CUR updates are most commonly delayed near the beginning and end of months, without much explanation from AWS as to why this is.
Reporting at the end of the month can also be tricky to navigate since AWS often makes retroactive updates to last month’s reports in addition to updating the current month’s reports. For example, if you have an enterprise discount, AWS may apply it to your report at the end of a monthly billing cycle. This means that AWS will update last month’s report to include discount details, which can be easy to miss.
For these reasons, we’d recommend that you avoid relying on AWS to deliver CUR updates on a timely basis. Instead, you might want to set up a system to consume CUR updates whenever they’re delivered, as suggested by AWS Well-Architectured Labs .
Misalignment Between CUR Features and Documentation
The data dictionary does a great job of explaining the columns you’ll find in your CUR file. However, it’s also prone to becoming outdated easily, especially since AWS periodically releases new fields and columns. In addition, just about any new AWS feature release could introduce new possible values or completely change the way something is reported. The data dictionary might be left to play catch-up.
In fact, the data dictionary acknowledges this in the intro: it describes only “a subset of columns that you see in your report”, so it may be possible that new columns aren’t immediately documented.
Must Opt in to Get Detailed Data
Perhaps the biggest shortcoming of the CUR is that despite all these other technical nuances and limitations, you’re still pretty much forced to opt into it. After all, it’s AWS’s only offering for receiving detailed spending data.
And not only are you forced to opt-in, but you should opt in ASAP. There’s no backfilling of past spending data with the CUR, so you’re missing out on a gold mine of data if you just sit idle. For instance, if you enable the CUR 3 years after opening your AWS account, that’s over 2 years of spending data that’s impossible to recover. While AWS Cost Explorer does give you basic spending information over the past 12 months, this is nothing compared to the detailed data you get with the CUR.
AWS should be more forthright about enabling the CUR the moment you set up your account, but unfortunately, this isn’t the case. We absolutely recommend enabling the CUR as early as possible to start accumulating spending data in your buckets.
Exploring CUR Integrations and Advanced CUR Topics
Now that we’ve covered the basics of the CUR, how to set it up, and its various limitations, the logical next step is to explore different CUR integrations and other advanced topics. After all, this is how you’re going to squeeze the most value out of your CUR.
In this section, we’ll take a closer look at the following topics:
Cost Analytics – Native CUR Integrations
Deep dive into cur columns.
- Cost Allocation Tags
CloudForecast.io
The data in your CUR is like an untapped gold mine: full of potential, but not particularly valuable until you extract and process it! This is where the CUR’s 3 native integrations come into play. By hooking up your CUR with Athena, Quicksight, or Redshift, you can gain more insights and create data visualizations, all from within the AWS ecosystem.
While this all sounds amazing, the CUR forces you to choose one of the three services to integrate with during the initial setup. While you can change this later on, it’s best to choose correctly the first time since the format of your CUR can differ based on which integration you pick. This can be extremely awkward for new CUR users that are unfamiliar with these services. If this is you, fear not because we’re now going to explore each of these integrations with Athena, Quicksight, and Redshift.
CUR Integration with Athena
Amazon Athena is a data querying service that’s great for large-scale use cases, CUR files included. Think of Athena as the “engine” you use to run SQL queries on columns in your CUR file. It’s completely serverless, you only pay for the queries that you run, and Athena is able to return results in seconds.
Note that Athena is only responsible for running your queries. This means that the results you get won’t immediately be useful from a data analytics perspective. You’ll probably have to build additional BI applications based on your query results. Still, because the types of SQL queries you can run are effectively boundless, a CUR integration with Athena is extremely flexible.
To get a sense of the types of queries you can run, head over to AWS Well-Architectured Labs for some inspiration. In particular, you can write queries that isolate costs related to EC2 usage , figure out which of your ELBs are idle , and track spend on serverless products only (useful for tracking serverless product adoption across teams), just to name a few. To get started with a CUR integration with Athena, refer to the AWS documentation .
Read more on this topic: Using AWS Athena With Cost and Usage Reports (CUR)
CUR Integration with Quicksight
Amazon Quicksight is a business intelligence service that focuses on helping you create visualizations and dashboards for your CUR data. When setting up the integration, all you need to do is upload your CUR manifest file into Quicksight, and all columns and data from that file will be available for creating custom charts and graphs.
Among the three integrations, Quicksight has the smallest learning curve. Unlike Athena, which requires domain knowledge of SQL, Quicksight features a drag-and-drop interface so anyone can use it to create professional-looking dashboards.
To see Quicksight in action, we turn again to AWS Well-Architectured Labs for inspiration. The lab walks you through creating a graph to visualize cost by account and product , and cost by line item description . AWS documentation on CUR integrations with Quicksight is sparse, so we recommend the lab for getting started.
Read more on this topic: Using Amazon QuickSight With Cost and Usage Reports (CUR)
CUR Integration with Redshift
Amazon Redshift is a data warehouse where you can store and analyze large-scale data. Since Redshift is a data warehouse, you’ll have to load in your data into your Redshift cluster first, as opposed to the Athena integration where you can query the CUR file directly in S3.
The advantage of Redshift is that it contains backend optimizations to make querying more efficient. This makes it a great choice if you plan on running frequent queries. At the same time, you’d probably incur higher charges using Redshift since it’s not serverless: you’ll need to pay for data storage in addition to compute.
Since Redshift also works with SQL queries, the examples from AWS Well-Architectured Labs for Athena also apply to Redshift. This is a great place to get started with a Redshift integration.
Read more on this topic: Using Amazon Redshift With Cost and Usage Reports (CUR)
Here’s a table summarizing the three integrations:
| Topic | Athena | Quicksight | Redshift |
| Service summary | Serverless, data querying service that supports SQL | Serverless, BI service for creating visualizations and dashboards | Non-serverless, data warehouse service |
| Main capability | Run queries on the CUR as-is (stored in S3) | Create data visualizations for CUR data | Run queries on CUR data loaded into Redshift cluster |
| When/why choose this service? | Good for SQL SMEs, lower cost, better choice for infrequent querying | Beginner-friendly option, good choice for generating graphs quickly | Good for SQL SMEs, higher cost, better choice for frequent querying |
Becoming fluent in CUR-speak is what distinguishes a CUR expert from a newbie. With so many columns in a CUR file, you’ll want to focus your attention on just the ones that are most important to you. For starters, this may include:
- LineItem/UsageStartDate – The start date of the usage period for the current line item.
- LineItem/UsageEndDate – The end date for the usage period for the current line item. Together with LineItem/UsageStartDate, these are crucial for writing SQL queries that focus on a particular time window.
- LineItem/UnblendedCost – The total cost for this line item charged based on direct usage.
- LineItem/BlendedCost – The averaged cost for this line item across all member accounts of an organization. Unblended vs. Blended costs is a common source of confusion among newer CUR users.
- LineItem/ResourceId – The resource ID. Only included if you enable individual resource IDs in your report. Each AWS service may refer to a different resource identifier, summarized in this table in the AWS documentation .
Of course, there are a wealth of other columns that might be crucial to you. Anything in the data dictionary is fair game! For example, if you’re on a Savings Plan, pay special attention to the savingsPlan/ columns .
AWS Cost Allocation Tags
Cost allocation tags are a special breed of tags. They help you categorize resources based on how you want them billed, which may or may not be the same as how you manage and organize them regularly (i.e. with plain-old resource tags). This is the main distinction between cost allocation tags and regular tags.
Your CUR file displays cost allocation tags only. Cost allocation tags come in two flavors: AWS-generated, and user-defined.
- There is just one AWS-generated tag : aws:createdBy , which contains information about who created the resource. Fields within this tag include account-type and account-id .
- User-defined tags are more interesting: you can create whatever tags you want that make the most sense in allocating your costs. Tags that you create have the user: prefix.
For both of these types of tags, you must activate them in order for them to start showing up in the CUR as resourceTags/ columns. Creating effective cost allocation tags can be a game-changer in helping you make the most sense of your costs.
And finally, if you’re tired of all this CUR business, you may want to give CloudForecast a spin. Rather than having to sift through columns and run complex queries all day, CloudForecast provides a central cloud monitoring and cost optimization platform that makes tracking costs easy.
Remember all the downsides to the CUR that we covered in the last section? CloudForecast addresses these pain points with the following core features:
- Visual dashboards – Right out of the box, CloudForecast takes your CUR and produces easy-to-read visual spending reports out of it. Why interpret your CUR yourself when CloudForecast can do it for you?
- Cost anomaly detection – CloudForecast lets you view all your AWS resources in a central platform. For each resource, you can monitor the overall cost, usage, and performance, making it easy to detect anomalies early.
- Custom dashboards – CloudForecast generates a daily spending report highlighting the most important cost information, but what if you wanted more? Good news: you also get the ability to customize dashboards to share with your stakeholders.
Overall, CloudForecast can be an invaluable tool in helping your organization both understand your costs and figure out avenues for cost optimization .
Whew! We’ve just steamrolled through a lot of content on the CUR–props to you for making it through this far. Hopefully, this gave you a good overview of AWS Cost & Usage Reports, one of the most important offerings that many AWS users don’t use to their full potential.
In this article, we explored everything from the basics of CUR to its limitations. We provided a step-by-step guide on setting up the latest version of CUR Data Exports from the AWS console. Following that, we examined key CUR integrations and suggested advanced topics to dive into next.
Though we’re at the end of this article, your CUR journey should not and cannot end here. Remember that as your organization grows, so will your costs, so taking steps to proactively understand the CUR is crucial to do sooner rather than later. Or, feel free to delegate that piece to CloudForecast and they’ll make sure you’re in good hands.
Manage, track, and report your AWS spending in seconds — not hours
CloudForecast’s focused daily AWS cost monitoring reports to help busy engineering teams understand their AWS costs, rapidly respond to any overspends, and promote opportunities to save costs.
Monitor & Manage AWS Cost in Seconds — Not Hours
CloudForecast makes the tedious work of AWS cost monitoring less tedious.
More from CloudForecast
The Ultimate Guide to AWS Data Transfer Pricing
AWS cost management is easy with CloudForecast
We would love to learn more about the problems you are facing around AWS cost. Connect with us directly and we’ll schedule a time to chat!
The Cloud Cost Playbook
The step-by-step- guide to cost maturity

AWS Cost Allocation Tags Explained: When Should You Use Them?
AWS cost allocation tags aim to organize your cloud usage and costs in detail. But are they the most effective way to organize your cloud spend?

Knowing only how much you spent on your AWS bill each month isn’t enough to provide the cost visibility you need to make cost-aware engineering and business decisions. It’s why AWS introduced tags. Tags enable AWS users to label their resources to track cost and usage in the vast AWS infrastructure.
The goal of tagging is to help you understand who, what, and why your cloud spend is changing. By doing this, you can pinpoint areas in your AWS cost and usage report where you can reduce unnecessary costs and maximize profitability.
However, AWS does not compute your resource consumption and associated costs based on all tags. This level of cloud cost visibility is only possible via AWS cost allocation tags.
We’ll explain what AWS cost allocation tags are and why they matter in this guide. We’ll then discuss whether you can skip endless tagging exercises and still gather accurate cost insight you can use to inform strategic decisions.
Table Of Contents
What Are Cost Allocation Tags In AWS?
How and when to use aws cost allocation tags.
- The Challenges Of Cost Allocation Tags In AWS
- What Is The Alternative To AWS Cost Allocation Tags?
AWS cost allocation tags are labels that you or AWS assign to resources to help you track your resource usage and costs. Cost allocation tags help identify similar departments, use cases, teams, etc., so costs can be grouped accordingly.
What are the types of AWS cost allocation tags?
There are two types of cost allocation tags:
AWS-generated cost allocation tags – Amazon Web Services or the AWS Marketplace ISV creates, defines, and applies these tags on your behalf. This means you have no control over these tags and can’t customize them. They have an “ aws:createdBy ” format.
You can apply and compute these tags when you create a new AWS resource that is supported.
AWS-generated cost allocation tags do not apply to all AWS services. Specifically, they apply to:
- AWS CloudFormation
- Amazon Elastic Compute Cloud (EC2)
- Amazon Elastic Beanstalk
- Amazon S3 Glacier
- Amazon ElasticCache
- AWS Data Pipeline
- Amazon Kinesis
- Elastic Load Balancing
- Amazon Relational Database Service
User-defined cost allocation tags – You create these custom tags to organize resource consumption and related costs according to your preferences. You create the tags using the AWS Tag Editor . By using the “ user :” prefix, these tags can identify who created a specific resource, for example.
Here is an example of how the tags might appear in two Amazon EC2 instances (for example, Cost Center and Stack ):

Credit: AWS
Yet there is more to AWS-generated and user-defined coat allocation tags.

Cost allocation tag uses include seeing how much you spent on a particular AWS service or resource, such as EC2 instances or S3 buckets. Activating cost allocation tags in the Billing and Management Console lets you do this.
Only after activating both types of tags can you use them as usage and cost identifiers.
Cost allocation tags cannot track resource usage and costs for AWS services and resources created before they are activated — i.e., they cannot be backdated.
After activating the tags, AWS generates a cost allocation report that displays your usage and costs. The cost allocation report is a CSV file of your usage and costs, according to your chosen format. Owner, cost center, stack, and application names are among the most popular tags.
- Application shows the name of an application running on specific AWS resource(s).
- Owner helps identify which team or team member handles what specific resource.
- Cost center identifies which business department is using a particular resource.
- Stack helps organize usage and cost data according to the environment using a specific resource. This can include testing, development, and production.
If you use these tags, your cost allocation report might look like this:

The cost allocation report includes cost and usage data for all tagged and untagged resources from a specific billing period. If you wish to aggregate, report, and analyze the data with AWS cost monitoring tools like AWS Cost Explorer, AWS Cost & Usage Report (CUR), and AWS Budgets, you must enable the tools first.
With these tools, you can filter usage and costs across AWS environments based on how you named (tagged) them. As soon as an account manager activates a tag from their management account, that tag activates for all members.
There are also restrictions on who can access Cost Allocation Tags inside the Billing and Cost Management console. Access is restricted to a management account in an organization or single accounts that are not members of the organization.
Another thing. To apply tags to your AWS resources, you can also use the AWS Management Console or the API . However, this is only applicable to supported services .
AWS services require unique tag implementations. You can choose to work with each implementation individually. Or you can also use Tag Editor for user-defined cost allocation tags to ease the process.
But here is the thing. To make your usage and cost data meaningful to your use case, you must use a consistent set of tags. In addition, the more detailed reports you want, the more tags you need.
Many organizations find that this is time-consuming and can become complicated pretty quickly, which adds to the challenges of AWS tagging .
The Challenges Of AWS Cost Allocation Tags
Scaling an organization makes it hard to maintain a consistent tagging strategy. When you have more resources to track, you have to create more tags to keep up.
Inconsistencies may also occur if you merge with or get acquired by another company with a different tagging strategy. If a team member or account manager leaves or changes their role, your tagging strategy could also be affected.
For example, a new team member may tag a resource in lower case without realizing that another team member already tagged it in uppercase. If this occurs, the resource appears as two separate resources in your AWS billing reports, but it is a single resource that has been labeled twice. Simple mistakes like this can lead to inaccurate data for the entire billing period.
Additionally, whenever a member account moves to another organization, you have to reactivate all the cost allocation tags associated with that member account using the new management account.
But that’s not all. It’s possible to tag unmetered resources. However, they don’t appear in the AWS Cost Management suite. Billing and Cost Management does not decode or encode tags for you either. Suffice to say; tagging is a highly manual process.
Ultimately, it’s impossible to tag all AWS resources, supported or otherwise. For example, shared resources running in a multi-tenant environment can be difficult to tag. The difference in consumption between untagged and untaggable resources is nearly impossible to calculate as well.
You risk missing some useful cost and usage data if you don’t have another way to collect cost metadata. If that happens, you will have inaccurate cost forecasting and allocation data.
Yet it is not worthwhile to give up and return to slicing and dicing data in spreadsheets.
But is there a better way?
Is it possible to accurately track AWS resource consumption and costs even with messy tags or an imperfect tagging strategy?
Is There A Better Alternative To AWS Cost Allocation Tags?
AWS Cost Categories are one way to do this. However, Cost Categories work similarly to AWS tags — so both are extraordinarily complex systems. You can read about the similarities and differences between AWS Cost Categories and AWS Tags here .
So, is there a unique alternative to cost allocation tags?
By putting AWS costs in context, cloud cost intelligence provides a way to overcome the tagging barrier.
The most advanced AWS cloud cost intelligence solutions like CloudZero utilize this approach to capture every detail of your AWS cloud usage and costs, so you don’t:
- Overlook important information you shouldn’t miss, or;
- Mix up the data and lose track of what goes where.
Adding CloudZero to your AWS infrastructure allows you to ingest massive amounts of data, normalize the data, and connect it to the people, products, and processes that created that data.
Below is an illustration of what CloudZero can do with the data it ingests:

You can learn more about how CloudZero simplifies AWS cost allocation even with messy tags .
Better yet, see CloudZero in action for yourself and experience the power of cloud cost intelligence over endless tagging. Schedule a demo here .

Cost Allocation Tags Best Practices
Cost allocation tags follow many of the same best practices as regular AWS tags . However, a few relevant ones for cost allocation purposes include:
- Implement a consistent tagging strategy across departments, teams, and environments to correlate usage and costs with specific cost centers.
- Secure and protect sensitive information by not including it in tags. You can apply standard base-64 encoding to your tag.
- Tag your resources as soon as possible to collect data on cost and usage ASAP. Activate AWS generated and user-defined tags in the Billing and Cost Management console to make them work.
- Enable AWS Cost Explorer, AWS Cost and Usage Report, and AWS Budget for further cost allocation analysis.
- Null tag values do not appear in AWS Budgets or Cost Explorer.
- If the CloudTrail log for creating AWS cost allocation tags is too large, then the tag could fail to create them.
Switch To Cloud Cost Intelligence To Break The Tag Barrier
CloudZero’s approach lets you allocate 100% of your spending in hours instead of months. Moreover, CloudZero helps you organized spend for tagged, untagged, untaggable, and shared resources in multi-tenant architectures.
Most importantly, CloudZero helps you align AWS costs to the people, processes, and products that produce them, regardless of whether you use containers, Kubernetes, or a multi-tenant environment.
With CloudZero’s unit cost analysis , you can enable different teams to break down AWS costs and usage however they choose:
- Engineering can get cost per product, cost per feature, cost per environment, cost per dev team, cost per deployment, and more . These granular insights can help engineering teams understand how their architectural decisions, such as their code, affect the organization’s cloud spend and ability to compete in the market.
- Finance can track cost per customer or per tenant to determine how much they spend to support a particular customer. Based on this information, they can decide how to price their services to protect their margins or increase profitability on a specific contract.
- C-suite can look at cost of goods sold (COGS) to estimate the cost of onboarding a group of new customers the following month. In addition, executives can determine which types of customers or customer segments are most profitable to target similar customers for greater profitability.
- The board can use CloudZero to track the organization’s profitability, and hence its attractiveness to investors. They can then determine whether they need to enhance their gross margins to attract ideal investors.

The step-by-step guide to cost maturity

Suggested Articles

November 20, 2023
November 13, 2023

November 6, 2023
AWS Cost Allocation Tags
- Chapter 1: the guide to aws cost optimization
- Chapter 2: ec2 spot instances
- Chapter 3: aws sizing tool
- Chapter 4: aws savings plan
- Chapter 5: aws ebs pricing
- Chapter 6: aws disaster recovery
- Chapter 7: aws data transfer pricing
- Chapter 8: aws cost allocation tags
- Chapter 9: aws bill analysis

Cost Allocation Tags are a feature provided by AWS to help you closely monitor the usage and costs of your AWS resources. These tags can be assigned to resources within your AWS accounts, allowing you to construct a customized cost allocation and governance framework that best fits your organization. Cost Allocation Tags are helpful in better organizing the costs and usage of your AWS resources, however, they are best used in conjunction with other cost analysis tools such as Cost Explorer , AWS Budgets , Budget Reports , Cost and Usage Reports (CUR) , Cost Categories , and Anomaly Detection .
What are AWS Cost Allocation Tags?
AWS Cost Allocation Tags are labels that you can assign to any applicable AWS resource. Each tag consists of two things: a key and a unique value . AWS requires that all user-defined cost allocation tags use unique keys; for AWS-generated cost allocation tags, the tags are defined, created, and applied by AWS itself or AWS Marketplace ISV using more universal conventions.
Types of AWS Cost Allocation Tags
There are two types of AWS cost allocation tags, as mentioned earlier: AWS-generated and user-defined cost allocation tags. Both types of tags require activation via the Billing and Cost Management Console to serve as cost allocation tags vs. regular operational tags (further explained in a section below). Also, applied tags are visible for only the instances that are provisioned after the activation of tags.

AWS-Generated Cost Allocation Tags
AWS-generated cost allocation tags are viewable in the Billing and Cost Management Console and in reports. They cannot be found elsewhere, such as the AWS Tag Editor. Tags generated by AWS use the same key: aws:createdBy which is designed to capture all relevant information related to the creation of a new resource in AWS for future reference . For example:
- aws:createdBy = IAMUser: ASGHNBDGTRE :userName
- aws:createdBy = AssumedRole: NBVCXGFD :userRole
Once AWS-generated cost allocation tags are activated by the account manager, the tags are automatically activated for all account members.
AI/ML-informed cost insights that provide enhanced cost observability and analysis

Full lifecycle FinOps for application of insights and automation across all resource stages

A cloud right approach to facilitate the convergence of public and private clouds.
Examples of AWS-Generated Tag Values
- account-type: States the account type (e.g., FederatedUser , AssumedRole , IAMUser , and Root )
- account -id: tracks the total number of root accounts or federated users who are responsible for creating resources
- access-key: tracks the IAM access key used and the session role name if applicable
- user-name: records a user name when available
There are a few limitations to AWS-Generated Cost Allocation Tags; one such limitation is these tags cannot be applied to all AWS services. The services in which these tags can be applied include:
- AWS CloudFormation
- AWS Data Pipeline
- Amazon ElasticCache
- AWS Elastic Beanstalk
- Elastic Load Balancing
- Amazon S3 Glacier
- Amazon Kinesis
- Amazon Relational Database Service
Considerations for AWS-Generated Cost Allocation Tags
- Can only be activated by a management account
- You can’t update, edit or delete the tags
- Cannot apply to the resources that were created before the tag was activated
- The maximum active tag keys for Billing and Cost Management reports is 500
- Created using CloudTrail logs, so AWS Generated Tag creation can fail if the log file is too large to accept new entries
- Tag names and values are automatically assigned
- Tag names don’t count towards the user-defined resource tag limit of 50
- Null tag values will not appear in Cost Explorer and AWS Budgets
- If there is only one tag value that is also null, the tag key will also not appear in Cost Explorer or AWS Budgets
User-Defined Cost Allocation Tags
User-defined cost allocation tags are defined, created, and applied to resources by members of your AWS account. Usage of these tags follow the same process as AWS-generated tags, that is, they require activation and are applied only to the resources that are initiated after the activation process. These kinds of tags allow for level-2 tagging, meaning that you can tag resources launched by other resources (e.g., an Amazon EMR’s EC2). User-defined cost allocation tags can be viewed via the Cost Management Console after enabling Budgets, Cost Explorer, Legacy reports, or AWS Cost and Usage Reports. User-defined tags also appear in the cost allocation report for you to manage and track your AWS costs.
How to Create User-Defined Cost Allocation Tags
There are several ways for you to create user-defined cost allocation tags, including:
- AWS Tag Editor
- AWS Management Console
Considerations for User-Defined Cost Allocation Tags
- The reserved prefix is “user:” which is displayed in the Cost Allocation Report
- Each key can only be used once for each resource
- In some services, you can tag a resource when you create it
- You can’t backdate the application of a tag
- Tags only start appearing on your Cost Allocation Report after you apply them
- You can apply standard base-64 encoding to your tag
- Billing and Cost Management does not encode or decode your tag for you
- Tags on non-metered services can be activated; however, these tags do not populate in the Cost Management suite
Activating Cost Allocation Tags
Cost Allocation Tags must be activated from a list of regular AWS tags. In other words, you must first create an AWS tag and then instruct AWS to use it specifically as a Cost Allocation Tag. This approach helps AWS lower the indexing overhead in its billing logs unless requested by the account administrators. The instructions to activate user-defined are documented in this article , and the AWS-defined tags are defined in this article , even though they involve identical steps.
AWS Cost Allocation Tag Use Cases
Some common use cases for cost allocation tags include:
- Automating operations
- Managing access and minimizing security risk management
- Identifying costs for business units, departments, projects, products, or regions
- Identify underutilized resources
- Building disaster recovery plans
- Forecasting resource needs

Best Practices for Using AWS Cost Allocation Tags
This section is a high-level overview of best practices you should keep in mind when using AWS Cost Allocation Tags. Use these best practices to quickly design a tagging strategy that has room to evolve with your organization’s needs over time.
- Employ a cross-functional team to identify tag requirements
- Assign owners to define consistent tag values for each key
- Focus on required and conditionally required tags
- Start small; less is more
- Design and enforce a consistent tag nomenclature
- Adhere to consistent notation formats for different resource types
- Align Cost Allocation Tags with financial reporting dimensions
- Use them along with Linked Accounts to associate an AWS account with a master payer account
- Avoid multi-valued Cost Allocation
- Tags Tag everything
- Integrate with authoritative data sources
- Use compound tag values (where one key has multiple values) judiciously
- Use automation such as CloudFormation templates to proactively tag resources
- Constrain tag values with AWS Service Catalog
- Propagate tag values across related resources (for example all EBS volumes attached to an EC2)
- Lockdown tags used for access control (where tags are used to limit security access privileges to specific resources)
- Remediate untagged resources by periodically creating a list
- Implement a tag governance body that meets regularly to review best practices
Featuring guest presenter Tracy Woo, Principal Analyst at Forrester Research
AWS Billing
Cost Allocation Tags appear in the form of a report as comma-separated values in a CSV file that can be generated via the AWS Billing and Cost Management Console. The usage and cost of resources are grouped within the CSV file based on your active tags. This report is known as the Cost Allocation Report .
Cost Allocation Tags in the Billing Dashboard
Via the billing dashboard, you can access the cost allocation report and apply tags representing your business categories such as cost centers, owners, application names, production, testing, and so on.
You can view both tagged and untagged resources and organize them accordingly to better calculate the charges for your resources. For example, if you tag your AWS resource with the application name then you will have the ability to track even a single application that utilizes the tagged resource.
AWS Cost Allocation Reports
A Cost Allocation Report is a list of the usage of your AWS resources grouped by your product category and any linked account user. It also contains, like detailed Cost and Usage Reports, the same line items with the addition of your Auto-Generated and User-Defined Cost Allocation Tags.
There are two types of cost allocation reports:
- Monthly Cost Allocation Report
- Hourly Cost Allocation Report
During a billing cycle, AWS first generates an estimated cost allocation report that gets overwritten by the actual usage throughout the billing period.
Viewing a Cost Allocation Report
You can download a CSV file and view it in a desktop spreadsheet application. The data in the file can then be organized by creating a pivot table to group the keys and values to get the combined values of tagged resources.
Unallocated Resources in Cost Allocation Reports
Unallocated resources by default follow that standard billing aggregation, that is, they get organized by the line item, account, and product.
Unexpected Costs Associated with Tagged Resources
There are several possible situations for the unexpected appearance of costs associated with tagged resources, these situations include:
- Usage exceeds the AWS Free Tier
- AWS Free Tier expires
- Bill is received after account closure
- Disabled regions with resources still active for those regions
- Elastic Beanstalk environments terminated before the termination of resources
- Elastic Load Balancing (ELB) termination before the termination of EC2 instance
- Services started in AWS OpsWorks
- Undeleted Amazon Elastic Block Store volumes and snapshots
- Unreleased Elastic IP addresses
- Services launched by other services
- Costs associated with storage services such as RDS and S3
Managing Tags Programmatically
There are several ways to automate the tagging process. Here are some:
- Auto Scaling Groups (ASG) are designed to scale in and out the number of nodes in a a cluster based on application workload. They are also able to automatically tag the nodes that are launched.
- In 2017, AWS unveiled AWS Tagging APIs that can be accessed programmatically via a script, or as part of a continuous delivery process. You can find the API functions in this article .
- The AWS Command Line Interface (CLI) is a popular method to apply changes to your AWS environment by typing commands and avoiding the need to click in a UI. The AWS CLI supports the tagging API functions.
Set Tag-based KPIs
The natural evolution of tagging and measuring is benchmarking. Defining KPIs, or Key Performance Indicators, is a great way to understand the state of your resource usage visibility over time. Here are a few examples:
- Percentage of resources where tagged resource has no tag value
- Percentage of resources that have no tags at all
- Percentage of un-tagged resources trending over time
Read 6 Cost KPIs to Drive Hybrid Cloud Value for ideas on how to measure your cloud optimization progress. Here are three additional KPIs that you can add to the list for tracking tagging success:
Percentage of untagged resources
Percentage of resources tagged with null value
Trend graph of your tagging coverage over time
How to Get the Most Out of AWS Cost Allocation Tags
Adding AWS Cost Allocation Tags to your resources is an excellent way of organizing AWS resources and separating costs, but don’t stop there. Tags should be used in conjunction with other cost analysis tools. Here are some examples of how to make use of your tags:
- Analyze your costs with Cost Explorer
- Manage your costs with AWS Budgets
- Report your budget metrics with budget reports
- Manage costs with AWS Cost Categories
- Use the AWS Price List API
AWS Cost Management Features
AWS provides many cost management services. The following services are divided into groups with specific capabilities and use cases.
- AWS Cost Allocation Tags and AWS Cost Categories allow you to organize and construct a cost allocation and governance foundation. They also allow you to use your own tagging strategy.
- AWS Cost Explorer and AWS Cost and Usage Reports allow you to generate reports to raise awareness and offer accountability for your cloud expenditure. They do so by providing you with detailed allocable cost data.
- AWS Consolidated Billing , AWS Purchase Order Management , and AWS Credit allow you to access and track billing information across the entire organization.
AWS Budget Features
AWS Budgets, AWS Budget Actions, and AWS Service Catalog allow you to budget and keep your spending in check via the budget thresholds, auto alerts, and notifications.
AWS Billing Alarm Features
You can use AWS Budgets and AWS Budget Actions to set alarms, auto alerts, and notifications for overage on any resource that is being used. You have the option to receive your budget alerts for your resources in Amazon Chime, and in Slack using the AWS Chatbot.
Read Report

AWS Trusted Advisor
Using a trusted advisor is an excellent option for cost optimization. Trusted Advisor checks , across all AWS regions, your AWS infrastructure and creates a summary of the results. With the cost optimization option in the Trusted Advisor, you can view the potential monthly saving, recommendations, and cost optimization checks. Trusted Advisor can perform the following check categories:
- Potential Monthly Savings
- Cost Optimization Checks for Underutilized Resources
- Cost Optimization Checks for Reservation
- Amazon Route 53 Latency Resource Set Check
The era of VMware for the masses is ending. Here’s the future.
Read Whitepaper
Related Blogs

The New FinOps Paradigm: Maximizing Cloud ROI
Featuring guest presenter Tracy Woo, Principal Analyst at Forrester Research In a world where 98% of enterprises are embracing FinOps,…

FinOps X 2024 Recap
Join Will Norton (Sr Director Product Marketing), Kyle Campos (CTO), and Ryan Wrenn (VP of AI/ML), as they recap what…

Day One of FinOps X 2024: Home Sweet Home
By the time J.R. Storment finished his opening keynote, “The Future of FinOps,” at FinOps X 2024 in San Diego, it…

Journeying into FinOps: A Content Marketer’s First Week
“We’d love to have you join our team,” he said. Eeks! I screamed in my head. You did it, Joanne! …
- Skip to primary navigation
- Skip to main content

AWS Cost Allocation Guide: Identifying Your Costs
At The Duckbill Group, our clients repeatedly tell us the same thing: We need to know why our AWS bill went up . In fact, gaining better visibility into your cloud spend is one of the biggest pain points you will encounter with AWS.
For organizations moving from the data center world, AWS is a completely different cost model and requires retraining how you think about costs. Even for cloud-native organizations, different AWS services bill usage in different ways , often unexpectedly so.
The best way to solve this problem—to create that visibility—is by improving your cloud cost allocation practices.
What is cloud cost allocation?
Cloud cost allocation is the process of identifying, aggregating, and assigning cloud spend to your organization’s teams, business units, products, etc. When it’s done effectively, cloud cost allocation can have lasting positive impacts on how your business manages cloud costs.
In the next few blog posts, we’ll walk through each step of the process with you to help you understand not just what to do but why doing it is so important.
Better visibility into your cloud spend starts with identifying your cloud spend—especially as it pertains to your teams, business units, products, etc. Until you know which teams’ resources live where, you won’t be able to accurately allocate costs to those teams.
Duckbill has seen three successful methods for identifying cloud costs: user-defined cost allocation tags, hierarchical account separation, and third-party tooling.
User-defined cost allocation tags
Whether you only have a single AWS account or hundreds of accounts spanning multiple subsidiaries and business units, user-defined cost allocation tags are the best place to start identifying your cloud costs.
AWS won’t show your tags in Cost Explorer (or the Cost and Usage Report) until you enable them in your account , so make sure those tags are enabled in the AWS Billing console as soon as you start tagging resources. Additionally, Cost Explorer doesn’t backfill spend data for tagged resources once they’re tagged, so the sooner you add tags to your resources, the sooner you’ll have more accurate cost allocation visibility.
There’s lots of existing documentation that talks about which tags you should use. But we ultimately want to highlight the importance of the tagging strategy itself.
Tagging doesn’t have to be the worst
It seems like every blog post that talks about “how to save money” tells you to tag your resources. But that advice feels much the same as when your doctor tells you to eat healthier.
Of course, we all know we should eat more veggies. But the doctor’s advice doesn’t teach us anything new about veggies. What we need to learn is how to make vegetables taste more delicious so that we’ll choose to eat more of them.
In other words, our veggie consumption (er, lack of) isn’t because we don’t know that we should eat more. It’s because we’re never looking forward to a heaping plate of unseasoned lima beans.
Likewise, tagging your resources just for the sake of tagging won’t help your organization because you’re missing the crucial component: strategy.
Teamwork makes the (tagging) dream work
Tags are for more than just billing or finding out “who spun up this x1e.32xlarge host?” (Trick question! The answer is always you .)
For the best results, start your tagging efforts as a series of holistic conversations with different teams. Bring together Finance, Product, and Engineering/Operations to talk about how each team leverages tagging to benefit their work.
For example, Security might use tags for audits and patch compliance while Finance uses them to identify cloud spend allocated to development work for tax credits. Both are completely valid use cases for different reasons and both generate different requirements for your organization’s tagging policy.
Collaborate to create a purposeful tagging strategy—one that will incentivize Engineering teams to commit to tagging because it will actually enable them to do their job more easily and more effectively. Socializing each team’s tagging requirements provides business context for why including each tag is so important and is a great way for your engineers to create shared purpose and belonging within the organization.
What starts as two teams collaborating can turn into a grassroots effort to improve tagging across the organization, and lead to a community of practice for tagging best practices. Once you have a tagging strategy that everyone agrees on, you need to shout it from the rooftops.
Track your tagging success (or lack thereof) at a similar granularity across teams or products. Celebrate teams that tag all their resources, thus improving the accuracy of your cost allocation, and socialize their workflows with other teams who may be struggling to tag or get value from their tags.
For more information, check out AWS’s “thrilling” 24-page Tagging Best Practices Whitepaper . Don’t let the length or the undoubtedly “edge of your seat” storyline sway you from giving it a quick perusal. It includes a slew of helpful use cases for various tagging strategies to fit nearly every business need. We’ve also written our own guide to tagging.
Hierarchical account separation
Most (but not all!) AWS usage types are taggable. This means even when you tag everything in AWS, you’re still going to end up with “untagged spend” in your cost allocation model.
It’s annoying, right?
How do you allocate that untaggable spend without hours of spreadsheets and resource-specific utilization metrics? By moving resources into separate AWS accounts for each team, product, or business unit.
First, create separate AWS accounts for each of your core cloud-related administrative functions—like security, logging/monitoring, identity, and shared tools (CI/CD). AWS accounts are free, so there are no extra charges here.
Next, create accounts in a standardized manner based on your organization’s brands and products. The most common and effective pattern we have seen adopted is one account per environment per product.
If your organization has multiple brands each with multiple products, you may want to create one account per environment per product per brand . Should a given brand desire more environments (staging, QA, etc.) or further security boundaries for special cases, additional accounts should be created within the same pattern.
While it’s still not perfect, AWS’s native tooling has made massive improvements in the last few years to make multi-account creation and management a breeze.
Access to production or entire brands can easily be controlled with this arrangement. (Remember, account boundaries are the only hard security limits within AWS!) We recommend having some staff with full access to all accounts so organization-wide changes are quick and easy, but still secure and auditable.
Third-party tools
Third-party tools can accomplish the same goals as the above two methods. But the cost allocation features you’ll want are usually bundled into a larger suite of cost management tools that will cost you 1% to 3% of your total AWS spend.
For example, in addition to helping you allocate your costs, SaaS platforms like Cloudability and CloudHealth provide customizable dashboards, insights, and forecasting capabilities that may or may not be what you need right now in your cost allocation journey.
And chances are you’re not utilizing your third-party tooling to its full potential. That’s not a knock against you—it’s just a common occurrence we see with powerful software that has so many bells and whistles. That hefty price tag provides you with solid features. But unless your organization is full of power users for these tools, you’re likely not getting the best bang for your buck.
Plus, if you don’t have a strong cost allocation policy in place before utilizing these tools, you’re going to have a much harder time accurately identifying cloud costs within these tools.
In our experience, clients have generally found the price tag to not be worth the results.
Building blocks for success
Whew, that’s a lot to digest!
I know tagging and account migrations doesn’t sound glamorous or exciting. But remember, you have to crawl before you can walk. In other words, you have to identify cloud costs before you can get visibility into your cloud costs.
And this process takes time.
It’s not just about how you break up your costs, but why you break up your costs—what are you ultimately trying to accomplish by breaking up your costs?
Talk with your engineers. Talk with Finance. Heck, talk with Product and Security and Leadership. All stakeholders should buy-in to your process for identifying cloud costs before you implement it, because all of them will depend on the results.
In the next part of our guide, we will discuss implementing your cost allocation process by aggregating and assigning cloud costs. This is the place where your organization becomes empowered to make data-driven decisions on optimizing cloud spend. It’s where the true magic happens.

Jesse is a Cloud Economist at The Duckbill Group. He is a seasoned operations engineer with a deep passion for understanding complex technical and organizational systems. He’s spent his career helping Engineering teams achieve their business goals by improving how they interact with their technical systems, and with each other. Today, he’s focused on helping guide organizations along their journey of cloud cost optimization and management.
More Posts from Jesse

How Storytelling Can Shape Your Cloud Cost Management Strategy
Storytelling can change the narrative of your cloud cost management strategy by opening up communication and sharing business context across your organization.

AWS Cost Allocation Guide: Aggregating and Assigning Cloud Costs
Understanding AWS spend is a big pain point for companies, but cloud cost allocation can help. In the second part of this series, we’re focusing on what to do with your cloud cost data once it’s generated.

The Secret Ingredient Duckbill Looks for in Employees
I hate writing job descriptions. I always feel like I’m going to inadvertently write a job description for a purple squirrel. I know who we are as a company; that part’s easy to write. But how much do I know about what we’re looking for in a candidate? Are we basing the job description off […]
Get the Newsletter!
AWS cost management tips and news, delivered monthly. You can afford (but probably don’t want) to miss out!
" * " indicates required fields
Using the monthly cost allocation report
The monthly cost allocation report lists the Amazon usage for your account by product category and linked account user. This report contains the same line items as the detailed Amazon Cost and Usage Report and additional columns for your tag keys. We recommend that you use Amazon Cost and Usage Report instead.
For more information about the monthly allocation report, see the following topics.
Setting up a monthly cost allocation report
Getting an hourly cost allocation report, viewing a cost allocation report.
By default, new tag keys that you add using the API or the Amazon Web Services Management Console are automatically excluded from the cost allocation report. You can add them using the procedures described in this topic.
When you select tag keys to include in your cost allocation report, each key becomes an additional column that lists the value for each corresponding line item. Because you might use tags for more than just your cost allocation report (for example, tags for security or operational reasons), you can include or exclude individual tag keys for the report. This ensures that you're seeing meaningful billing information that helps organize your costs. A small number of consistent tag keys makes it easier to track your costs. For more information, see Viewing a cost allocation report .
Amazon stores billing reports in an Amazon S3 bucket that you create and own. You can retrieve these reports from the bucket using the Amazon S3 API, Amazon Web Services Management Console for Amazon S3, or the Amazon Command Line Interface. You can't download the cost allocation report from the Account Activity page of the Billing and Cost Management console.
To set up the cost allocation report and activate tags
Sign in to the Amazon Web Services Management Console and open the Amazon Billing and Cost Management console at https://console.amazonaws.cn/billing/ .
Under Detailed billing reports (legacy) , choose Edit , and then select Legacy report delivery to S3 .
Choose Configure an S3 bucket to activate to specify where your reports are delivered.
In the Configure S3 Bucket dialog box, choose one of the following options:
To use an existing S3 bucket, choose Use an existing S3 bucket , and then select the S3 bucket.
To create a new S3 bucket, choose Create a new S3 bucket , and then for S3 bucket name , enter the name, and then choose the Region .
Choose Next .
Verify the default IAM policy and then select I have confirmed that this policy is correct .
Choose Save .
In the Report list, select the check box for Cost allocation report , and then choose Activate .
Choose Manage Report Tags .
The page displays a list of tags that you've created using either the API or the console for the applicable Amazon Web Service. Tag keys that currently appear in the report are selected. Tag keys that are excluded aren't selected.
You can filter tags that are Inactive in the dropdown list, and then select the tags that you want to activate for your report.
Choose Activate .
If you own the management account in an organization, your cost allocation report includes all the usage, costs, and tags for the member accounts. By default, all keys registered by member accounts are available for you to include or exclude from your report. The detailed billing report with resources and tags also includes any cost allocation tag keys that you select using the preceding steps.
The cost allocation report is one of several reports that Amazon publishes to an Amazon S3 bucket several times a day.
During the current billing period (monthly), Amazon generates an estimated cost allocation report. The current month's file is overwritten throughout the billing period until a final report is generated at the end of the billing period. Then a new file is created for the next billing period. The reports for the previous months remain in the designated Amazon S3 bucket.
The following example tracks the charges for several cost centers and applications. Resources (such as Amazon EC2 instances and Amazon S3 buckets) are assigned tags like "Cost Center"="78925" and "Application"="Widget1". In the cost allocation report, the user-defined tag keys have the prefix user , such as user:Cost Center and user:Application . Amazon-generated tag keys have the prefix aws . The keys are column headings identifying each tagged line item's value, such as "78925".

Pick your keys carefully so that you have a consistent hierarchy of values. Otherwise, your report won't group costs effectively, and you will have many line items.
If you add or change the tags on a resource partway through a billing period, costs are split into two separate lines in your cost allocation report. The first line shows costs before the update, and the second line shows costs after the update.
Unallocated resources in your report
Any charges that cannot be grouped by tags in your cost allocation report default to the standard billing aggregation (organized by Account/Product/Line Item) and are included in your report. Situations where you can have unallocated costs include:
You signed up for a cost allocation report mid-month.
Some resources aren't tagged for part, or all, of the billing period.
You are using services that currently don't support tagging.
Subscription-based charges, such as Amazon Web Services Support and Amazon Web Services Marketplace monthly fees, can't be allocated.
One-time fees, such as Amazon EC2 Reserved Instance upfront charges, can't be allocated.
Unexpected costs associated with tagged resources
You can use cost allocation tags to see what resources are contributing to your usage and costs, but deleting or deactivating the resources doesn't always reduce your costs. For more information on reducing unexpected costs, see Understanding unexpected charges .
Javascript is disabled or is unavailable in your browser.
To use the Amazon Web Services Documentation, Javascript must be enabled. Please refer to your browser's Help pages for instructions.
Mastering the Basics and Best Practices of AWS Cost Allocation Tags

AWS cost allocation tags allow you to effortlessly track how you’re using AWS budgets and resources to help you better control your cloud costs .
Cost allocation tags are a key part of managing Amazon Web Services (AWS) expenses and forecasting your company’s future resource needs. They make it easy to track how your AWS resources are being used so you can form a more granular understanding of your AWS costs and resource allocation.
In this article, we’ll cover everything you need to know about AWS cost allocation tags, including the types of tags, when you should use them, and seven best practices for using AWS cost allocation tags.
What are AWS cost allocation tags?
AWS cost allocation tags are digital labels assigned to resources such as Amazon EC2 instances and Amazon S3 buckets. Once AWS cost allocation tags have been activated, you can then track tagged resources using AWS Cost Explorer and other AWS billing and reporting tools such as the Cost and Usage Report (CUR) so you can understand the cost of AWS services and your resource usage on a more detailed level.
Each cost allocation tag consists of a unique tag key and value. This allows the tag to serve as a unique identifier for a tagged resource. You can apply tags to represent numerous categories (such as cost centers, application names, or owners), or you can use them to organize your costs across numerous AWS services.
The two types of AWS cost allocation tags
AWS offers two options for tagging and tracking resource usage: AWS-generated cost allocation tags and user-defined cost allocation tags . Which option is best will depend on your priorities and what you are trying to accomplish.
Let’s take a detailed look at both, how they work, and the advantages that they offer.
AWS-generated cost allocation tags
When activated, AWS automatically creates AWS-generated cost allocation tags and applies them to AWS resources, giving companies the time-saving benefits of automation when tagging new resources. These tags are an excellent choice if you want to achieve basic cost tracking without the complexities of creating custom tags or providing unique assignments to various member accounts.
AWS-generated cost allocation tags include “createdBy” tags that AWS automatically creates and manages in order to show which user or role launched resources. You can use them for a variety of cost analysis functions, including linking each resource’s cost back to specific invoices.
The “createdBy” tags must be activated in order for AWS to autonomously tag resources as they are launched. However, any resources tagged prior to the tag activation will not retroactively receive the “createdBy” tags.
User-defined cost allocation tags
AWS-generated cost allocation tags can provide a lot of insights into resource usage and costs, but user-defined cost allocation tags offer a much higher level of customization.
With these tags, you’ll have the flexibility to create your own custom tags using AWS Tag Editor and assign those tags based on your organization’s unique needs. This enables granular cost tracking and analysis and the ability to track cloud spend however your organization best sees fit.
With user-defined cost allocation tags, you can create and activate tags to categorize resource usage and costs based on projects, departments and teams, deployment environments, the AWS service you’re using, and numerous other categories.
While it can be time-consuming to create and apply these tags manually, the level of insight and transparency they provide within a company’s cost management console and other reports are often well worth the effort.
When should your business use AWS cost allocation tags?
AWS cost allocation tags have numerous use cases. Ultimately, these tags provide businesses with valuable data—and like any business metrics, you can use the data provided by cost allocation tags to unlock plenty of useful insights.
AWS cost allocation tags enrich your billing console with detailed information and key insights into how you’re using your AWS resources. These insights can help you efficiently allocate resources, identify resource usage patterns/cost optimization opportunities, and make informed budget decisions.
Any business that needs granular visibility and control over AWS spending will benefit from using cost allocation tags. These tags are especially valuable in multi-resource and multi-team environments where tracking costs based on projects, departments, or initiatives is key.
Advantages of using AWS cost allocation tags
Using AWS cost allocation tags provides many benefits compared to untagged resources, including noteworthy advantages such as:
- Granular cost tracking
- Resource accountability
- Improved budgeting and forecasting
- More detailed financial reporting
- Automation and APIs for efficiently managing tags
AWS cost allocation tags help provide the visibility you need for AWS cost optimization. By combining these tags with a cost optimization platform such as ProsperOps, you can gain unmatched insight into how you’re using your AWS resources and identify valuable opportunities for savings.
How to enable each type of AWS cost allocation tags
AWS does not automatically enable AWS cost allocation tags. Instead, you must activate and apply them to AWS resources before they will work. In the case of user-defined tags, you must also first create and define the tag.
Here is how you can enable each type of AWS cost allocation tag:
Steps for AWS-generated tags
AWS automatically applies AWS-generated tags to specific resources. They do not require any manual intervention.
However, to ensure they are present in your cost allocation reports and analysis, follow these steps:
- Activate AWS cost allocation tags : Log in to your AWS Management Console, go to the AWS Cost Explorer, and make sure you’ve activated cost allocation tags for your AWS account. This will ensure that the automatically generated tags are recorded and included in your cost reports.
- Review cost allocation reports : Once you have enabled cost allocation tags, regularly review the AWS Cost and Usage Reports to see detailed breakdowns of your AWS-generated tags. The reports can also be exported to Amazon S3 for further analysis and reporting.
Steps for user-defined tags
You must manually create and assign user-defined cost allocation tags to AWS resources.
Here are the steps you should follow to set up user-defined tags:
- Identify tag categories : Determine the categories you want to use for cost allocation. For example, you can create tags to track resource usage based on projects, departments, environment types (such as production or development), or service types (such as EC2 or RDS).
- Create tags : You can create user-defined tags using the AWS Tag Editor, which you can find in your AWS Management Console. When creating tags, be sure to assign each tag a meaningful key and value based on your chosen categories.
- Apply tags to resources : After creating the user-defined tags, you’ll need to apply them to the specific resources you want to track. You can apply tags to new resources during the resource creation process or add them later through the AWS Management Console.
- Review cost allocation reports : Once you’ve assigned user-defined tags to your resources, review the AWS Cost and Usage Reports or utilize the AWS Cost Explorer to analyze cost data based on these tags. This provides insights into how AWS allocates expenses across different categories or projects, enabling better cost management and resource optimization.
Best practices for using AWS cost allocation tags
AWS cost allocation tags can offer a lot of value—especially when you know how to take full advantage of the benefits they provide. To make the most of your AWS cost allocation tags, here are seven best practices that you should follow:
Keep your tagging strategy straightforward
When it comes to using AWS cost allocation tags, simplicity is your best bet. You’ll want to develop a clear and straightforward tagging strategy that aligns with your company’s objectives. Avoid going overboard with excessive tag categories, as this is likely to create more confusion than clarity.
Instead, focus on essential aspects, such as projects, departments, environments, or services. This will ensure that you can glean meaningful insights from your reports. It also helps eliminate a lot of wasted time spent managing tags that are not truly necessary.
Start tagging ASAP
It’s a good idea to start tagging your AWS resources as soon as possible; if you aren’t doing so already, there’s no better time to start than right now.
Take a proactive approach to tagging AWS resources to ensure you capture essential cost data right from the start. This allows you to analyze historical cost and usage trends more accurately.
Getting started using AWS cost allocation tags as soon as possible can also help eliminate the amount of retroactive tagging you have to do—which can be a cumbersome process and ultimately less accurate than tagging resources when you create them.
Pay attention to tag requirements
It’s important to understand the limitations and requirements of AWS cost allocation tags. For example, different types of tags have specific character and naming constraints. Different AWS services may have unique tagging requirements and limitations as well.
When creating and applying cost allocation tags, you’ll want to make sure you comply with all of these requirements. This will be key to ensuring your tags function correctly, and your cost allocation reports are accurate.
Don’t include sensitive information
AWS cost allocation tags do not have the strongest security or access control features. Instead, they are visible to anyone who has the appropriate permissions, which can often end up being a large number of employees within your company.
Maintaining the security and privacy of sensitive data is a top priority anytime you are storing data on the cloud. Therefore, where and how you store data is a key security concern. In the same way that you wouldn’t store valuables in Tupperware containers, you should use cost allocation tags for their intended purpose without containing any sensitive data.
Using cost allocation tags for non-metadata purposes could inadvertently expose sensitive data. To avoid potential security risks, make sure that your cost allocation tags do contain any data that would be deemed private or sensitive.
Regularly audit your tags
Consistently monitoring and auditing your cost allocation tags is essential to maintaining the accuracy and consistency of your cost-tracking efforts. This helps you regularly validate the accuracy and relevance of your tags to ensure the system applies them consistently to new resources and that the tags on existing resources are kept up-to-date and meaningful.
Business operations evolve over time, and how your company utilizes AWS resources will change as well. Auditing your AWS cost allocation tags on a regular basis to ensure they align with your business operations and objectives is vital for maintaining the effectiveness of your cost allocation strategy.
Standardize tags for consistency
Adopting standardized naming conventions for your AWS cost allocation tags will help promote consistency and streamline your cost analysis processes. For example, using standardized tag prefixes, such as “Project:” or “Department:” will provide a clear indication of the tag’s purpose and category that you and your team can understand at a glance.
As we mentioned earlier, it’s also important to develop a naming strategy that will keep your tags within the character limits imposed by various AWS services. By developing standardized naming conventions for your tags, you can keep them compliant with AWS requirements while also helping keep your tags organized and easy to work with.
Handle multi-account environments appropriately
AWS cost allocation tags are especially useful for tracking costs in multi-account environments. Doing so, however, requires careful planning and coordination.
When managing cost allocation tags across multiple AWS accounts, it’s essential to develop a consistent tagging strategy. Using AWS Organizations is one effective way to centralize tagging policies and ensure you’ve consistently enforced those policies across all accounts.
By employing standardized tags and tagging policies across all of your company’s AWS accounts, you can achieve the consistency and transparency needed to track resource allocation across your entire organization.
Optimize your cloud costs with ProsperOps
Using AWS cost allocation tags is crucial to understanding how your company allocates AWS resources, but it’s only the beginning when it comes to AWS cost optimization.
To reduce your company’s cloud spend without reducing performance, you need to execute a comprehensive cost optimization strategy that includes right-sizing resources, using the right discount instruments (such as Savings Plans and Reserved Instances ), managing idle resources, and numerous other considerations.
ProsperOps helps you optimize cloud costs automatically, leveraging powerful machine-learning algorithms to analyze your company’s usage patterns and automatically optimize cost controls in real-time for maximum savings.
With ProsperOps, managing cloud spend doesn’t have to be an all-consuming process. To start optimizing your AWS costs automatically, sign up for a free ProsperOps demo today.
Get started for free
Latest from our blog.

FinOps X 2024 Recap: Highlights, Booth Fun, and Key Takeaways!

Our Take On the 2024 State of FinOps Report

GCP Committed Use Discounts: Basics, Benefits, and How to Use
Request a free savings analysis.
3 out of 4 customers see at least a 50% increase in savings.
Get a deeper understanding of your current cloud spend and savings, and find out how much more you can save with ProsperOps!
- Visualize your savings potential
- Benchmark performance vs. peers
- 10-minute setup, no strings attached
Submit this form to request your free cloud savings analysis.
New: Autonomous Discount Management for Google Cloud Platform. Learn more.
Tip #30: AWS costs: analyze your spend with AWS cost allocation tags
Learn how to use cost allocation tags to manage your ongoing aws costs.
- May 27, 2022
- Cost management
- Cost allocation tags , Getting started
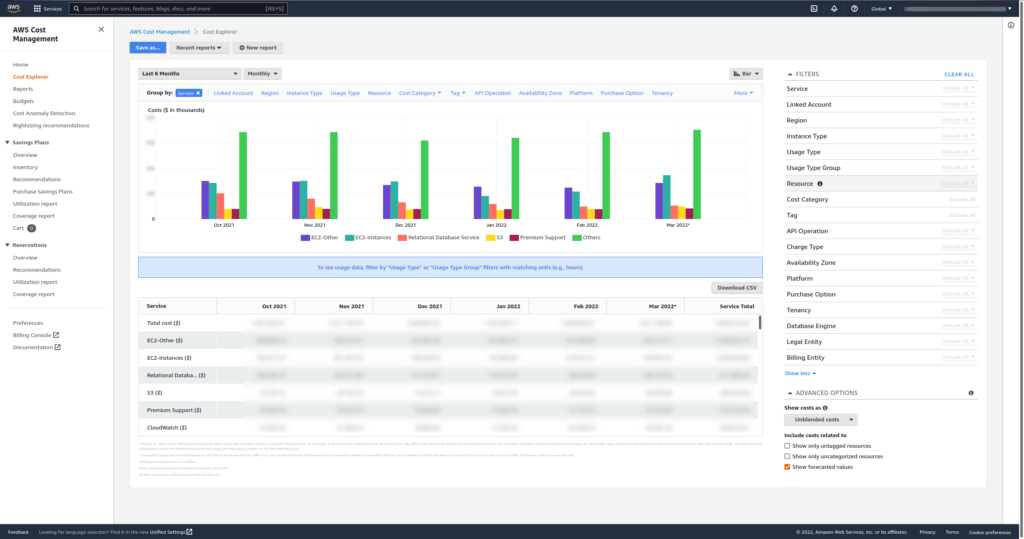
AWS provides detailed billing reports and tools such as AWS Cost Explorer to analyze your costs. There are plenty of parameters to group by and filter, helping you to analyze your monthly AWS bill. However, what happens if you want to dig a little deeper? Maybe you want to assign costs to business units, products, services or specific customers. Say hello to cost allocation tags!
What are cost allocation tags?
AWS provides its own set of 44 cost allocation tags, and you can also use any of your own regular tags as cost allocation tags. However, cost allocation tags are inactive by default. Once activated, it will take up to 24 hours for them to be included in your next cost report. Cost allocation tags are not retro-active, they will only be applied to costs generated after the tag was activated.
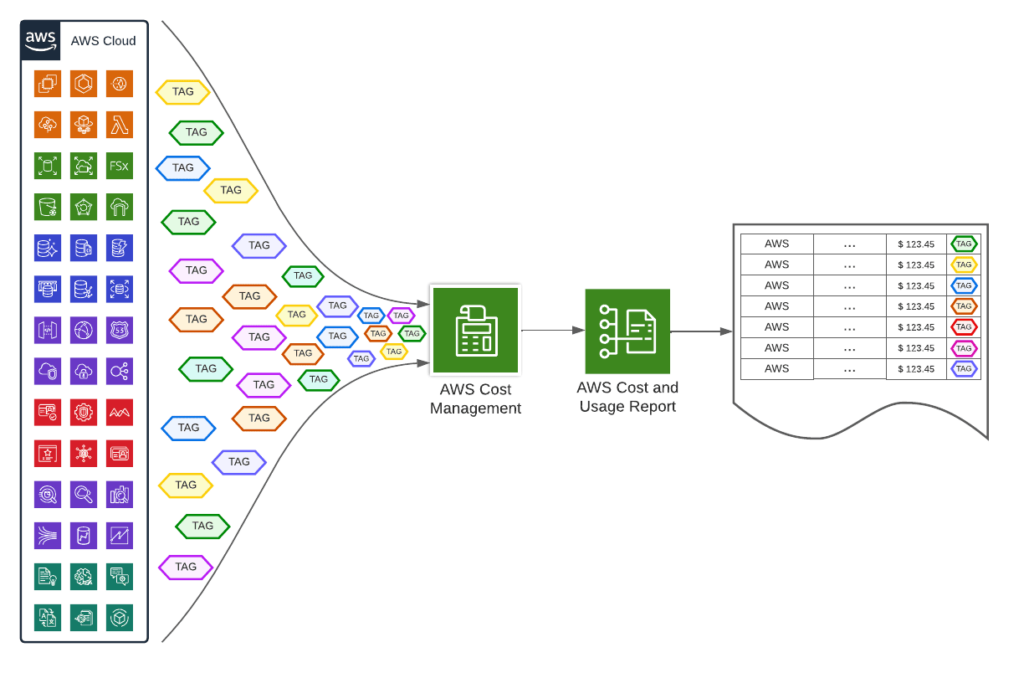
Which tags should I use?
There is no one-size-fits-all answer to this question. However, it is crucial to unify your tags across all of your accounts and resources. Otherwise it will be impossible to assign costs properly.
I would start with analyzing how your organization is structured and which products and services you are running in the cloud. This would provide a handful of useful tags such as ProductName and BusinessUnit to start with. However, cost allocation tags are also used within feedback loops for cost optimization operations. You can be really creative with these, and gain useful insights once you dig deep enough.
Analyze your cost reports
Once your cost allocation tags are doing their work, head back to the AWS Cost Explorer. You should be able to group by and filter by the cost allocation tags you defined. You can also export your cost and usage report (CUR) to Athena and analyze your costs with queries.
Instructions
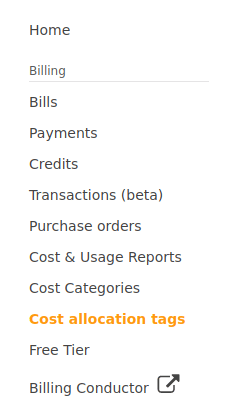
- Click on Activate and confirm
- Allow up to 24 hours for these tags to show in the cost reports
- Using Cost Allocation Tags – AWS Billing. (n.d.). AWS Billing User Guide. Retrieved April 29, 2022, from https://docs.aws.amazon.com/awsaccountbilling/latest/aboutv2/cost-alloc-tags.html
- User-Defined Cost Allocation Tags – AWS Billing. (n.d.). AWS Billing User Guide. Retrieved April 29, 2022, from https://docs.aws.amazon.com/awsaccountbilling/latest/aboutv2/custom-tags.html
- Activating User-Defined Cost Allocation Tags – AWS Billing. (n.d.). AWS Billing User Guide. Retrieved April 29, 2022, from https://docs.aws.amazon.com/awsaccountbilling/latest/aboutv2/activating-tags.html
- Querying Cost and Usage Reports using Amazon Athena – AWS Cost and Usage Reports. (n.d.). AWS Cost and Usage Reports User Guide. Retrieved April 29, 2022, from https://docs.aws.amazon.com/cur/latest/userguide/cur-query-athena.html
Leave a Reply Cancel reply
Your email address will not be published. Required fields are marked *
Save my name and email in this browser for the next time I comment.
Related Tips & Tricks
Tip #50: amazon s3 cost and performance optimization.
Here are three of the top recommendations to optimize Amazon S3 for cost and performance.
Tip #47: AWS optimization – well architected framework and other tools
Learn how the AWS well architected framework and additional tools can help you optimize your AWS setup for cost and performance
Tip #46: AWS RDS: top five relational database cost questions
Follow these AWS RDS best practices to improve your relational database costs and performance
Tip #43: AWS cost management: basic tools to get started
Use these tools and best practices to create your AWS cost management plan
Read more Tips & Tricks »
General election: results in full
Conservative.
Speaker's seat included in Other, not Labour
Conservative seats in 2019*
*Based on 2024 constituency boundaries
Live forecast methodology
As individual constituency results are declared on election night, it is not always clear how the election is playing out nationwide. We expect comfortable Labour victories in the first seats to declare, in the north-east of England, for example, but these may not be representative of the country as a whole. To track how many seats we expect each party to win, we simulate the election in each constituency based on pre-election forecasts, the exit poll, and results as they are declared.
The starting point for our live model is our pre-election forecast. Once the exit poll is released, at 10pm, we incorporate the seat estimates into our model—narrowing the range of possible outcomes. As results come in, we update the model to include the trends seen in the new data. If a party is under- or over-performing expectations, or performing particularly well in certain areas, we extrapolate that across the remaining constituencies. We run 10,000 simulations to give a range of possible outcomes across the country.
More from undefined
What are AWS Cost and Usage Reports?
The AWS Cost and Usage Reports (AWS CUR) contains the most comprehensive set of cost and usage data available. You can use Cost and Usage Reports to publish your AWS billing reports to an Amazon Simple Storage Service (Amazon S3) bucket that you own. You can receive reports that break down your costs by the hour, day, or month, by product or product resource, or by tags that you define yourself. AWS updates the report in your bucket once a day in comma-separated value (CSV) format. You can view the reports using spreadsheet software such as Microsoft Excel or Apache OpenOffice Calc, or access them from an application using the Amazon S3 API.
AWS Cost and Usage Reports tracks your AWS usage and provides estimated charges associated with your account. Each report contains line items for each unique combination of AWS products, usage type, and operation that you use in your AWS account. You can customize the AWS Cost and Usage Reports to aggregate the information either by the hour, day, or month.
AWS Cost and Usage Reports can do the following:
Deliver report files to your Amazon S3 bucket
Update the report up to three times a day
Create, retrieve, and delete your reports using the AWS CUR API Reference
How Cost and Usage Reports work
After you create a Cost and Usage Report, AWS sends your report to the Amazon S3 bucket that you specify. AWS updates your report at least once a day until your charges are finalized.
Your report files consist of a .csv file or a collection of .csv files and a manifest file. You can choose to configure your report data for integration with Amazon Athena, Amazon Redshift, or Amazon QuickSight.
Report timeline
After you create your report, it can take up to 24 hours for AWS to deliver the first report to your Amazon S3 bucket.
After delivery starts, AWS updates the report files at least once a day. Each report update in a given month is cumulative, so each version of the report includes all of the billing data for the month to date. The report updates that you receive throughout the month are estimates. The charges are subject to change as you continue to use your AWS services.
Different AWS services provide your usage-based billing information at different times, so you might notice updates to a certain hour or day come in at different times.
AWS builds on previous reports until the end of the billing period. AWS finalizes your report’s usage charges after issuing an invoice at the end of the month. After the end of the report billing period, AWS generates a new report for the next month with none of the information from the previous report.
After your report is finalized, AWS might update the report if AWS applies refunds, credits, or AWS Support fees to your usage for the month. Because Developer, Business, and Enterprise Support are calculated based on final usage charges, those are reflected on the sixth or seventh of the month for the prior month’s Cost and Usage Report. AWS applies credits or refunds based on the terms of your agreement or contract with AWS.
Report files
Your report is a .csv file or a collection of .csv files stored in an Amazon S3 bucket. The number of files that your report generates depends on your selection for report versioning and the size of your report.
When you create a report, you can choose to create new report versions or overwrite the existing report version with every update. If you choose to create new report versions, then your report generates more files with every update.
The size of an individual report can grow to more than a gigabyte and might exceed the capacity of desktop spreadsheet applications to display every line. If a report is larger than most applications can handle (around 1 million rows), then AWS splits the report into multiple files that are stored in the same folder in the Amazon S3 bucket.
AWS also generates refunds into separate files. AWS issues refunds after the closing of a monthly bill.
For more information on report files, file-naming conventions, and versioning, see Understanding your report versions .
Report columns
Each report includes several columns with details about your AWS costs and usage. The columns that AWS includes in your report depend on your usage during the month.
Every report includes columns with the identity/ , bill/ , and lineItem/ prefixes. All other columns are included only if your monthly AWS usage generates data to populate those columns.
For example, your report includes savingsPlan/ columns only if you used Savings Plans during that month.
To learn more about the columns in your report, see the Data dictionary .
Using your report
You can download your report from the Amazon S3 console, query the report using Amazon Athena, or upload the report into Amazon Redshift or Amazon QuickSight.
For more information about creating an Amazon S3 bucket and using Athena to query your data, see Querying Cost and Usage Reports using Amazon Athena .
For more information about uploading to Amazon Redshift, see Loading report data to Amazon Redshift .
For more information about uploading to Amazon QuickSight, see Loading report data to Amazon QuickSight .

To use the Amazon Web Services Documentation, Javascript must be enabled. Please refer to your browser's Help pages for instructions.
Thanks for letting us know we're doing a good job!
If you've got a moment, please tell us what we did right so we can do more of it.
Thanks for letting us know this page needs work. We're sorry we let you down.
If you've got a moment, please tell us how we can make the documentation better.
IMAGES
VIDEO
COMMENTS
The detailed billing report with resources and tags also includes any cost allocation tag keys that you select using the preceding steps. Getting an hourly cost allocation report. The cost allocation report is one of several reports that AWS publishes to an Amazon S3 bucket several times a day.
The cost allocation report includes all of your AWS costs for each billing period. The report includes both tagged and untagged resources, so that you can clearly organize the charges for resources. For example, if you tag resources with an application name, you can track the total cost of a single application that runs on those resources.
The monthly cost allocation report feature will be unavailable at a later date. We recommend that you use the AWS Cost and Usage Reports instead. You can create custom cost allocation tag sets for your AWS resources that can describe the business dimensions of your AWS usage. You can use these tag sets to organize and track your AWS costs.
AWS Cost & Usage Reports contains the most comprehensive set of AWS cost and usage data available, including additional metadata about AWS services, pricing, and reservations. ... Organize cost and usage data with your own AWS cost categories and cost allocation tags. ... Query the cost and usage report to analyze the root causes of unexpected ...
As we help customers better organize and report AWS cost and usage information, we have curated tips and tricks of how to leverage AWS resources to achieve your reporting and cost allocation needs. In the coming weeks, we will present several blogs that can provide more details in the strategies and tactics mentioned in this blog.
Cost Allocation Blog Series. As we help customers better organize and report AWS cost and usage information, we have curated tips and tricks of how to leverage AWS resources to achieve your reporting and cost allocation needs. Check out our cost allocation blog series topics to learn more: Cost Allocation Basics That You Need to Know
This is the main distinction between cost allocation tags and regular tags. Your CUR file displays cost allocation tags only. Cost allocation tags come in two flavors: AWS-generated, and user-defined. There is just one AWS-generated tag: aws:createdBy, which contains information about who created the resource.
AWS cost allocation tags are pretty much your regular AWS tags with a twist — they need to be manually activated before they start appearing in your Cost and Usage Report (CUR).
After activating the tags, AWS generates a cost allocation report that displays your usage and costs. The cost allocation report is a CSV file of your usage and costs, according to your chosen format. Owner, cost center, stack, and application names are among the most popular tags. Application shows the name of an application running on ...
AWS Account - Cost allocation within one AWS account can be performed by additional dimensions such as services or regions. It's possible to further tag resources within an account and work with the groups of such resource tags. ... In AWS Cost and Usage Report (CUR), you can filter out lines that correspond to usage covered by RI and SP ...
Cost Allocation Tags appear in the form of a report as comma-separated values in a CSV file that can be generated via the AWS Billing and Cost Management Console. The usage and cost of resources are grouped within the CSV file based on your active tags.
The cost allocation report includes all of your Amazon costs for each billing period. The report includes both tagged and untagged resources, so that you can clearly organize the charges for resources. For example, if you tag resources with an application name, you can track the total cost of a single application that runs on those resources.
After you enable these resource level tags as AWS Cost Allocation Tags in your Billing and Cost Management Console, the metadata will appear in your cost management tooling such as the Cost and Usage Report (CUR) and Cost Explorer. However, costs such as data transfer and support fees are trickier to tag, causing additional metering and ...
Cost allocation tags in AWS can help track and allocate resource costs. When designing your tagging strategy, establish a consistent naming convention and tag resources programmatically.
After you create and activate tags, AWS generates a cost allocation report with your usage and costs grouped by your active tags. The cost allocation report includes all of your AWS costs for each billing period. The report includes both tagged and untagged resources, so that you can clearly organize the charges for resources.
Whether you only have a single AWS account or hundreds of accounts spanning multiple subsidiaries and business units, user-defined cost allocation tags are the best place to start identifying your cloud costs. AWS won't show your tags in Cost Explorer (or the Cost and Usage Report) until you enable them in your account, so make sure those ...
The monthly cost allocation report lists the Amazon usage for your account by product category and linked account user. This report contains the same line items as the detailed Amazon Cost and Usage Report and additional columns for your tag keys. We recommend that you use Amazon Cost and Usage Report instead.
Once AWS cost allocation tags have been activated, you can then track tagged resources using AWS Cost Explorer and other AWS billing and reporting tools such as the Cost and Usage Report (CUR) so you can understand the cost of AWS services and your resource usage on a more detailed level.
The reserved prefix is aws:.. AWS-generated tag names and values are automatically assigned the aws: prefix, which you can't assign. User-defined tag names have the prefix user: in the cost allocation report.. Use each key only once for each resource.
Analyze your cost reports. Once your cost allocation tags are doing their work, head back to the AWS Cost Explorer. You should be able to group by and filter by the cost allocation tags you defined. You can also export your cost and usage report (CUR) to Athena and analyze your costs with queries.
As constituencies report throughout the night, we project the vote in remaining seats to produce an estimate of the final tally. How deep are the Tories' losses? 2024 result.
The AWS Cost and Usage Reports (AWS CUR) contains the most comprehensive set of cost and usage data available. You can use Cost and Usage Reports to publish your AWS billing reports to an Amazon Simple Storage Service (Amazon S3) bucket that you own. You can receive reports that break down your costs by the hour, day, or month, by product or ...