How to set router to assign static IP address automatically to Windows 10
You can configure your router to assign a static IP address configuration automatically without changing the Windows 10 settings, and here's how to do it.

On Windows 10, a static IP address is a recommended configuration for many scenarios, such as when sharing files, printers, media, and other services.
If the device doesn’t include a static IP address, services will eventually stop working. Usually, because computers connected to a network receive their Internet Protocol (IP) address configuration from the Dynamic Host Configuration Protocol (DHCP) server, which are dynamic and temporary.
Typically, you would assign a static IP address using the Windows 10 settings , but you can also set the dynamically assigned networking configuration from the DHCP server as the static configuration using the router settings.
In this guide , you’ll learn the steps to configure your router’s DHCP server to assign a static IP address to a computer without the need to change the networking settings on Windows 10 .

How to convert dynamic IP address to static using binding
How to assign static ip address using dhcp server.
Use these steps to make a DHCP assigned IP address configuration static on Windows 10:
Open Router web interface.
Click on Network Map from the left pane.
Click on the Clients button.
Under the “Client status list” section, click the computer you want to change its configuration.

Turn on the MAC and IP Address Binding toggle switch.

Click the Apply button.
Once you complete the steps, the DHCP server will always assign the same TCP/IP address configuration to the device you specified.
Use these steps to configure the DHCP server on your router to assign a static IP address configuration to a Windows 10 device:
Click on LAN from the left pane.
Click on the DHCP tab.
Under the “Manually Assigned IP around the DHCP list” section, use the drop-down to select the MAC address of the device you want to configure.
In the “IP Address” section, specify the static IP address you want the computer to use.
Click the Add (+) button.

After you complete the steps, every time the device you specified connects to the network the DHCP server will assign the TCP/IP configuration without the need to change the Windows 10 settings.

Mauro Huculak is a Windows How-To Expert who started Pureinfotech in 2010 as an independent online publication. He has also been a Windows Central contributor for nearly a decade. Mauro has over 15 years of experience writing comprehensive guides and creating professional videos about Windows and software, including Android and Linux. Before becoming a technology writer, he was an IT administrator for seven years. In total, Mauro has over 21 years of combined experience in technology. Throughout his career, he achieved different professional certifications from Microsoft (MSCA), Cisco (CCNP), VMware (VCP), and CompTIA (A+ and Network+), and he has been recognized as a Microsoft MVP for many years. You can follow him on X (Twitter) , YouTube , LinkedIn and About.me . Email him at [email protected] .
- Windows 10 update KB4512508 (build 18362.295) releases for version 1903
- Explore Beekeeping theme for Windows 10 (download)
We hate spam as much as you! Unsubscribe any time Powered by follow.it ( Privacy ), our Privacy .
- Forums New posts Search forums
- What's new New posts Latest activity
- Members Current visitors
- AMD deep-dives Zen 5 architecture — Ryzen 9000 and AI 300 benchmarks, RDNA 3.5 GPU, XDNA 2, and more
- Amazon Prime Day: Best Tech and PC Hardware Deals!
- Nvidia, AMD, and Intel GPUs ranked by bang for the buck — Prime Day deals let you break 60 fps for $280
how to configure static ip address for ASUS router
- Thread starter Mike Baum
- Start date Nov 19, 2013
- Nov 19, 2013
In order to demonstrate a product connected to my wireless router I need to set up a static IP address so that I can "see" - log onto - the product from anywhere on the internet and from a table or a smart phone. How can I set up a static IP address for my wireless router? Router is a Asus RT-AC68U.
here the manual http://dlcdnet.asus.com/pub/ASUS/wireless/RT-AC66U/E7415__RT-AC66U_Manual_English.pdf http://event.asus.com/2012/nw/dummy_ui/en/Advanced_LAN_Content.html
here the manual http://dlcdnet.asus.com/pub/ASUS/wireless/RT-AC66U/E7415__RT-AC66U_Manual_English.pdf http://event.asus.com/2012/nw/dummy_ui/en/Advanced_LAN_Content.html
In order to access your network from anywhere on the Internet, your external address needs to be static. For the most part, this isn't too much of an issue as your ISP usually does not change your external IP address that often. However, if you need to be able to connect regardless of whether your external IP Address has changed, you need to find a free DNS service that maintains updates to your external IP Address. Of course, an easier option would be to upgrade your service through your ISP to a static (usually business) IP Address. -Wolf sends
TRENDING THREADS
- Started by Admin
- Friday at 1:25 PM
- Replies: 156
- Started by tecmo34
- Apr 30, 2011
- Replies: 5K
- Started by sergey1239
- Today at 2:55 AM
- Replies: 19
- Monday at 9:05 AM
- Replies: 152
- Today at 11:13 AM
- Started by Shamanji
- Today at 1:18 PM
- Started by Popikaify
- Today at 11:58 AM
Latest posts
- Latest: SkyNetRising
- 1 minute ago
- Latest: XxDarkMario20xX
- 16 minutes ago
- Latest: Lavahit
- 30 minutes ago
- Latest: NayuKani
- 32 minutes ago
- Latest: Eximo
- 34 minutes ago
- 40 minutes ago
- Latest: Shamanji
Moderators online
Share this page
- Advertising
- Cookies Policies
- Term & Conditions
How to Assign Static IP Address to Your Devices
By default, your router assigns dynamic IP Address to every device that connects to it. This is called DHCP (short for Dynamic Host Control Protocol). But sometimes, we need our devices to have the same IP address (i.e. Static IP) every time it connects to the network. Reason being,
- Access your computer from the Internet.
- Share data between two devices on the same network.
- Quickly access your Network Printer or NAS.
- Use your computer as a media server.
- Or your work WiFi requires you to use Static IP address.

What IP address should you choose?
If two devices on the network have the same IP address, then there will be conflicts. The Internet won’t work on one of them or both, depending on your router. So, it’s important to assign a unique IP address to your computer. There are a couple of ways to pick an unused IP address.
For instance– first find your device’s IP address , say it’s 192.168.1.7 ; then keep the first three values (i.e. 192.168.1) as it’s and replace the last digit with some far number like 192.168.1.222 . Though make sure the last digit should be between a 0-255 range.
Assigning Static IP address to most devices is easy, just go to its network settings, look for DHCP option and turn it OFF. Once you do that, you’ll see a text area to enter Static IP address. Enter the new IP address there, save changes and that’s it.
So let’s see how to Assign Static IP address to various Operating Systems
1. Assign IP Address on Windows 10/8/7
You can do this quickly through the command line. You will need to first find your subnet mask, default gateway, and network adapter name. In my case, I’m on a Wi-Fi network, so the adapter name is Wi-Fi. To find yours just type the following command.
Once you get the output, find for the Network Adapter which has IP listed under it. The adapter name is a one-word name suffixed to the end of the Network Title. You will also need the Subnet mask and the Default Gateway Address.

Once you have the adapter name, Subnet Mask and Default Gateway, run the following command.
Wherein, Wi-Fi should be replaced by your adapter name and the IP, subnet mask and gateway address according to your configuration.

This will change your IP address from DHCP to manual with the static IP address you have specified.
In case you find it too confusing, you are not alone. You can do the same via GUI which is much more intuitive. You’ll need the Subnet Mask and Default Gateway Address . You can refer to the above step on how to find these details. Once you have noted down the address, click on Start Menu and type in Network and Sharing Center. Click once you see the Network and Sharing Center Icon.

Alternatively, if you are in Windows 10 then you can right-click on the Start menu and click on “ Network Connections “.

A new window will open, click on Change Adapter Options.

Right Click on your Current Network Adapter ( like WiFi) and choose Properties.

When the new window pops up, select Internet Protocol Version 4(TCP/IPv4) and click on Properties.

Once you get the pop-up window, select “ Enter the IP address you want ” and fil the IP Address, For Subnet Mask , and Default Gateway Address enter the values that you have noted down previously. Next, click on OK to save changes.

To switch to dynamic IP, click on Obtain the IP address automatically. Once this is enabled, your system will start picking an IP address dynamically from the router.
2. How to setup static IP on Ubuntu
On Ubuntu, you can set a static IP Address via the terminal or GUI. Firstly, let’s start with the command line. Right-click anywhere on the desktop to open the terminal.

Once the terminal window opens, we need to run a command. We need the subnet mask and network adapter name in order to set a static IP and to get that, run the following command on the terminal.
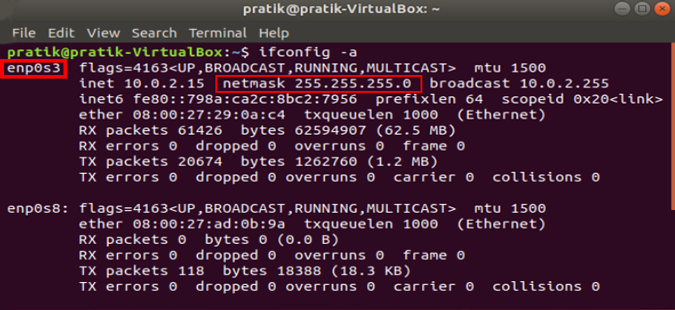
Once you have the subnet mask noted down, in my case, it’s 255.255.255.0, we can proceed further.
It is pretty simple and straight forward. We need to open the Network Adapter settings. To do that, click on the Network Icon at the top right corner of the desktop.

Now, navigate on the active network and click on the expand button for more options. Click on Wired Settings to open the Network menu.

Once you get the Wired Settings dialogue, make sure you are on the Network page. Click on the Settings icon beside the active network to open the adapter properties.
When you get the pop-up, navigate to the IPv4 tab to change the IP settings.

On the IPv4 tab, select the radio button which says “ Manual “. Some text fields will appear, you need to enter the IP address, Netmask and Gateway accordingly. Once it is validated, you can click on the Apply button to register the changes.

Again you need to restart the network for the changes to take effect. You can do it manually via command line or just switch off and switch on the Network adapter. Once done, run ifconfig on the terminal to check the IP address. It should be the same IP address which you have specified earlier.

3. How to setup static IP on Mac
If you are on macOS, setting static IP is quite similar to that of Ubuntu. But, here you don’t need the subnet mask or Default Gateway Address. Right click on the apple icon at the top left corner of the desktop. Click on System Preferences from the dropdown list.

Once the System Preferences dialogue box displays, navigate to Network and click on it to open the Network Settings

Alternatively, you can also hit Cmd+Space to trigger the Spotlight search. Type “ Network ” in the search bar and click on the icon once it appears. This will directly navigate you to the Network Settings.

From the pop-up window, select an active network interface. For example, I am connected to a WiFi network so my active network is Wi-Fi. Make sure you are on the active network tab and then click on Advanced .

A new window will open the configuration settings for that adapter. Move over to the IP settings by clicking on the TCP/IP tab .

From the Configure IPv4 menu, choose Using DHCP with manual address. Enter a static IP address in the IPv4 Address and leave the Subnet Mask and Router field as default. Click Ok to save the changes.

Now when you do an ifconfig, the system should be using the static IP you have defined in the previous times. If the IP’s have not changed, try restarting the Wi-Fi and it should fix it.
To switch back to dynamic IP, move back to “ Using DHCP ” from the Configure IPv4 menu.
4. How to setup static IP on Android

The network which you are connected to should be on top of the list. Tap on the settings icon beside the Wi-Fi network name.

Once the pop-up opens, you will see IP settings at the bottom of the menu. The default option is “DHCP”. Tap on it to change the IP configuration.

Select “ Static ” from the presented drop-down menu. Enter the desired IP address and leave the other options as default. Make sure that other devices are not using the same IP. You can see the IP address of the other devices in your network by using a small utility called Fing . For a detailed process, check our article on how to find the IP Address of any Device on your network . Once you have entered the IP, click on Save to register the change. Now, your Android phone should start using the desired IP Address.

In almost all the Android version, you get the option to set static IP Address. For some rare older Android versions, you can use a third-party app like WiFi Static . It’s free and it doesn’t require ROOT.
To switch back to dynamic IP, repeat the same procedure and select “DHCP” from the IP settings instead.
5. How to setup static IP on iPhone and iPad
If you are using an iPhone or iPad, then you can set static IP Address natively. You would need the Subnet Mask of your network. This can be obtained from the Wi-Fi settings and we would see to it in the further steps. To get started, click on the Settings icon in the dock to get to the Settings menu.

Now on the Settings menu page, tap on Wi-Fi to get to the Wi-Fi settings.

On the Wi-Fi page, you should see your connected Wi-Fi network at the top. Click on the “i” button beside it. This will open the Wi-Fi configuration window.

Once the Wi-Fi settings page appears, you will see an option called “ Configure IP “. By Default, this would be set to automatic. Just below this option, you will see “ Subnet Mask “, note it down as we will need it in the further steps. In order to set static IP, we need to change Configure IP it to Manual. Tap on it and it will open the IPv4 settings page.

There should be 3 options available on the “Configure IPv4” page. Select “ Manual ” from it. As soon as Manual IP is enabled, you will get extra text fields at the bottom to enter the IP Address, Subnet Mask, Router. We need to fill in the IP Address of our choice and Subnet Mask which we noted down in the previous step. Now, after you fill both the fields, the save button at the top right corner will be enabled. Click on it to save the static IP configuration.

Now, when you return to the Wi-Fi settings page, you will see your device is using the Static IP address. This should be the same IP address we have set in the IP configuration menu.

This static IP address will be applicable only to that particular Wi-Fi network. In case, you connect to some other Wi-Fi network the IP will change accordingly.
6. How to setup static IP to any Device from Router
Other network devices like your Wireless Printer, PS4, NAS, IP Camera, Raspberry Pi , etc. do not have an Interface. Hence, in order to configure the network, either you have to connect remotely or use the router. If you have access to the router, setting Static IP for network devices is the easiest and convenient way. I would recommend this method over any other.
So, to assign a Static IP Address to any network device, you need to login to the web portal of the router. The web portal address, username, and password are mostly printed behind the router. In case you don’t have physical access to the router, the web portal URL is mostly the PC’s gateway address. To find that, open command prompt and type the following command.
Once you have the web portal loaded, log in with the credentials. Now every router has a different web UI, but the overall structure is the same. Basically, you will have to link the IP Address to the Mac Address and Hostname of the device. So, we need to find the MAC address & Hostname of the network device. To do that, look for DHCP client list which should look something like the following screenshot.

You can get your MAC Address & Hostname under DHCP Client list. Once, you have the MAC address & Hostname noted down, we can proceed further. On most of the routers, you will have the option to set a Static IP under the section IP Mac binding or DHCP Static IP option. In case you are on a custom ROM like dd-wrt, head over to Services tab and you will have DHCP Server . Under DHCP Server, add an entry for Static Leases by clicking on the Add button.

Clicking on the Add button will create a new row. You have to enter the MAC Address, Hostname, desired Static IP and Lease time . Lease time is a unit in minutes after which your IP will be renewed. Since we are adding only 1 entry for the particular host the IP will be the same even after the renewal. Once, done click on Save changes .

Once you have configured successfully on the router, just restart the Wi-Fi on the device. When it connects it should start using the static IP. In case of issues, make sure that you have the correct MAC Address and Hostname. To check, just run the command ipconfig or look back again in the router’s DHCP client list.

These changes are written to the ROM so restarting the router won’t make changes to the static IP configuration. In order to get back to Dynamic IP, just remove the entry from the IP leases.
What’s next
Once you have started configuring the IPs on Router and network devices, you are good to go configure telnet and SSH. Have a look at our brief article on How to Enable Telnet Server in Windows 10 , Best SSH clients for iOS To Manages Remote Servers and 6 Best FTP Clients For Android . A word of caution would be to note down the static IPs assigned to devices as assigning the same IP to two network devices would render them useless.
Also Read: How To Change DNS on Windows|Mac|Android|iOS

Mrinal Saha
Mrinal is a tech geek who spends half of his day reading and writing about tech. While the nights are spent on shooting or editing YouTube videos. Feel free to geek out with him on-
You may also like
7 ways to read telegram messages without marking..., how to transfer images and videos from google..., what do various icons and symbols mean on..., 2 ways to send a snap to multiple..., what is the difference between incognito and guest..., 3 things to do if your chrome extension..., tired of random people adding you to instagram..., what happens when you disable or delete your..., can you really block youtube channels find out..., what happens when you uninstall or delete whatsapp, leave a comment cancel reply.
You must be logged in to post a comment.
How to enable IPv6 on your ASUS router or mesh Wi-Fi

IP addresses are vital for the internet and all the networks in the world. IPv6 addresses even more so, because the world has run out of IPv4 addresses. Without them, we couldn’t send data between our devices and use an ever-expanding internet. Most internet service providers (ISP) worldwide offer IPv6 internet addresses for all their clients, and enabling them is a great idea. If you have an ASUS router or mesh Wi-Fi system, here’s how to enable IPv6 on it and how to configure IPv6 internet connectivity:
Skip to chapter
Step 1. log in to your asus router or mesh wi-fi, step 2. go to the ipv6 settings on your asus router, step 3.1 set native ipv6 connections on your asus router or mesh wi-fi, step 3.2 set static ipv6 connections on your asus router or mesh wi-fi, step 3.3 set passthrough ipv6 connections on your asus router or mesh wi-fi, how to verify that your asus router or mesh wi-fi is using an ipv6 address, did you successfully enable ipv6 on your asus router or mesh wi-fi.
IMPORTANT: This guide must be followed only after your ASUS router is connected to the internet and the Wi-Fi works well in your home, using IPv4 addresses. If your WAN connection is not set up correctly, you shouldn’t be activating IPv6 on your router.
Also, for more information about IP addresses, read this guide: What is an IP address and a subnet mask, in simple terms? If you’re curious about the benefits of using IPv6 addresses for all the devices on the internet, Facebook has published an interesting study they’ve done on the topic: IPv6: It’s time to get on board .
On your PC or device, open your favorite browser and navigate to router.asus.com or your router's IP address. On newer models, the default IP address is 192.168.50.1. On older ASUS routers, the IP address is 192.168.1.1. Next, type the username and password and click or tap Sign In .

Log into your ASUS router or mesh Wi-Fi
NOTE: If you need help with other ways to log in to your ASUS router, read: How to login to your ASUS router .
When you see the admin interface of your ASUS router, look for the Advanced Settings section in the left sidebar. Find the entry named IPv6 and click or tap on it.

On the left, choose IPv6
IMPORTANT: If you don’t see the IPv6 section, your ASUS router may not be able to work with IPv6 addresses or may need the latest version of firmware to add this feature. If you’ve checked for new firmware and your ASUS router doesn’t feature IPv6 settings, it is an old model that doesn’t work with this type of IP address.
Step 3. Configure the IPv6 settings on your ASUS router or mesh Wi-Fi
After selecting IPv6 on the left, go to the IPv6 tab on the right. Click or tap the Connection type drop-down list and choose the type of connection you want.

Choose the appropriate Connection type
Depending on your specific router, you will see a longer or shorter list of connection types. However, for most people, the following options should be used:
- If you have a PPPoE internet connection , like I do, you should select Native .
- If you have a static IP internet connection, you should choose Static IPv6 .
- If you have an automatic IP internet connection, you should select Passthrough .
Depending on this choice, you get different configuration options. But before going into details about each of them in the next subchapters, let’s briefly describe the other connection types available in the dropdown list, which tend to be used only in business networks:
- FLET’S IPv6 service - a special type of IPv6 PPPoE internet connection that uses the same PPPoE connection method as IPv4 FLET'S services. Users configure their ASUS router using the IPv4 PPPoE account and password. Both IPv4 and IPv6 PPPoE settings are required to set up an IPv4/IPv6 dual-stack environment.
- Tunnel 6in4 - a tunneling protocol that encapsulates IPv6 packets on specially configured IPv4 links. A 6in4 packet format consists of the IPv6 packet preceded by an IPv4 packet header. When using this option, you need to provide static IP addresses for the server and client communicating over this tunnel.
- Tunnel 6to4 - a system that allows IPv6 packets to be transmitted over an IPv4 network without the need to configure explicit tunnels, like is the case with Tunnel 6in4 .
- Tunnel 6rd - an extension of the Tunnel 6to4 feature that allows the internet service provider (ISP) to provide a unicast IPv6 service to customers over its IPv4 network by using encapsulation of IPv6 in IPv4.
When you have a PPPoE internet connection, all you have to do is to select Native in the Connection type drop-down list and click or tap Apply .

Setting Native IPv6 connections
Your ASUS router or mesh Wi-Fi system will reboot, apply your settings, and receive an IPv6 address for your internet service provider.
When you have a static IP internet connection, choose Static IPv6 in the Connection type drop-down list. Then, you have to enter lots of information like the IPv6 address for your WAN connection, the IPv6 Gateway, IPv6 DNS servers, and so on. You need to talk to the tech support service to get all that information so that you can complete it correctly.

Setting Static IPv6 connections
When you are done entering everything, verify that all the IP addresses were typed correctly, and then hit the Apply button. After the router restarts, your IPv6 settings are applied.
If your internet connection uses an automatically assigned IP address from your provider, in the IPv6 tab, choose Passthrough for the Connection type.

Setting Passthrough IPv6 connections
There’s no other setting to be made. Only hit Apply , wait for the router or mesh Wi-Fi to reboot, and it will be receiving an IPv6 address in no time.
After you’ve made your settings, you may want to verify if everything works well and if your ASUS router has an IPv6 address. To do that, fire up your favorite web browser on a computer connected to the network managed by your router and visit Test your IPv6 . This site automatically tests if everything works well, and it gives you a readiness score. If it’s 10 out of 10, all is great. 🙂

Test your IPv6 settings
If it’s not, the site shares what it finds missing in your IPv6 connectivity. This information might help you figure out what’s wrong and improve your IPv6 settings on your ASUS router or mesh Wi-Fi.
By the end of this guide, you should have an IPv6 internet connection enabled on your ASUS router. Hopefully, everything worked well from the very first try, and the website shared earlier confirms that IPv6 is configured correctly. Before closing, tell me if the IPv6 settings on your ASUS router work as intended and whether you have any issues. Use the commenting options below, and let’s chat.
- Subscribe to newsletter.
Receive our daily newsletter. You may unsubscribe at any time. For details read the Privacy policy.
Check this box if you agree to receive our emails.
You are subscribed to www.digitalcitizen.life .
Receive our weekly newsletter. You can unsubscribe at any time. For details, read our Privacy policy.
Related articles

What is ASUS Smart Connect? How to turn it On or Off!

Best ASUS routers for streaming and gaming in 2022

How to set up a VPN on an ASUS router or mesh Wi-Fi

How to configure and use Instant Guard on ASUS Wi-Fi routers
How to configure a static IP on Windows 10 or 11
Do you need to switch from a dynamic to a static IP address configuration on Windows 11 or 10? Here's how.

- Windows 11 static IP
- Windows 10 static IP
On Windows, the router's Dynamic Host Configuration Protocol (DHCP) server is (usually) responsible for assigning a dynamic Transmission Control Protocol/Internet Protocol (TCP/IP) configuration to every device in the network, including to your computer running Windows 11 or Windows 10.
Although a dynamic IP address is the recommended configuration for most situations, you may need to change to a static IP address if you're thinking about setting up a printer or file sharing, or you have to configure port forwarding on the router to your computer.
The reason is that a dynamic network configuration can change at any time after the lease from the DHCP expires and if the address changes, network resources you may have configured will stop working. Setting a static IP address will always stay the same on the computer, allowing a more reliable experience sharing resources in the network or forwarding ports.
Whatever the reason, on Windows 10 and 11, you have many ways to configure a static TCP/IP address, including using the Settings app and Command Prompt.
This guide will walk you through the different ways to configure a static network configuration on Windows 11 and 10.
How to set a static TCP/IP network configuration on Windows 11
On Windows 11, you can change your computer's dynamic IP configuration to static in at least two ways through the Settings app or commands.
Configure IP from Settings app
Get the Windows Central Newsletter
All the latest news, reviews, and guides for Windows and Xbox diehards.
To assign a permanent TCP/IP configuration on Windows 11, use these steps:
- Open Settings .
- Click on Network & internet .
- (Optional) Click on Advanced network settings .
- Under the "More settings" section, click on Hardware and connection properties.
- Note the current IPv4 , Subnet mask , Default Gateway , and DNS server addresses to determine the new configuration, as it has to be in the same network scope.
- Click the Ethernet or Wi-Fi page on the right side from the "Network & internet." page.

- Quick note: If you select the Wi-Fi page, you need to click on the connection properties to access the network settings.
- Click on the Edit button for the "IP assignment" setting.

- Select the Manual option from the drop-down menu.
- Turn on the IPv4 toggle switch.
- Confirm the IP address for the computer – for example, 10.1.4.90.
- Confirm the subnet mask for the configuration – for example, 255.255.255.0.
- Confirm the default gateway address (usually your router's IP) – for example, 10.1.4.1.
- Confirm the preferred DNS address – for example, 10.1.4.1.

- Quick note: In a home network, you may also be able to use the router's IP address for the DNS configuration. You can also use third-party DNS services like Google Public DNS, Cloudflare, Cisco's OpenDNS, and others.
- (Optional) Select the "On (automatic template)" option for the "DNS over HTTPS" setting and leave the "Fallback to plaintext" option disabled unless you want to encrypted as well as unencrypted traffic or you're troubleshooting connectivity.
- Quick note: DNS over HTTPS (DoH) is a feature that encrypts the DNS queries over the HTTPS protocol to improve security and privacy on the internet. You only want to enable this feature if the DNS server supports this feature.
- Confirm the alternate DNS address (if applicable).
- (Optional) Select the "On (automatic template)" option for the "DNS over HTTPS" setting and leave the "Fallback to plaintext" option disabled.
- Click the Save button.
Once you complete the steps, the computer will start using the static network configuration. If everything has been configured correctly, you should be able to open the web browser to access the internet.
If you entered an address (such as the DNS address) and then changed it, you probably won't be able to save the settings. If this is the case, cancel the configuration, start over, enter the correct configuration, and then try to save the settings.
Configure IP from Command Prompt
To set a static TCP/IP configuration on Windows 11, use these steps:
- Open Start .
- Search for Command Prompt , right-click the top result, and select the Run as administrator option.
- Type the following command to see your current networking configuration and press Enter : ipconfig /all
- Confirm the name of the adapter and the networking configuration, including the IPv4 , Subnet mask , Default Gateway , and DNS Servers .

- Type the following command to configure a static TCP/IP address and press Enter : netsh interface ip set address name= "ADAPTER-NAME" static IP-ADDRESS SUBNET-ADDRESS DEFAULT-GATEWAY-ADDRESS
In the above command, replace ADAPTER-NAME with the name of your network adapter. Change IP-ADDRESS SUBNET-ADDRESS DEFAULT-GATEWAY-ADDRESS with the device IP address, subnet mask, and default gateway addresses you want. For example, this command sets the 10.1.4.90, 255.255.255.0, 10.1.4.1 configuration: netsh interface ip set address name="Ethernet 10Gb" static 10.1.4.90 255.255.255.0 10.1.4.1

- Type the following command to set a DNS server address and press Enter : netsh interface ip set dns name="ADAPTER-NAME" static DNS-ADDRESS
In the command, change ADAPTER-NAME with your adapter's name and DNS-ADDRESS with the DNS server address of the network. For example, this command sets the local router as the DNS server: netsh interface ip set dns name="Ethernet 10Gb" static 10.1.4.1
- Type the following command to set an alternate DNS server address and press Enter : netsh interface ip add dns name="ADAPTER-NAME" DNS-ADDRESS index=2
In the command, change ADAPTER-NAME with the adapter's name and DNS-ADDRESS with an alternate DNS server address. For example, netsh interface ip add dns name="Ethernet 10Gb" 1.1.1.1 index=2
After you complete the steps, the commands will set a static network configuration on Windows 11.
How to set a static TCP/IP network configuration on Windows 10
On Windows 10, you can also use the Settings app and Command Prompt to set up a static IP network configuration.
To assign a permanent TCP/IP configuration on Windows 10, use these steps:
- Click on Ethernet or Wi-Fi .
- Click on the active connection on the right side.

- Click the Edit button for the "IP assignment" setting.

- Select the Manual option.
- Confirm the subnet prefix length (subnet mask) for the configuration – for example, 24 to specify the 255.255.255.0 subnet mask.

- Quick tip: It's important to use the number that represents the network instead of the subnet mask. Otherwise, the configuration won't save. If you don't know the subnet prefix length for your subnet mask, you can use any online subnet calculator to find out.
Once you complete the steps, Windows 10 will start using the static IP configuration. If you lose network connectivity, restart the computer to regain access to the local network and internet.
To change from dynamic to static IP address with commands on Windows 10, use these steps:
In the command, change ADAPTER-NAME with your adapter's name and DNS-ADDRESS with the DNS server address of the network. For example, this command sets the local router as the DNS server: netsh interface ip set dns name=" Ethernet 10Gb" static 10.1.4.1
In the command, change ADAPTER-NAME with the adapter's name and DNS-ADDRESS with an alternate DNS server address. For example, netsh interface ip add dns name="Ethernet0" 1.1.1.1 index=2
After you complete the steps, the network configuration will switch from dynamic to static on Windows 10.
Mauro Huculak is technical writer for WindowsCentral.com. His primary focus is to write comprehensive how-tos to help users get the most out of Windows 10 and its many related technologies. He has an IT background with professional certifications from Microsoft, Cisco, and CompTIA, and he's a recognized member of the Microsoft MVP community.
- 2 A $770 discount gets you this 'monster of a gaming laptop' with an RTX 4080
- 3 This Samsung Galaxy S24 Ultra deal CANNOT be missed, especially if you're a Windows PC user
- 4 You can get a Z1 Extreme ROG Ally for less than the price of an entry-level Steam Deck right now. Here's how.
- 5 I just beat my first "Soulslite" — It was challenging but extremely satisfying thanks to the multiplier combat system, platforming, and rewarding exploration
How-To Geek
How to assign a static ip address in windows 10 or windows 11.

Your changes have been saved
Email Is sent
Please verify your email address.
You’ve reached your account maximum for followed topics.
The Best Last Minute Amazon Prime Day Deals of 2024
Switching to a dual mouse setup is the best thing i’ve done this year, today's nyt connections hints and answer for july 18 (#403), quick links, what is a static ip address, assign static ip addresses via your router, how to set a static ip address in windows 11, how to set a static ip address in windows 10, how to set a static ip address in windows 7 or 8 using "network connections", set a static ip address in windows vista, set a static ip address in windows xp, key takeaways.
- To set a static IP address in Windows 10 or 11, open Settings -> Network & Internet and click Properties for your active network.
- Choose the "Edit" button next to IP assignment and change the type to Manual.
- Flip the IPv4 switch to "On", fill out your static IP details, and click Save.
Sometimes, it's better to assign a PC its own IP address rather than letting your router assign one automatically. Join us as we take a look at assigning a static IP address in Windows.
A static IP address is manually set to a permanent, fixed address rather than being assigned automatically by your router using a procotol known as Dynamic Host Configuration Protocol (DHCP). DHCP is a handy way for devices to connect to your network more easily, because you don't have to configure IP addressing for each new device yourself. The downside to automatic addressing is that it's possible for a device's IP address to change from time to time, which is why people choose static IPs for certain types of devices. For example:
- You have a device like a home media server that you want to be able to find using the same IP address or host name each time.
- You have certain apps that can only connect to network devices using their IP address. In particular, many older networking apps suffer this limitation.
- You forward ports through your router to devices on your network. Some routers play nice with port forwarding and dynamic IP addresses; others do not.
Whatever your reason, assigning static IP addresses to devices is not difficult, but you do have a choice to make---whether to do it from the router or on the device itself.
Related: How to Set a Static IP Address in Ubuntu
While this article covers assigning static IP addresses to PCs within Windows itself, there is another way to go about it. Many routers allow you to assign a pool of IP addresses that are handed out to specific devices (based on the device's physical, or MAC address). This method offers a couple of significant advantages:
- IP addresses are still managed by the router, meaning that you won't have to make (and keep up with) changes on each individual device.
- It's easier to assign addresses within the same IP address pool your router uses.
This article is about assigning static IP addresses directly to PCs running Windows. We've already got a great guide on How to Set Static IP Addresses On Your Router , so if that's the way you want to go, be sure to give it a read.
With all that in mind, though, let's take a look at how to assign static IP addresses within any version of Windows.
Related: How to Find Your Router's IP Address on Any Computer, Smartphone, or Tablet
To set a static IP address in Windows 11, you'll want to open Settings, go to Network & Internet, and then find the Properties for your network. Inside there you'll be able to click the Edit button for IP Assignment and then fill out the manual network details.
First, open up the Settings app and then find Network & Internet on the left-hand side. You'll be presented with a panel that shows your current network connection. You can click where it says "Properties" right underneath the network, or if you have multiple network connections you can drill down into the specific network to see the IP address details for each one . In this case it's called "Ethernet", but you will most likely see "Wi-Fi" as the option to choose.

Once you've drilled down into the network connection that you want to set a manual IP for, scroll down until you see "IP Assignment" and then click the Edit button to the right.

Once there, you'll flip the drop-down to "Manual" and switch the IPv4 switch to "On". At this point you can fill out your network details and click Save to finish.

You can also use the old-school Network Connections panel in Windows 11, so if you prefer to use that method, keep reading.
If you're interested in more advanced networking, you might need to set up a static TCP/IP route , reset the entire TCP/IP stack on Windows , check open TCP/IP ports , find your MAC address on Windows , or find your IP address from the Command Prompt . We've got you covered there too.
To set a static IP address in Windows 10, you'll need to open the Settings app and drill down to Network & Internet. From there you'll select Properties for your network, and then the Edit button next to IP Assignment where you can input a manual IP address.
First, open the Settings app and locate the Network & Internet button.

On the next screen you'll see your network status, which should show you your active network. Here you'll want to click the Properties button. If you have multiple different networks, you could select them from the left-hand menu---in our case you'll notice we have both Wi-Fi and Ethernet networks, so you'll want to pick the one that you are trying to set a manual IP address for. You'll notice this is the same method we use when we're trying to find an IP address on Windows 10 .

On the network properties screen, scroll down until you see "IP settings" and click the Edit button under "IP assignment".

In the resulting popup window, change the Edit IP settings dropdown to Manual and then flip the IPv4 switch to "On". Fill out the details, click Save, and you should be good to go.

You might need to reboot to get all of your applications to work properly, just because it's Windows.
It's worth noting that you can use the old Network Connections method to set an IP address in any version of Windows, so if you prefer that method, keep reading.
To change the computer's IP address in Windows 7, you'll need to open the "Network Connections" window. Hit Windows+R, type "ncpa.cpl" into the Run box, and then hit Enter.

In the "Network Connections" window, right-click the adapter for which you want to set a static IP address, and then select the "Properties" command.

In the properties window for the adapter, select "Internet Protocol Version 4 (TCP/IPv4)" and then click the "Properties" button.

Select the "Use the following IP address" option, and then type in the IP address, subnet mask, and default gateway that corresponds with your network setup. Next, type in your preferred and alternate DNS server addresses. Finally, select the "Validate settings upon exit" option so that Windows immediately checks your new IP address and corresponding information to ensure that it works. When you're ready, click the "OK" button.

And then close out of the network adapter's properties window.

Windows automatically runs network diagnostics to verify that the connection is good. If there are problems, Windows will give you the option of running the Network troubleshooting wizard. However, if you do run into trouble, the wizard likely won't do you too much good. It's better to check that your settings are valid and try again.
Changing your IP from DHCP to a Static address in Vista is similar to other versions of Windows, but getting to the correct location is a bit different. Open the Start Menu, right-click on Network, and select Properties.

The Network and Sharing Center opens...click on Manage network connections.

Right-click on the network adapter you want to assign an IP address and click Properties.

Highlight Internet Protocol Version 4 (TCP/IPv4) then click the Properties button.
![sshot-2010-06-06-[02-49-46]](https://static1.howtogeekimages.com/wordpress/wp-content/uploads/2010/06/sshot20100606024946.png "how to set a static ip asus router")
Now change the IP, Subnet mask, Default Gateway, and DNS Server Addresses. When you're finished click OK.
![sshot-2010-06-06-[02-51-04]](https://static1.howtogeekimages.com/wordpress/wp-content/uploads/2010/06/sshot20100606025104.png "how to set a static ip asus router")
You'll need to close out of Local Area Connection Properties for the settings to go into effect.
![sshot-2010-06-06-[02-51-16]](https://static1.howtogeekimages.com/wordpress/wp-content/uploads/2010/06/sshot20100606025116.png "how to set a static ip asus router")
Open the Command Prompt and use the
command to verify that the changes were successful.
![sshot-2010-06-06-[02-52-29]](https://static1.howtogeekimages.com/wordpress/wp-content/uploads/2010/06/sshot20100606025229.png "how to set a static ip asus router")
To set a Static IP in Windows XP, right-click the "My Network Places" icon, and then select "Properties."

Right-click the adapter for which you want to set the IP, and then select "Properties" from the context menu.

Select the "Internet Protocol (TCP/IP)" entry, and then click the "Properties" button.
![sshot-2010-06-05-[22-27-58]](https://static1.howtogeekimages.com/wordpress/wp-content/uploads/2010/06/sshot20100605222758.png "how to set a static ip asus router")
Select the "Use the following IP address" option. Type in the IP address, subnet mask, default gateway, and DNS server addresses you want to use. When you're finished, click the "OK" button.
![sshot-2010-06-05-[22-28-15]](https://static1.howtogeekimages.com/wordpress/wp-content/uploads/2010/06/sshot20100605222815.png "how to set a static ip asus router")
You will need to close out of the adapter's properties window before the changes go into effect.
![sshot-2010-06-05-[22-29-15]](https://static1.howtogeekimages.com/wordpress/wp-content/uploads/2010/06/sshot20100605222915.png "how to set a static ip asus router")
And you can verify your new settings by using the
command at the command prompt.
![sshot-2010-06-05-[22-37-10]](https://static1.howtogeekimages.com/wordpress/wp-content/uploads/2010/06/sshot20100605223710.png "how to set a static ip asus router")
By and large, it's better to let most of your devices have their IP addresses assigned automatically by your router. Occasionally, though, you might want to set a static IP address for a particular device. While you can set static IP addresses directly on your devices (and this article has shown you how to do just that on Windows PCs), we still recommending setting up static IP addressing on your router if possible. It will just make life easier.
Related: How to Find Any Device's IP Address, MAC Address, and Other Network Connection Details
- Search forums
- Wireless Networking
- ASUS Wireless
- ASUSWRT - Official
ASUSWRT 386 new guest network IP space and DHCP static IPs
- Thread starter brentil
- Start date Nov 11, 2020
- Tags dhcp static lease guest network
SNBForums Code of Conduct
SNBForums is a community for everyone , no matter what their level of experience.
Please be tolerant and patient of others, especially newcomers. We are all here to share and learn!
The rules are simple: Be patient, be nice, be helpful or be gone!

Occasional Visitor
- Nov 11, 2020
We were talking about this in the RT-AC86U 386 firmware but saw people with RT-AC68U devices starting to have the same issue and wanted to pop it out into it's own thread. There is a new behavior with the 386 firmware that Guest Network 1 uses a different IP space from what you have defined on your main network. Main Network = 192.168.1.xyz Guest Network 1 = 192.168.101.xyz (2.4 GHz) and 192.168.102.xyz (5 GHz) The problem is you can no longer define DHCP static leases for any device on Guest Network 1 in these new IP spaces because the UI says these 192.168.101.xyz and 192.168.102.xyz IP ranges are invalid. If you have DHCP static leases defined they will be ignored in favor of these new IP ranges. If you run an IoT network on Guest Network or have firewall rules based on IP addresses you'll start to have issues. We did find a workaround though. Guest Network 2 & 3 do not assign new IP spaces to devices and continue to use the main IP space so if you move a guest network to one of those you need DHCP static leases on they'll work again. So for example I moved my IoT network from GN1 to GN2 and the moved my actual guests on my network to GN1 so those exist in the new IP space which actually makes things easier since being in a different class C my firewall rules block them automatically.
I believe I have been a 'victim' of this new behavior on my AC68U. I am running my Asus router in AP mode. After the update, clients connecting to guest network 1 weren't able to be assigned an IP address by my main router (an OPNsense box) anymore. Switching from guest network 1 to 2 solved that issue for me. In my mind this is a bug. If you run the Asus router in AP mode, guest network clients should be served an IP address by the authoritative DHCP server on the network, not by the Asus access point.
cannondale said: In my mind this is a bug. If you run the Asus router in AP mode, guest network clients should be served an IP address by the authoritative DHCP server on the network, not by the Asus access point. Click to expand...
Regular Contributor
- Nov 19, 2020
brentil said: We were talking about this in the RT-AC86U 386 firmware but saw people with RT-AC68U devices starting to have the same issue and wanted to pop it out into it's own thread. There is a new behavior with the 386 firmware that Guest Network 1 uses a different IP space from what you have defined on your main network. Main Network = 192.168.1.xyz Guest Network 1 = 192.168.101.xyz (2.4 GHz) and 192.168.102.xyz (5 GHz) The problem is you can no longer define DHCP static leases for any device on Guest Network 1 in these new IP spaces because the UI says these 192.168.101.xyz and 192.168.102.xyz IP ranges are invalid. If you have DHCP static leases defined they will be ignored in favor of these new IP ranges. If you run an IoT network on Guest Network or have firewall rules based on IP addresses you'll start to have issues. We did find a workaround though. Guest Network 2 & 3 do not assign new IP spaces to devices and continue to use the main IP space so if you move a guest network to one of those you need DHCP static leases on they'll work again. So for example I moved my IoT network from GN1 to GN2 and the moved my actual guests on my network to GN1 so those exist in the new IP space which actually makes things easier since being in a different class C my firewall rules block them automatically. Click to expand...
Senior Member
- Nov 20, 2020
I’ve been trying to follow along with this here and in the .386 beta thread and I’m confused a bit. So the guest network #1 is no longer isolated from the rest of the network regardless of whether you’ve allowed that behavior or not via the tickbox setting, yes no. Also, is this behavior only for those using aiMesh or is it behavior for all guest #1 on .386 I experienced some strange behavior on .386 guest network not using aiMesh, but this is really messed up if the guest network is not isolated And you’ve not allowed it specifically in the settings. I mean wtf is the setting there for if it’s gonna be ignored for anyway

Very Senior Member
I wonder who thought this behavior was preferred?

Part of the Furniture
cannondale said: I believe I have been a 'victim' of this new behavior on my AC68U. I am running my Asus router in AP mode. After the update, clients connecting to guest network 1 weren't able to be assigned an IP address by my main router (an OPNsense box) anymore. Switching from guest network 1 to 2 solved that issue for me. In my mind this is a bug. If you run the Asus router in AP mode, guest network clients should be served an IP address by the authoritative DHCP server on the network, not by the Asus access point. Click to expand...
bbunge said: There is no advantage in running a guest wifi in AP mode. Guest networks are to block access to the LAN. Thus using a different subnet for the guest wifi is a good thing not a bug. Click to expand...
ATLga said: I’ve been trying to follow along with this here and in the .386 beta thread and I’m confused a bit. So the guest network #1 is no longer isolated from the rest of the network regardless of whether you’ve allowed that behavior or not via the tickbox setting, yes no. Also, is this behavior only for those using aiMesh or is it behavior for all guest #1 on .386 I experienced some strange behavior on .386 guest network not using aiMesh, but this is really messed up if the guest network is not isolated And you’ve not allowed it specifically in the settings. I mean wtf is the setting there for if it’s gonna be ignored for anyway Click to expand...
jplw said: My experience is that I cannot access the main network from Guest network 1, but I could acess Guest network 1 from the main network. I could not acces Guest network 2 from the main network. Click to expand...
- Nov 23, 2020
brentil said: ...There is a new behavior with the 386 firmware that Guest Network 1 uses a different IP space from what you have defined on your main network. Main Network = 192.168.1.xyz Guest Network 1 = 192.168.101.xyz (2.4 GHz) and 192.168.102.xyz (5 GHz)... Click to expand...

ATLga said: Ok, so I upgraded back to: Version 3.0.0.4.386.40451 2020/10/22 60.01 MBytes I do not use aiMesh or have any other routers on my single ac86u network. I then enabled guest #1 on my ac86u. It does NOT behave as you've stated. My main network = 192.168.50.xyz My Guest network 1 = 192.168.50.xyz No different ip space showing for me. Click to expand...
OzarkEdge said: Then it will when the next RC2 beta gets released. OE Click to expand...
ColinTaylor
ATLga said: I thought that sounded proper, but on 2nd thought, shouldn't main always be able to access guest but not the other way around. Click to expand...
bbunge said: Do you have Access Intranet enabled in your Guest 1 WIFI? If so you will not have the 192.168.101.0/24 or 192.168.102.0/24 subnet. And yes, the new Guest WIFI subnetting has been implemented and for some of us it is a good thing. Click to expand...

- Nov 25, 2020
Interesting thread - I have put my AC88U to AP-mode, and the guest networks are compeltely useless now. I have 2,4 1&2 activated. Not only that bandwith limitations do not work anylonger, no, you can easily access devices in the other networks. From guest and to guest. So for me AP mode and guest networks do not work together at all. The checkbox for "allow intranet access" doesnt even exist ... a warnign at least would be nice. So looking at the development described above I hope they have their own mini dhcp for guest in ap mode with future fw releases, otherwise it is pointless, or they could finally enable VLAN tagging....
dffvb said: Interesting thread - I have put my AC88U to AP-mode, and the guest networks are compeltely useless now. I have 2,4 1&2 activated. Not only that bandwith limitations do not work anylonger, no, you can easily access devices in the other networks. From guest and to guest. So for me AP mode and guest networks do not work together at all. The checkbox for "allow intranet access" doesnt even exist ... a warnign at least would be nice. So looking at the development described above I hope they have their own mini dhcp for guest in ap mode with future fw releases, otherwise it is pointless, or they could finally enable VLAN tagging.... Click to expand...
OzarkEdge said: Guest WLAN clients in AP Mode never were isolated from LAN/WLAN clients, yes? Click to expand...
- Nov 28, 2020
ATLga said: I thought that sounded proper, but on 2nd thought, shouldn't main always be able to access guest but not the other way around. The way I thought guest worked was Guest cannot access intranet unless specifically told yes with the tickbox setting. Asus faq confirms this. Seems like main should always be allowed to access guest though. this faq from Sep 2020 clearly needs some work, especially 2 at the bottom where it says devices won’t show in network map GUI if they are on guest. They do and have done so for awhile. [Wireless Router] How to set up Guest Network | Official Support | ASUS USA Click to expand...
Similar threads
- Jun 19, 2024
- ASUS BE Routers & Adapters (Wi-Fi 7)
- Jun 1, 2024
- Asuswrt-Merlin
- May 23, 2024
- Sep 21, 2023
- Jan 11, 2024
- ASUS AC Routers & Adapters (Wi-Fi 5)
| Thread starter | Title | Forum | Replies | Date |
|---|---|---|---|---|
| 0 | ||||
| 2 | ||||
| 6 | ||||
| 10 | ||||
| 4 | ||||
| 2 | ||||
| 20 | ||||
| 5 | ||||
| 6 | ||||
| 1 |
- Started by GAndreone
- Started by bidenkoanton
- Dec 5, 2023
- Started by dwp
- Oct 29, 2023
- Started by StrikerXXX
- Oct 18, 2023
- Replies: 10
- Started by MDFDoom
- Yesterday at 10:53 AM
- Started by Clark Griswald
- May 9, 2024
- Started by Tons
- Jan 10, 2024
- Replies: 20
- Dec 19, 2023
- Started by Lyxx
- Nov 11, 2023
- Started by binib26607
- Sep 29, 2023
Latest threads
- Started by torstein
- Today at 11:45 AM
- Started by YunSung Jang
- Today at 8:40 AM
- Started by woozy-wave
- Today at 3:53 AM
- Started by Bobbize
- Yesterday at 11:18 PM
- Started by fotingo
- Yesterday at 10:41 PM
Support SNBForums w/ Amazon
Sign up for snbforums daily digest, members online.
- rudoyeugene
- TheLostSwede
- samirchagan
- cinemaniarota
- aduquenator
- Charlestesmunk
- SeriousFamily
- Viktor Jaep
- ivooliveira
- ZebMcKayhan
Welcome To SNBForums
SNBForums is a community for anyone who wants to learn about or discuss the latest in wireless routers, network storage and the ins and outs of building and maintaining a small network.
If you'd like to post a question, simply register and have at it!
While you're at it, please check out SmallNetBuilder for product reviews and our famous Router Charts , Ranker and plenty more!
- This site uses cookies to help personalise content, tailor your experience and to keep you logged in if you register. By continuing to use this site, you are consenting to our use of cookies. Accept Learn more…
Stack Exchange Network
Stack Exchange network consists of 183 Q&A communities including Stack Overflow , the largest, most trusted online community for developers to learn, share their knowledge, and build their careers.
Q&A for work
Connect and share knowledge within a single location that is structured and easy to search.
Static IPs for Asus router VPN clients
I have asus router RT-AC58U (fw 3.0.0.4.382_51899) and have successfully set up OpenVPN. Here are my custom settings: OpenVPN custom settings
these setting automatically generate file
config.ovpn
I know it is possible to to create file in ccd directory with
but I cannot create them manually, everything is generated. I can enable client specific options and add clients throught ui, which generates ccd directory with client files, but the generated content looks like this:
Is it possible to assign VPN clients static IP addresses?
I also have only one client.ovpn possible to export which has always the same CN == client
- 1 Can you generate an "iroute 10.8.0.9 10.8.0.10" ? This will generate a static on each side with a /30 netmask. (You can use 10.8.0.8 as that is not a valid IP when dealing ng with /30's) – davidgo Commented Oct 26, 2019 at 23:01
- Yes, I generated also "iroute 10.8.0.9 10.8.0.10" but nothing changed, still got some IP like 10.8.0.6 – Iwaneez Commented Oct 27, 2019 at 8:50
I managed to make it work by applying following steps:
- You need to activate ssh access to your router (+ setup username and password)
- Login to your router ssh username@routerIp
- There is a writable directory /jffs . Create some config structure under it e.g. /jffs/configs/openvpn/ccd (use mkdir )
- In ccd dir create file with same name as your vpn client username (e.g. touch nuc )
- Write config for your client in this file ( vi nuc )
- Write your client's config there using format ifconfig-push staticIP mask (e.g. ifconfig-push 10.0.8.10 255.255.255.0 ) and save
- Leave secure shell ( exit )
- Log into your router's ui, go to OpenVpn setup menu and fill the path to your client config into "Custom Configuration" field: client-config-dir /jffs/configs/openvpn/ccd Also don't forget to switch Username / Password Auth. Only to "Yes" (otherwise client config files should be named by client's CN)
- Save router config clicking on Apply button
Now you can connect with vpn client and you will get the set up IP (mine was 10.0.8.10)
You must log in to answer this question.
Not the answer you're looking for browse other questions tagged openvpn static-ip asus ..
- The Overflow Blog
- The framework helping devs build LLM apps
- How to bridge the gap between Web2 skills and Web3 workflows
- Featured on Meta
- Upcoming initiatives on Stack Overflow and across the Stack Exchange network...
- Announcing a change to the data-dump process
Hot Network Questions
- How to use chemfig package?
- Flights canceled by travel agency (kiwi) without my approval
- A story about a personal mode of teleportation, called "jaunting," possibly in Analog or Amazing Stories
- Why are maximum age restrictions so rare?
- Why are there two cables connected to this GFCI outlet?
- Can loops/cycles (in a temporal sense) exist without beginnings?
- Book where an Earth woman travels with human-like aliens to their planet, where all men are bald
- Wait, ASCII was 128 characters all along?
- The book where someone can serve a sentence in advance
- I can't find a nice literal translation for "Stella caelis exstirpavit"
- Teaching students how to check the validity of their proofs
- Can every kind of object perform actions?
- Why can THHN/THWN go in Schedule 40 PVC but NM cable (Romex) requires Schedule 80?
- What are good reasons for declining to referee a manuscript that hasn't been posted on arXiv?
- Why is this image from pianochord.org for A11 labeled as an inversion, when its lowest pitch note is an A?
- How should I run cable across a steel beam?
- Can I cause a star to go supernova by altering the four fundamental forces?
- Is the XOR of hashes a good hash function?
- Physical meaning of symmetric and antisymmetric wavefunction
- The Zentralblatt asked me to review a worthless paper, what to do?
- Colombian Sudoku, Cows and Bulls again…
- How to connect to "upstands" on the PCB without soldering?
- Can your boss take vouchers from you, offered from suppliers?
- What was the purpose of the SCAN commands on the Intel 8272 / NEC μPD765 floppy disk controllers?
OpenStack / Cloud / Virtualization / Linux
Asus rt-ac66u: how to configure dhcp static ip reservations for iot/smart home devices.

I’ve never been a fan of using DHCP reservations to reserve an IP address for a device. However, there are a few situations where a static reservation is the best route to take.
Try your hand with Home Automation via devices like the Wink Hub, IP cameras , smart plugs , satellite receivers , or even the Raspberry Pi and you will know full well the right time to use a static IP reservation.
In this post, I am going to walk you through that process on the Asus RT-AC66u.
First, log into your Routers webUI, select “ LAN ” in the left-hand menu. Then select the “DHCP Server” tab. Scroll midway down the page. Locate “Enable Manual Assignment” and select the “Yes” radio button.

Just below the section above, you will see a drop down box that you can use to select your device using the MAC or currently assigned IP. Enter the “Hostname” for the device. Select “Add/Delete “. This will add your device to the list.

Scroll down and find your device in the list. Select the icon to the left. Change the “Name” of the device if you so desire. The only really important information here is the “IP” and the “MAC”.

Here you also can change the default icon for the device, or add your own custom icons. Here, I am using a camera icon that I downloaded.

Below you can see some of the custom icons and names that I have set to help me keep track of my devices.

- Click to share on Twitter (Opens in new window)
- Click to share on Facebook (Opens in new window)
- Click to share on LinkedIn (Opens in new window)
- Click to share on Reddit (Opens in new window)
One thought on “ Asus RT-AC66U: How to Configure DHCP Static IP Reservations for IOT/Smart Home Devices ”
Thanks, Just used your information to give the NAS a standard address. Can you tell where you got your icons? The Asus-router accepts a .jpg-file but i like your icons more 🙂 With friendly greetings, Martin
Leave a Reply Cancel reply
This site uses Akismet to reduce spam. Learn how your comment data is processed .
Discover more from FATMIN
Subscribe now to keep reading and get access to the full archive.
Type your email…
Continue reading
Get the Reddit app
A community for support, discussions, and recommendations related to ASUS. Welcome!
ASUS changed the router static IP addresses to work only if the static IP is under DHCP range
I always configure my DHCP range to be between 192.168.0.100 to 255 .
Because I reserve the range up to 192.168.0.99 to some devices that I want to have static IPs, like my wireless printer.
I.e., out of the DHCP range, to make sure any other devices doesn't get that any IP lower than .100 by accident.
All the static IPs were assigned using the router interface, not in the device itself.
And I do this way for decades, with different routers from different manufacturers (home brands, like Asus, TP-Link and NetGear).
But few weeks ago, my RT-AX88U , which is under auto update (yeap, I know), started to act in a different way: static IP will work only if the IP is under the DHCP range. So, my wireless printer started to get a totally random IP (and all other devices that previously were working with the static IPs, like the NAS, my production machine, etc).
I took hours for me to figure out the reason.
I've sent an email to ASUS Support, but as they've updated their documentation to state that static IPs should be under the DHCP range, I received the canned answer that "it's works as expected".
I even pointed to the DHCP RFC , where it has nothing saying that static IPs should be under the DHCP range and it's even stated that:
DHCP must coexist with statically configured, non-participating hosts and with existing network protocol implementations.
But the support keeps pointing me to the updated FAQ (which now states that static IPs should be in the DHCP range) and asking me to reset my router.
[Wireless Router] How to reset to factory default and recover previous setups?
Send the page link to your email
Please enter your email
Scan QR code to open this page with your smart phone.
If you are considering initializing the settings of your ASUS router, but still like to keep your previous setups after resetting. Please follow the steps below. Please login to ASUS Web GUI to complete all the setups.
[Wireless Router] How to enter the router setting page(Web GUI)?

Notice: Router will automatically reconnect after the config file is uploaded. Please reenter to ASUS Web GUI if you need any further setups.
Note: You could also press “Create A New Network" and follow the QIS process to create a new network. [Wireless Router] How to use the QIS (Quick Internet Setup) to set up Router ? (Web GUI)
Was this information helpful?
What we can do to improve the article?
- Above information might be partly or entirely quoted from exterior websites or sources. please refer to the information based on the source that we noted. Please directly contact or inquire the sources if there is any further question and note that ASUS is neither relevant nor responsible for its content/service
- This information may not suitable for all the products from the same category/series. Some of the screen shots and operations could be different from the software versions.
- ASUS provides the above information for reference only. If you have any questions about the content, please contact the above product vendor directly. Please note that ASUS is not responsible for the content or service provided by the above product vendor.
- Brand and product names mentioned are trademarks of their respective companies.
COMMENTS
In general, the device connected to ASUS router will receive a dynamic private IP address from router DHCP server, like 192.168.1.3. However, if you want to share files in a computer to other devices, then you might need a manual assign IP function to set a static IP for the computer so you don't need to search and confirm the IP address of the ...
To set up a Static/specific IP address: Step 1: Launch a browser and access router settings by keying in https://192.168.1.1 on the address bar. Click "LAN" on the Advanced Settings menu on the left panel.
1. Please check LAN IP address subnets of your two ASUS routers. The subnet of the first router is 192.168. 50.X; The subnet of the second router is 192.168. 100.X; Note: If you don't know how to check LAN IP address of your routers, please refer to here.. 2. Please check if you connect a LAN port of the first ASUS router to the WAN port of the second ASUS router.
Without DHCP, you would need to hop on a computer, log into your router's admin panel, and manually assign an available address to your friend's device, say 10.0.0.99. That address would be permanently assigned to your friend's iPad unless you went in later and manually released the address. With DHCP, however, life is so much easier.
10 minutes. TOOLS. Windows 10 or 11. Step 1: Open the Command Prompt. Your first step should be to track down your computer's current IP address, subnet mask, and default gateway. Do this by ...
Click on LAN from the left pane. Click on the DHCP tab. Under the "Manually Assigned IP around the DHCP list" section, use the drop-down to select the MAC address of the device you want to configure. In the "IP Address" section, specify the static IP address you want the computer to use. Click the Add (+) button.
Nov 19, 2013. #3. In order to access your network from anywhere on the Internet, your external address needs to be static. For the most part, this isn't too much of an issue as your ISP usually does not change your external IP address that often. However, if you need to be able to connect regardless of whether your external IP Address has ...
From the Configure IPv4 menu, choose Using DHCP with manual address. Enter a static IP address in the IPv4 Address and leave the Subnet Mask and Router field as default. Click Ok to save the changes. Now when you do an ifconfig, the system should be using the static IP you have defined in the previous times.
Do you know the difference between setting a static IP and reserving an IP address? Knowing how to do both can be very useful, especially if you'd like to do...
As shown in the screenshot above, we first need to select the " YES" radio button to " Enable Static Routes". Next we enter a network ip (or static ip — if that's what we are up to) into the " Network/Host IP "field. Then we enter our netmask into the field that is not surprisingly labeled "Netmask". In my case my netmask is ...
Step 3.2 Set Static IPv6 connections on your ASUS router or mesh Wi-Fi. When you have a static IP internet connection, choose Static IPv6 in the Connection type drop-down list. Then, you have to enter lots of information like the IPv6 address for your WAN connection, the IPv6 Gateway, IPv6 DNS servers, and so on.
Go to router settings page (Web GUI) Step1 . Connect your computer to the router via wired or WiFi connection and enter your router LAN IP or router URL https://www.asusrouter.com to the WEB GUI. Note: Please refer to How to enter the router setting page (Web GUI) to learn more. Step2 .
To set a static TCP/IP configuration on Windows 11, use these steps: Open Start. Search for Command Prompt, right-click the top result, and select the Run as administrator option. Type the ...
Plug the cable from R1 into a LAN port on R2 and setup the network to have a DHCP Scope of 192.168.1./23 (i.e having the subnet mask as 255.255.254.0, thus giving you the address over the 192.168.1./24 and the 192.168.2./24 ranges) but this will be basically an open network that both ranges can talk to.
Key Takeaways. To set a static IP address in Windows 10 or 11, open Settings -> Network & Internet and click Properties for your active network. Choose the "Edit" button next to IP assignment and change the type to Manual. Flip the IPv4 switch to "On", fill out your static IP details, and click Save. Sometimes, it's better to assign a PC its ...
There is a new behavior with the 386 firmware that Guest Network 1 uses a different IP space from what you have defined on your main network. Main Network = 192.168.1.xyz. Guest Network 1 = 192.168.101.xyz (2.4 GHz) and 192.168.102.xyz (5 GHz) The problem is you can no longer define DHCP static leases for any device on Guest Network 1 in these ...
ifconfig-push ip mask but I cannot create them manually, everything is generated. I can enable client specific options and add clients throught ui, which generates ccd directory with client files, but the generated content looks like this: iroute 10.8.0.8 255.255.255.128 Is it possible to assign VPN clients static IP addresses?
In this post, I am going to walk you through that process on the Asus RT-AC66u. First, log into your Routers webUI, select " LAN " in the left-hand menu. Then select the "DHCP Server" tab. Scroll midway down the page. Locate "Enable Manual Assignment" and select the "Yes" radio button. Just below the section above, you will see ...
a. Basic Config (a1) Enable WAN: Enable and disable WAN.Under some connection types, you can get a new IP address by using Enable and Disable WAN. (a2) Enable NAT: NAT(Network Address Translation) is a process used in routers to replace the address information of network packets with new address information.Typical applications for NAT is for routers which connect to LAN with the WAN.
in the asus router, how can i configure a device so the local ip address doesn't change ... There you can manually set the IP address to be assigned to specific devices by MAC address. ... Thanks let me try that Reply reply More replies. ComputerDavid • This is called a static IP. Do what TheEthyr says, and you may have to reboot both devices ...
But few weeks ago, my RT-AX88U, which is under auto update (yeap, I know), started to act in a different way: static IP will work only if the IP is under the DHCP range. So, my wireless printer started to get a totally random IP (and all other devices that previously were working with the static IPs, like the NAS, my production machine, etc).
If you are considering initializing the settings of your ASUS router, but still like to keep your previous setups after resetting. Please follow the steps below. Please login to ASUS Web GUI to complete all the setups. [Wireless Router] How to enter the router setting page(Web GUI)? Step 1: Export Config File 1-1.